
1-3-1 Zone Defense: Complete Coaching Guide
The 1-3-1 zone is the most aggressive standard zone in basketball. It traps corners, denies reversal, and forces offenses into bad angles. This guide covers every position, rotation, and trap trigger you need to run it effectively.
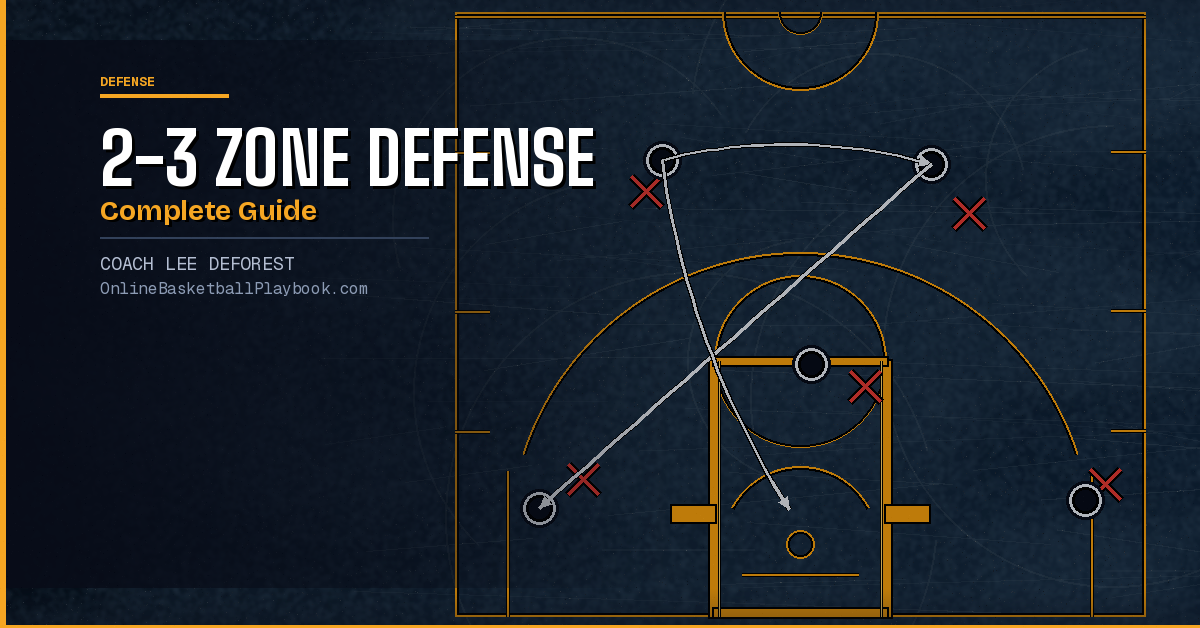
What Is the 1-3-1 Zone?
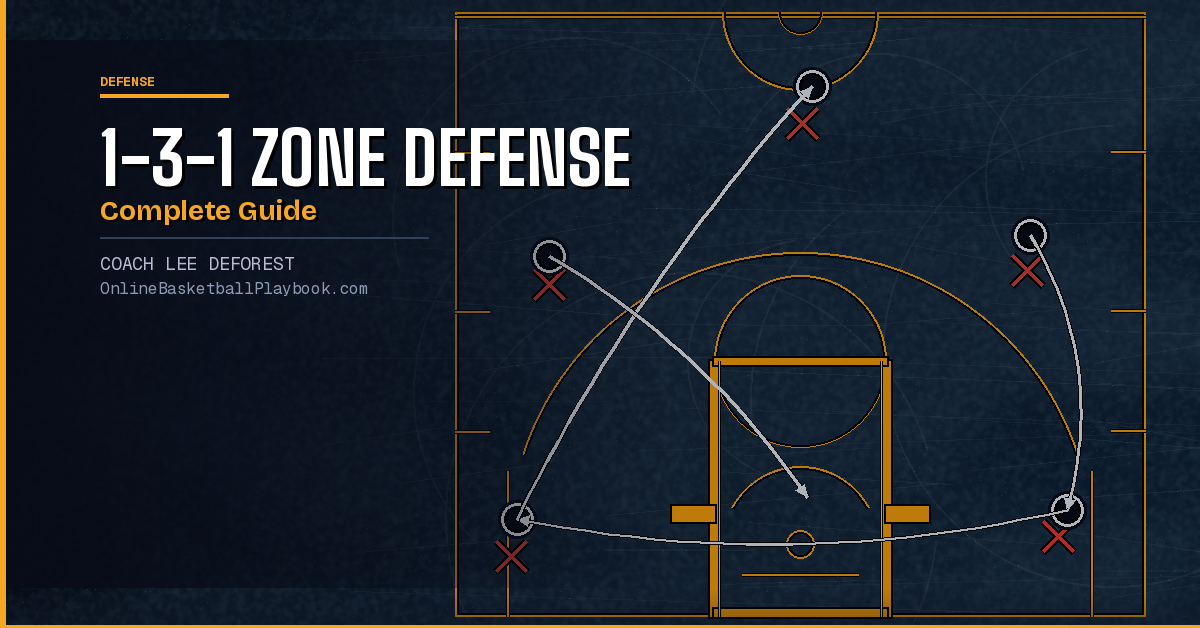
The 1-3-1 zone defense aligns one defender at the point of attack, three defenders across the middle of the floor, and one defender patrolling the baseline. That shape alone tells the story: the zone is built wide to swallow the wings and deep to cover corner-to-corner. It is not a passive defense that simply takes up space. Every player in a well-run 1-3-1 has an assignment on every pass, and when a ball enters a trap zone — a corner, a wing with no help, or a post with a cutter — the defense collapses on it immediately.
Most zones are designed to limit penetration and force perimeter shots. The 1-3-1 is designed to cause turnovers. The philosophy is different. Rather than sitting in gaps and absorbing offensive pressure, you are hunting opportunities to put two defenders on the ball in a spot where the handler has no easy outlet. Done right, it generates deflections, live-ball turnovers, and transition baskets. Done wrong, it gives up open threes on skip passes and uncontested mid-post catches.
The 1-3-1 is historically associated with pressing, fast-breaking teams — programs that want to play at a high pace and force a chaotic style on their opponents. But it works just as well as a change-up tool for teams that run a man-to-man base. The key is teaching your players exactly where to be on every pass and drilling the rotations until the movement is automatic. Zones fail when defenders freelance. This one fails faster than most if they do.
The most aggressive of the standard zones and the most versatile for building a zone-first identity.
— Online Basketball Playbook, 1-3-1 Zone Vault
Position Responsibilities
Every player in the 1-3-1 has a specific job. The most common mistake coaches make is teaching the zone by shape alone — telling players where to stand at the start rather than where to move on every ball flight. Position descriptions below are organized by the demands of the role, not just the starting spot.
The Point (X1)
X1 is your best athlete at the guard position — ideally a long, active defender with quick feet and good vision. The point defender's primary job is to deny guard-to-guard reversal. When the ball is at the top of the key, X1 must make the handler uncomfortable and force a decision rather than letting the offense swing the ball freely. On a wing pass, X1 does not chase the pass — he immediately cuts off the reversal lane so the offense cannot get the ball back to the original handler in a rhythm position. X1 is the denial hub at the top and must read the floor constantly to know when to help on a skip and when to stay in his lane.
The Wings (X2 and X3)
The wings are your athletes — versatile defenders who can cover from elbow to corner on their respective sides. When the ball is on their side, one wing closes out on the ball handler. Simultaneously, the opposite wing collapses into the paint to prevent a high-post dive or a skip pass across. Both wings must move the moment the ball is in the air — the "on air time" rule is non-negotiable. If a wing waits to see where the ball lands before moving, the rotation is already broken. The wing rotation needs to be drilled as a synchronized movement: ball-side wing closes out, weak-side wing drops to paint, every time.
The Middle (X4)
X4 is the most important and most demanding position in the zone. This defender roams from high post to low post depending on ball location. When the ball is on the perimeter, X4 must be active enough to stunt at the wing or threaten a trap. When the ball enters the post, X4 is the first line of resistance. The middle defender must be physically strong — strong enough to front post entries — and mobile enough to recover after any stunt or help action. This is not a position where you hide a player. If X4 is stationary, the whole interior of your zone breaks down.
The Baseline (X5)
X5 runs the baseline from corner to corner and is the communication engine of the entire defense. This defender needs to be your most vocal player on the court. When ball is on the strong side, X5 is in that corner ready to trap. When the ball swings away, X5 sprints to the weak-side corner. If X5 is slow to recover or goes silent, the back end of your zone will give up corner threes on routine ball reversals.
Trapping Triggers and Rotations
The 1-3-1 has two primary trap sets: the corner trap and the wing trap. Coaches need to decide which they are running — or whether they are mixing both — before installing the zone. Teaching both simultaneously to inexperienced players creates confusion. Start with one and master it before adding the second.
Corner Trap
The corner is the most natural trap in the 1-3-1 because the ball handler runs out of court. When the ball enters the corner, the ball-side wing and X5 sprint to trap hard. The rule is two on the ball with arms up, no easy pass line. X4 rotates to deny the first skip-out to the strong-side elbow. X1 and the weak-side wing must read the remaining pass options and get in passing lanes — they do not stay at their zones waiting. The trap only creates turnovers if the non-trappers take away the outlets.
Wing Trap
The wing trap is higher risk and higher reward. X1 and the ball-side wing trap the moment the ball is caught on the wing. X4 slides to cover the high post. X5 rotates up to cover the skip-out to the strong-side elbow. The weak-side wing is responsible for the back line and must communicate any baseline runner. This trap is most effective when the wing is isolated — when a poor ball-handler catches on the wing or when a guard catches and picks up his dribble immediately.
On any trap, the non-trapping defenders rotate to pass lanes — NOT to zones. The goal is an interception, not just forcing a time-out violation. Passive zone rotation loses this battle every time.
After the Trap Is Set
Once the trap is set, the defense has one of three outcomes: deflection, held ball, or the offense escapes. If the offense escapes with a pass, the defense must sprint back to its base alignment and reset before the next trap opportunity. Chasing a reset is the second-most common error after late trapping. The zone needs to breathe between traps — an extended broken rotation invites easy looks at the basket.
Weaknesses and How to Defend Them
The 1-3-1 has real vulnerabilities, and good offensive coaches will find them quickly. Knowing the weaknesses is not optional — you have to prepare your players to handle the counter attacks or the zone will break down in competition.
The High-Post Flash
When a skilled offensive player catches at the high post, they have immediate scoring options on either side of the floor. Your X4 (middle) must front the high-post entry before it happens. If the catch is made, X1 must recover and double immediately. The worst outcome is a clean catch at the high post with no pressure — the passer and the ball handler both stand and watch while the zone scrambles.
The Skip Pass
A good skip pass from corner or wing to the weak-side three-point line splits X1 and the weak-side wing simultaneously. To defend this, your weak-side wing must cheat toward the skip lane when the ball enters the trap zone. This is a conscious discipline — the wing cannot collapse fully to the paint on every corner entry without giving up the skip three. Coaches should scout opponents and know whether they like to skip before deciding how aggressively to rotate.
The Short Corner
The area just outside the lane, on the baseline, between the block and the corner is often called the short corner or dunker spot. This region is difficult for X5 to cover when they are trapping the actual corner. An offense that places a cutter in the short corner off the trap forces X5 to choose between completing the trap or covering the cutter. Running a second cutter to the weak-side block on the same action doubles the problem. Defending this requires X4 to have awareness of baseline cutters and to communicate the help assignment clearly before the trap is sprung.
Ball Reversal Against a Slow Point
If X1 is not athletic enough to close out on the wing AND recover to deny reversal, the offense will quickly learn to swing the ball through X1's side repeatedly to create a numbers mismatch deeper in the rotation. Every rep of an unchallenged reversal costs the zone credibility. Select X1 carefully — this is your best defender, not just a placeholder.
Teaching Progressions
The 1-3-1 breaks down faster than man-to-man when it is taught in pieces without integration. The following progression moves from individual assignment clarity to full-speed, full-court execution.
Step 1 — Align and identify. Put five defenders in starting positions and walk through the alignment with no ball. Every player points to who they would guard if ball started at each of five positions: top of key, left wing, right wing, left corner, right corner. This builds floor map awareness before any movement happens.
Step 2 — Pass and react (half speed). Use a coach or offensive player to make simple passes around the perimeter. Defenders move on air time — ball is released, all five defenders adjust. Call out the pass destination before throwing to reinforce anticipation. No traps yet — just rotations.
Step 3 — Add the corner trap. Once rotations are clean, add the corner trap with walk-through speed. Five offensive players, five defenders. Ball enters the corner; wing and X5 trap; X1, weak-side wing, and X4 rotate to passing lanes. Run this until the communication is automatic before accelerating.
Step 4 — Full-speed half-court live reps. No script — offense can make any pass. Defense executes trap triggers as they come. Add a shot clock if available. Run five to seven possessions, then stop and correct. The most common errors at full speed are late wing rotation, X4 standing still, and X5 failing to sprint to the weak-side corner on ball reversal.
Step 5 — Transition integration. Run the 1-3-1 out of your transition defense. How do you set up the zone after a made basket or an opponent's dead ball? Decide on a set entry and drill it so the zone is organized before the offense can push tempo.
- X1 denies reversal on wing passes — never chases the ball
- Wings move on air time — ball-side closes, weak-side drops to paint
- X4 fronts the high post and stumps the wing; never resting
- X5 sprints corner to corner on every ball reversal
- On any trap, non-trappers go to passing lanes — not zones
- After a trap escape, sprint back to base alignment before resetting
- Scout whether the opponent likes to skip — adjust weak-side wing depth accordingly
When to Use the 1-3-1
The 1-3-1 is a tool, not a permanent identity unless you commit to it as your base defense. Understanding when to deploy it makes it far more effective than running it as the default.
Use the 1-3-1 when you have a scouted advantage in the backcourt. If your opponent's guards are average ball-handlers under pressure, the wing and corner traps will generate live-ball turnovers at a high rate. If the opposing guards are excellent handlers and quick decision-makers, the trap will often end in a clean escape and an open three. Know your matchup before committing a full game to it.
Use it as a change-up after a man-to-man base to create confusion. Offenses that prepare for man-to-man and suddenly see a 1-3-1 after a timeout or after a made basket will often freelance rather than execute their zone sets. That chaos is your opportunity. Even two or three possessions in the 1-3-1 mid-game can force the other bench to call a timeout and disrupt rhythm.
Use it when your team needs a momentum shift. A corner trap that generates a turnover and an immediate transition basket can swing energy in a tight game. If the score is level at halftime, opening the second half in a 1-3-1 for the first four to five possessions forces the opponent to adjust before they have settled in.
Avoid the 1-3-1 when your opponent has an elite shooter positioned at the high post or short corner, when you lack the baseline defender (X5) who can sprint corner-to-corner every possession, or when your team is already fatigued. Zone defense in general requires less physical exertion than man-to-man on many possessions — but the 1-3-1 is the exception. Trapping and recovering demands full-effort sprints from every defender on every trap, every rotation, every possession. A tired X5 who jogs to the corner gives up an open three every time the ball swings.
The 1-3-1 rewards teams that play together, communicate loudly, and execute assignments without freelancing. When all five defenders trust the system and move as a unit, it is genuinely one of the most disruptive defenses in basketball at any level.
Want more defensive systems, play diagrams, and coaching breakdowns delivered to your inbox?
See it drawn up
Related diagrams


Keep Building
Related breakdowns