
2-3 Zone Defense: Complete Coaching Guide
The 2-3 zone is the most widely used zone in basketball. Two guards up top, three defenders across the baseline — it protects the paint, neutralizes dominant post players, and creates confusion for offenses that haven't prepared for it.
What the 2-3 Zone Is and Why Coaches Use It
The 2-3 zone has been around for decades, but it remains one of the most effective defensive schemes at every level of basketball — from middle school gyms to the college game. The core concept is simple: two defenders guard the perimeter from the top while three defenders protect the paint, the blocks, and the baseline.
Coaches reach for the 2-3 for several reasons. When the opponent has a dominant post player, the zone builds a wall in front of him and makes traditional post feeds difficult. When you're defending a team that lives in transition, the zone slows the game and forces opponents to execute half-court sets — often against a defense they haven't seen much of on film. When your own team has foul trouble, the zone can keep starters on the floor longer because there's less individual on-ball pressure that leads to reach-in fouls.
The 2-3 also creates turnovers in ways that man-to-man does not. The compressed middle of the zone turns over cross-court skip passes when defenders read the ball correctly. Corner rotations force offensive players into awkward angles. And when the zone is played with active hands and quick rotations, it can generate live-ball turnovers that lead directly to easy baskets.
That said, the 2-3 is not a passive defense. Coaches who treat it as a place to hide weak defenders or reduce effort get burned. The zone requires precise positioning, constant communication, and disciplined rotations. A lazy 2-3 bleeds in the corners, at the elbow, and on the short corner — exactly where smart offensive teams attack. Understanding why those spots are vulnerable is the foundation for teaching this defense well.
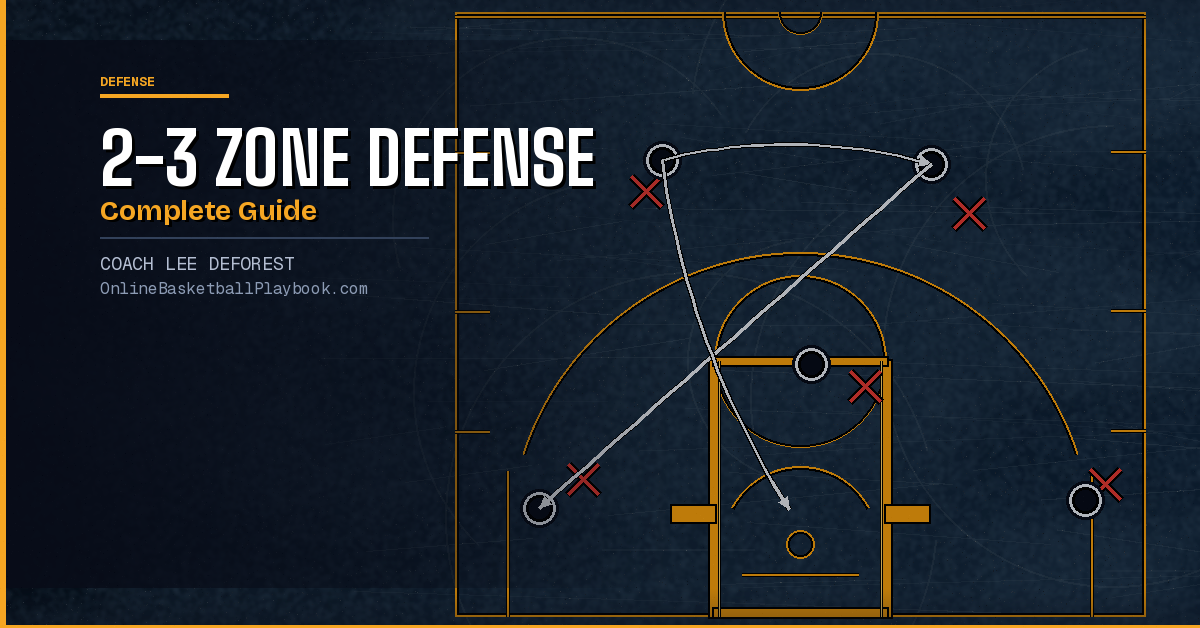
The two wing defenders (X3, X4) play free-throw-line-extended — forward of the block — to contest corner shots immediately without sprinting six feet.
— Online Basketball Playbook Vault, 2-3 Zone Defense Principles
Starting Alignment and Positioning Rules
Positioning is where most 2-3 zones break down before a single pass is thrown. Players either align too wide, too deep, or too casually — and each mistake creates an exploitable gap. Getting your five defenders in the right spots before the offense initiates is non-negotiable.
The Top Two Guards
The two guards at the top of the zone — typically labeled X1 and X2 — start about one step inside the three-point arc. They should be close enough to each other that no straight pass can split them into the high post. If a gap opens between the two top guards, the offense has a direct lane to the elbow, which is the most dangerous single spot in the 2-3 zone. A catch there puts the offense in a position to score or to collapse the entire back three out of position.
A common teaching cue: the guards should be able to shake hands at the start of each possession. They don't need to be that close once the ball moves, but the initial alignment should be tight enough to deny that high-post skip.
The Wing Defenders
The two wing defenders (X3 and X4) are the most active rotators in the zone. Their starting position is at the free-throw-line extended — not on the block, not halfway between the two. This is a specific point that many coaches get wrong, and it changes what the wing can defend.
When a wing defender starts on the block, she has to sprint six or more feet to contest a corner catch. By the time she arrives, the shooter has already gathered and is in her release. Starting at free-throw-line extended means the wing can close on a corner catch without sprinting far, and she's also close enough to pinch back toward the elbow if the ball enters the high post. The trade-off is that she's a step off the corner on initial alignment, but that's acceptable because the corner isn't occupied until the ball goes there.
The Center
X5 — the center — owns the paint. She starts in the middle of the lane, roughly even with the second or third hash mark on the lane line. Her job before any pass is made is to be positioned where she can reach either block in one or two steps. She communicates everything from the back: help calls, skip-pass warnings, lob alerts. The center position in the 2-3 zone is the highest cognitive demand on the floor.
Ball-Side and Weak-Side Responsibilities
Zone defense lives and dies on role clarity. Every player must know exactly what she covers on each ball position — not roughly, not approximately, but precisely. The best way to teach it is to walk through each common ball position and assign coverage responsibility.
Ball on the Wing
When the ball enters the wing (roughly three-point arc, 45-degree angle), X3 or X4 sprints to close out. On this closeout, the technique matters: the wing defender should close with her shoulder toward the baseline and her butt angled toward the corner. This body position does two things at once — it contests the catch and naturally covers the baseline drive. The defender who gives up the baseline on a wing catch has made a critical error because she has no help there. The corner and the baseline are the wing defender's responsibility alone.
While the ball-side wing closes, the ball-side top guard (X1 or X2) drops to deny the reversal pass back to the point. The weak-side top guard stays above the free-throw line, ready to cut off ball reversal. The center stays in the paint but shades toward the ball-side block. The weak-side wing pulls her foot into the lane, covering any lob or backdoor cut toward the weak-side block.
Ball in the Corner
A corner catch is the 2-3 zone's most dangerous moment. The wing defender who was on the wing now closes all the way to the corner. The center must shift hard to the ball-side block to take away any interior pass to a cutter. The ball-side top guard drops to the elbow area to take away the kick-back pass. The weak-side wing slides into the paint. The weak-side top guard covers the high post or any reversal.
The corner rotation requires all five players to move — and move with urgency. A single defender who doesn't rotate creates an open three, an open post catch, or an open elbow jumper. This is why coaches drill corner rotations repeatedly in practice.
Ball at the High Post
A pass to the high post — the elbow or above the foul line — is the emergency situation in a 2-3 zone. Both top guards must immediately converge on the ball to prevent a clean look or an easy dump-off pass. The center steps up hard to the mid-post. Both wings tighten into the lane. A high-post catch that isn't pressured leads to a shot or a pass to an open cutter every time.
Defending the Weaknesses
Every defense has structural weaknesses, and smart offensive teams will find and attack them. The 2-3 zone has well-known soft spots. Rather than pretending they don't exist, the best approach is to teach players exactly where the gaps are and build habits that minimize them.
The Corner
The corner three-pointer is the most common way to attack a 2-3 zone. The offense runs a player to the corner, forces the wing to close, and then looks for a skip pass to the opposite corner when the weak side hasn't fully rotated. The answer is discipline in the corner closeout — hard and fast — and relentless weak-side rotation awareness. The weak-side wing cannot admire the ball. She must move on ball movement, not after the skip pass is already in the air.
The Short Corner and High-Low
The short corner — the area just off the baseline, between the block and the corner — is another problem spot. An offensive player in the short corner forces the center to choose between defending the block and guarding the short corner. The 2-3 answer is to have the wing defender take the short corner once the ball is there, releasing the center to maintain paint presence. But this is a hard rotation to teach because it's counterintuitive — the wing is closing to a spot, not a player.
The high-low action combines a high-post catch with a quick interior pass to the block. This two-pass sequence splits the back three by forcing the center to guard the high post and then make a long rotation to the block. The counter: the center cannot leave the paint until the guard covers the high post. Never leave the rim unguarded.
Ball Reversal
Quick ball reversal — especially from guard to guard to wing — stresses the top two defenders. Each reversal requires the off-guard to jump to the ball, and if the jump switch is slow, the ball can get to a wing before the front guard is in position. Practice ball reversal against the zone until both top guards can make the switch without losing their positioning or closing gap.
The Middle Gap
A dribble penetration directly at the seam between the two top guards is another reliable attack. The guard who drives into the gap can force both top defenders to commit, freeing either wing for an open catch. The teaching point is simple: the top guards must not be drawn toward the dribble simultaneously. One stops the ball; the other stays in her position and cuts off the open pass. Knowing which guard takes the ball and which stays is a communication problem — name it in practice, rep it often.
In-Game Adjustments and Variations
The basic 2-3 is a starting point, not a fixed structure. Good coaches adjust based on scouting, game situation, and what the offense is showing them.
Tandem Variant
Instead of two guards in a flat line, the tandem 2-3 staggers one guard into a rover position slightly behind and off-center from the other. This makes the zone harder to read from the offensive end. The rover can jump passing lanes that a flat guard line would leave open, and it disrupts the timing that offenses rely on when attacking a traditional 2-3. The trade-off is that the tandem requires more communication at the top because the gap-closing responsibilities are less predictable.
Playing Active at the Top
Some coaches instruct the top two guards to pressure the ball handler as high as the half-court line rather than dropping inside the arc. This takes away dribble penetration and forces the offense to run its set from farther out, compressing their spacing. It works well against teams that need time to set up, but it requires athleticism at the guard spots — if the guards are beaten on the dribble, the whole zone shifts out of position before it even gets to set up.
Zone Press Hybrid
A 2-2-1 half-court press that drops into a 2-3 on a made basket or inbound can confuse offenses that prepare for one or the other but not the combination. The press applies ball pressure and forces quick decisions; if the press is beaten, the players reset into their 2-3 positions as the ball crosses half. This is a high-energy package that works well in short bursts or against teams that struggle with pace changes.
Adjusting to the Shooter
When the offense has one dangerous corner shooter, you can cheat the weak-side wing closer to that player rather than into the paint. This reduces weak-side corner opportunities while keeping everything else intact. It's a specific personnel adjustment that doesn't change the overall structure — it just shades one defender slightly toward a known threat.
Practice Drills to Build the Zone
No defense is built in a walkthrough. The 2-3 zone requires repetition at speed to become reliable. The following drills build the specific movement patterns this defense demands.
Shell Drill — Zone Edition
Four offensive players stand at the four perimeter spots (two guards, two wings). No corner players initially. The coach moves the ball around the perimeter and the five defenders rotate through each ball position. This is the base drill — no cutting, no live defense, just rotation footwork. Run it until all five players move in sync without the coach calling positions. Add the center reading high-post skips once the perimeter rotation is automatic.
Corner Rotation Drill
Ball starts on the wing. The offense skips to the corner. The five defenders complete the full corner rotation — wing to corner, guard drops to elbow, weak-side wing shifts to paint, center covers block, weak-side guard holds high. The coach then kicks back out to the wing and the rotation reverses. Run it 10 times each direction before adding a live offensive player in the corner who can shoot.
High-Post Attack Drill
The offense throws into the high post from the top. The two top guards converge; both wings tighten. The high-post player has three options: shoot, dump to the block, or kick to the wing. Defenders must stop all three looks. Start with two offensive options (high-post + one wing) and add a second wing and a block player once the base reads are clean.
Live 5-on-5 Half Court
Run it with the offense instructed to attack the known weak spots: corner threes, short corner, high-low, ball reversal. Give the offense a clear objective (score from the corner in 10 passes) and score it. Defenders get a point for every possession that doesn't allow a corner three or elbow mid-range. Track it over five possessions per group and rotate defenders.
- Wing starting position: free-throw-line extended, not the block — every possession, no exceptions
- Corner closeout technique: shoulder toward the baseline, butt toward the corner — covers both the catch and the baseline drive
- High-post rule: both top guards converge immediately — never allow a clean high-post catch with only one defender
- Weak-side wing: foot in the lane on all wing and corner catches — move on ball movement, not after the skip is in the air
- Center communication: X5 calls every skip pass, lob, and cutter — she's the only one who can see the whole floor
- Ball reversal: top guards make the jump switch before the ball arrives, not after — late switches give up the wing every time
Get zone defense diagrams, play cards, and weekly coaching breakdowns delivered to your inbox.
See it drawn up
Related diagrams


Keep Building
Related breakdowns