
Keys to Playing a 2-3 Zone Defense
The 2-3 zone is the most common zone in basketball. Two guards up top, three across the baseline — simple to install, hard to execute well. Here are the keys that separate a tight zone from a leaky one.
Starting Alignment and Guard Positioning
Every breakdown in a 2-3 zone can usually be traced back to one thing: the initial alignment was wrong before the ball was even inbounded. Get the setup right and the rotations become manageable. Get it wrong and you're scrambling the entire possession.
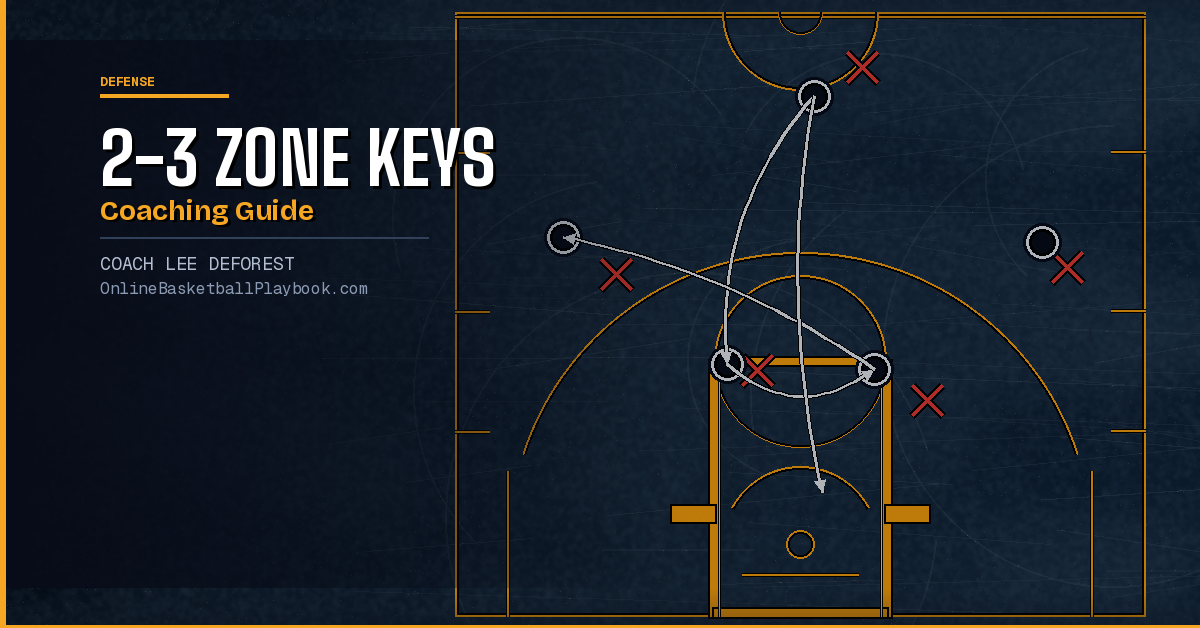
The two guards (X1 and X2) should start about one step inside the three-point arc, positioned close enough together that there is no clear gap between them. That gap — if it exists — invites a direct entry pass to the elbow. Once the ball is at the elbow with the offense facing the basket, the entire zone is compromised. The two guards need to be close enough to deny that pass and to make quick jumps when the ball is reversed.
The back three are not a flat line either. This is one of the most common mistakes coaches make when first installing the defense — they place the wing defenders (X3 and X4) on the block and keep them there. But if the wings start on the block, every corner catch becomes a wide-open three-point attempt. The wing defender will never close out in time after that kind of catch. The correct positioning is free-throw-line-extended, forward of the block. From there, the wing can contest a corner catch immediately without sprinting six feet.
The center (X5) owns the paint. This is the anchor of the defense, the player who communicates coverage, and the one who has to deal with ball-side post entries, skip passes to the short corner, and rim protection all in the same possession. The center has the most demanding read-and-react job in the entire zone. The two wings and two guards can each be locked onto a zone, but the center is constantly reacting to where the ball goes.
The two wing defenders (X3, X4) play free-throw-line-extended — forward of the block — to contest corner shots immediately without sprinting six feet.
— 2-3 Zone Defense Principles
Ball-Side Rotations and Corner Coverage
Once the ball is passed to a wing or corner on one side, the 2-3 zone shifts as a unit toward the ball. This is where the defense either tightens up or falls apart, depending on the technique of the ball-side wing defender.
When the ball enters the corner, the ball-side wing (X3 or X4) must close hard with the correct body angle. The technique here is specific: close with your butt pointed toward the corner, shoulder toward the baseline. This is not a casual close-out. It is a deliberate technique that accomplishes two things at once — it contests the catch and simultaneously takes away the baseline drive. If the wing defender turns the wrong way or squares up the wrong direction on the close-out, the offensive player has a clear path along the baseline toward the paint.
The ball-side top guard (X1 or X2, depending on which side the ball went) stays above the free-throw line, denying the pass back to the top. The guard must also be ready to cut off a ball reversal — if the offense swings the ball back to the top, the guard jumps to stop penetration before the other guard can slide over.
The center covers the low post when the ball is in the corner. The center cannot be caught flat-footed inside. The moment the ball goes to the corner, the center needs to be in position to front the low post or three-quarter front it from the top side, depending on your defensive philosophy. Allowing a direct catch in the low block — especially if the offense has a skilled post player — neutralizes the entire paint protection that made you run the zone in the first place.
The weak-side wing (X4 or X3) pulls toward the lane line on ball-side entries. The weak-side wing is not guarding anyone specific — they are protecting the paint from skip passes and backdoor cuts. The foot should be near the lane, and the wing should have vision on both the ball and any weak-side cutter simultaneously.
Protecting the High Post
The high post is the most exploitable area of any 2-3 zone. A skip pass or guard-to-elbow entry can split the defense before the back three have time to react. This is where teams that understand zone offense go to work early in the shot clock — not the corners, not the post, but the high post at the elbow.
When a ball handler at the top of the key makes a pass to the high post, the nearest guard must close hard toward that catch while the center rises out of the paint to contest from the bottom. This creates a two-defender sandwich at the elbow. But it is a vulnerable moment because both guards are above the ball and the back three are all below it — for a split second, the defense is disorganized.
The key to protecting the high post is prevention, not recovery. The two top guards must deny the high-post pass before it arrives. That means playing with active hands in the passing lanes and forcing the offense to hold the ball longer than they want to. Pressure on the ball at the top forces longer reads and slower ball movement, which gives the back three more time to react when passes are made.
Some teams will assign one of the top guards specifically as the "high-post stopper" — the guard who is always responsible for the first close-out to the elbow. This simplifies the communication requirement and reduces hesitation. When your defenders are thinking about who closes, they are slow. When they know before the possession starts, they are fast.
The center also plays a role in high-post protection. If the high post catches and faces, the center must rise to meet them while the guards collapse from the top. The center should never allow an uncontested catch-and-face at the elbow — even if it means leaving the low post momentarily. A shot from the elbow is a better outcome than a lob pass over a sleeping center.
Weak-Side Responsibilities
The weak side of a 2-3 zone is where possessions are lost quietly. The ball is on the right, your defenders are rotating correctly ball-side, and then a skip pass goes to the weak-side corner for a wide-open three. Nobody cheated, nobody gambled — the weak-side wing was just a step too far inside and couldn't recover in time. These are the surrendered threes that add up to a bad shooting night for your zone.
The weak-side wing (the wing opposite the ball) has a float responsibility. They cannot park themselves inside the lane because that abandons the weak-side corner entirely. But they also cannot sit on the weak-side block because that removes them from lane protection. The correct position is a floating stance near the middle of the paint — close enough to contest a weak-side corner skip but also available to help if a drive or post entry comes from ball-side.
The weak-side top guard also has a coverage job. When the ball is on one side, the off-guard covers above the free-throw line, watching for a skip pass back to the top or a direct skip to the weak-side wing. These are the reset passes that offenses use to probe the zone — passing the ball back and forth to force the defense to shift, then hitting a skip pass in the brief moment when coverage is transitioning.
Communication between the weak-side wing and the center is essential. Those two players share responsibility for the entire weak-side area — the short corner, the low block, the paint, and the skip pass coverage. A quick verbal "I've got corner" or "I've got post" between those two during a possession can prevent a defensive breakdown. Silent zones give up weak-side threes. Loud zones hold them.
Rebounding Out of the Zone
Zone defense creates a rebounding problem that man-to-man does not: there are no assigned box-out matchups. In man defense, every player knows who they are boxing out before the shot goes up. In a zone, the ball movement has been rapid, players are covering areas not individuals, and when a shot goes up, there can be genuine confusion about who takes which rebounder.
The rule for 2-3 zone rebounding is area boxing, not man boxing. Each player owns a section of the paint on the shot. The center takes the middle. The two wings take their respective sides. The two guards drop into the free-throw lane area to pick up any long offensive rebounds or reset misses. This is a simple system, but it must be drilled separately from the zone itself. Teams that run the zone but never drill zone rebounding give up second chances at a high rate.
The center has the most critical rebounding role. The center must rebound aggressively on ball-side while also being aware of a cutback opposite. Offenses often crash two or three players to the offensive glass against a zone, and one of those crashers will cross the paint. The center has to rebound through contact and hold the position.
The wings also need to pursue the rebound actively. One of the errors in coaching a 2-3 zone is teaching the wings to stay wide to prevent outlets — this is unnecessary and it costs you rebounds. The wings should collapse to the paint on every shot and crash hard. The guards handle outlet denial. Rebounding by committee, with all five players active, is what makes a zone defense actually effective rather than just appearance-deep.
How Offenses Attack It — and How to Adjust
Understanding how offenses attack the 2-3 zone is the fastest way to coach your defenders. When you can explain to a player what the offense is trying to do — and why the specific technique you are teaching defeats it — buy-in goes up and execution improves. Defense is easier to play when you understand what you are stopping.
The most common attack sequences against a 2-3 zone are: the skip pass to the weak-side corner, the high-post entry and split, the dribble penetration between the two top guards, and the flash to the short corner with the center pulled away. Each of these attacks targets a specific structural gap in the defense.
The corner skip is stopped by the weak-side wing maintaining enough width to contest without cheating inside. The high-post entry is stopped by guard pressure on the ball and active denial of the elbow pass. Dribble penetration between the guards is stopped by the guards narrowing their gap and committing to force the ball handler left or right rather than going straight up the gut. The short-corner flash is stopped by the center communicating early and the ball-side wing helping rotate down before the center has to leave the paint completely.
When an offense is attacking you effectively with skip passes, tighten the weak-side wing's position and have a guard help contest earlier. When they are killing you with the high-post entry, deny harder above and consider a matchup zone variation where one guard becomes a rover who can jump high-post entries more aggressively. The 2-3 zone is not a rigid structure — it is a set of principles that can be adjusted based on what the offense shows you.
- Guards start one step inside the arc — close enough to deny the elbow gap
- Wings at free-throw-line-extended, not on the block
- Ball-side wing closes with butt to corner, shoulder to baseline — never give up the baseline
- Center rises to contest the high-post catch whenever a guard-to-elbow entry occurs
- Weak-side wing floats near the paint — not in the lane, not on the block
- All five players crash the paint on every shot — zone rebounding is area-based, not matchup-based
- Top guards deny the high-post pass before it arrives — pressure on the ball forces slower decisions
Get more zone defense breakdowns, drills, and play diagrams delivered to your inbox.
See it drawn up
Related diagrams


Keep Building
Related breakdowns
5 Keys to Building Relationships With Your Players
5 Keys to Building Relationships With Your Players

10 Keys for Beating Pressure Defense in Basketball
10 Keys for Beating Pressure Defense in Basketball