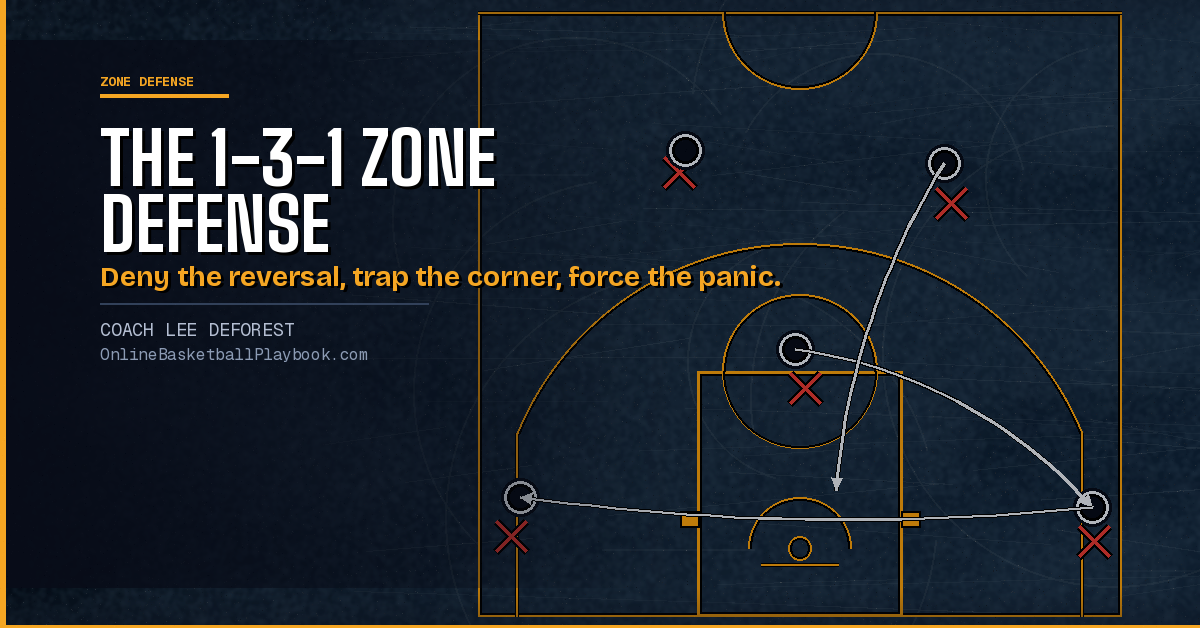

The 1-3-1 is the most aggressive zone in basketball — built to trap, force turnovers, and disrupt half-court offense. Run it wrong and it gives up corner threes. Run it right and it is a structural foul-reduction machine.
The Four-Layer Structure
The 1-3-1 aligns one at the point, three across the middle, and one on the baseline — but the name describes the shape, not the jobs. Each layer has a distinct, demanding role, and the defense only works when every player understands both their zone and the zones around them.
Point (X1) — The Denial Hub
The point is ideally the tallest guard on the team: long arms, a quick first step, and the intelligence to take angles rather than chase. The primary job is to deny guard-to-guard reversal at the top of the zone. When the ball goes to the wing, X1 does not chase the ball — he immediately cuts off the reversal lane so the offense cannot simply pass back to reset. A point defender who chases the ball leaves the reversal open and destroys the entire structure.
Wings (X2, X3) — The Athletes
The wings are the most athletically demanding positions in the zone because they cover the range from elbow to corner on their side. On a ball-side wing catch, one wing closes out to the ball; the other wing simultaneously drops to the paint to stop a high-post dive. Both wings must move on the flight of the ball — not after the catch, before it. A wing that reacts instead of anticipates is always a step late to every coverage rotation.
Middle (X4) — The Engine
X4 is the most physically demanding position on the floor. The middle defender roams from the high post to the low post depending on ball location — fronting post entries, stunting at wing traps, and collapsing on baseline drives — all while communicating rotations to the rest of the zone. Against a big-ball offense, the X4 matchup decision is the most critical personnel choice a coach makes when running the 1-3-1. This position is not a rest spot; it is the zone's engine.
Baseline (X5) — The Communicator
The baseline defender is the smallest, most vocal player on the court — not the most athletic. X5 covers corner to corner along the baseline and must communicate everything happening in front of the defense. On a corner entry, X5 is the first trapper alongside the ball-side wing. Running corner to corner for 30 minutes requires stamina; rotating X5 with a qualified substitute is a legitimate game-management tool, not a sign of weakness.
"Kankakee ran a committed 1-3-1 for 12 years and attempted 227 MORE free throws per year than their opponents. Zone = fewer fouls; that is a structural advantage, not luck." — the foul-reduction case for making the 1-3-1 a full-time identity
Personnel Requirements for Each Position
The 1-3-1 is uniquely personnel-dependent. Running it with the wrong players in the wrong spots produces exactly the leaks that good offenses exploit.
Point (X1): tall guard with long arms and a quick first step. Must take away guard reversal and cannot be beaten off the dribble to the wing — if X1 is slow or too short, the entire top of the zone opens on a single drive.
Wings (X2, X3): the best athletes on the team. They need the range to cover elbow to corner in both directions and the body to stunt at a trap without yielding a straight line to the basket. Wing athleticism is the ceiling of the defense.
Middle (X4): the most physically demanding role — strong enough to fight post players inside, quick enough to stunt at traps on the perimeter. When the opponent has a traditional big who posts up, X4 is the matchup the game plan is built around. Against a spread offense without a post presence, X4 can be more of a rover; against a physical interior team, X4 must be a true interior defender.
Baseline (X5): athleticism matters less here than floor-reading and vocal communication. The best X5 is a wing who thinks quickly, reads passing lanes, and communicates relentlessly. Running this position with a poor communicator breaks the zone without a trap ever being set.
Trapping Triggers — Corner, Wing, and Midcourt
The 1-3-1 has three distinct trap triggers. Each requires different rotations and a different risk-reward calculation from the coaching staff.
Corner entry (the primary trap): ball enters the corner, the ball-side wing and X5 trap hard — two on the ball, arms up, no easy pass line. The other two perimeter defenders sprint to the nearest open pass lanes and intercept; they do not stay at their zones. The Kankakee system uses an explicit rule: "lock the legs" — the second defender to the trap steps into the handler's legs to prevent a dribble escape. X4 rotates to deny the first skip-out to the strong-side elbow, which is the most dangerous pass out of the corner trap.
Wing trap (the Potsdam "Suicide" variation): X1 traps with the ball-side wing the moment the ball hits the wing. X4 slides to cover the high post. The baseline defender runs hard to the corner. This is the highest-risk option — every defender is gambling and sprinting simultaneously. It is only sustainable with rotations drilled to the point of automaticity.
Midcourt fake trap: X1 and a wing pretend to trap the guard bringing the ball up. The goal is misdirection — the guard throws a lob or a blind reversal pass before realizing the trap is not fully committed. This is not a true trap; it is a look designed to create a turnover off confusion rather than off a genuine two-man trap rotation.
The "Dead Zone" Theory and the Philosophical Inversion
Every zone defense has an area it deliberately concedes. In the 2-3, it is the contested mid-range pull-up at the high post. In the 1-3-1, it is the area just below the free-throw line, between the blocks — the zone the defense consciously "invites" the offense to pass into, then swarms.
A catch in the dead zone produces either a low-percentage mid-range pull-up or a post move against X4 in help. Neither outcome is catastrophic for the defense. The 1-3-1's dangerous catch is not in the paint — it is at the elbow, where a crisp skip pass exits the corner trap and arrives at the elbow before X4 or the rotating wing can recover. Every defender must have one thought while in the corner trap: who is at the elbow?
This is the 1-3-1's philosophical inversion of the 2-3: in a 2-3, the defense protects the paint and surrenders the corners; in the 1-3-1, the defense concedes the paint and forces the offense to score over a fully rotating defense. The foul-count data validates the trade. Kankakee's full-time zone identity produced 227 more free throw attempts per year than their opponents — year after year, for a full decade-plus. That is a structural advantage built into the defensive alignment itself, not a product of playing style.
The #1 Danger: The Corner-to-Elbow Skip Pass
If one pass breaks the 1-3-1 reliably, it is the corner-to-elbow skip — a quick, crisp pass from a trapped corner to the elbow area before the wing or middle defender can recover. Every coaching source that covers this defense names this as the primary exploit.
The defense's answer has two components. First, X4 (middle) must be reading the corner trap and moving toward the elbow before the skip pass is thrown — not after. The skip pass wins a footrace; the defense can only win it by starting the rotation on the flight of the ball, not the flight of the pass. Second, the non-trapping perimeter defenders sprint to the skip outlets immediately when the trap sets — they are already in position to contest the elbow before the pass arrives.
Three situations create the corner-to-elbow skip reliably:
- The offense rushes out of a corner trap and throws blind to the elbow — the "think TIP, not steal" rule addresses this by teaching defenders to deflect first, not reach for the clean steal.
- X5 "cheats" to one corner, anticipating the ball, and the offense reverses quickly to the other side — X5 must never shade early to either corner or the baseline coverage collapses on the opposite side.
- The offense overloads one side — two players in the corner, one at the wing — and collapses the wing and baseline defenders simultaneously, leaving the elbow open against a slow-rotating X4.
In every corner trap the 1-3-1 sets, X4's one job is elbow denial. Every other defender has a passing lane to cover, but X4's lane — the corner-to-elbow skip — is the most dangerous and the hardest to rotate to in time. If X4 is not positioned to contest the elbow before the offense even decides to throw the skip, the trap has produced a clean catch in the best scoring position on the floor.
Half-Court vs. Full-Court 1-3-1
The half-court and full-court versions of the 1-3-1 share a name but are fundamentally different defenses with different risk profiles. Running them interchangeably in the same game without preparation is how good offenses find easy buckets in transition.
Half-court 1-3-1: waits for the offense to cross half-court, then sets the trapping structure. Used to neutralize a specific half-court offense, force traps at the wing and corner, and disrupt rhythm without gambling on turnovers in transition. The Kankakee identity system is a half-court 1-3-1 — the structure was consistent enough over 12 years that the foul-reduction data is statistically significant, not a small-sample artifact.
Full-court 1-3-1: pressures the inbounds, traps at half-court, and attempts to create turnovers in transition. Functions as a full-court press. Exhausting to maintain for entire games — most coaches use it for three to five possessions (after a made basket, to kill momentum, to come from behind late) rather than for whole halves. The Potsdam "Suicide" variation and the FIBA Europe corner-trap scheme both live in this category.
Using both versions in the same game creates maximum confusion because the offense cannot identify which is coming until they are already committed to their alignment. The half-court version is the base; the full-court version is the surprise. Switching between them at media timeouts — without a verbal announcement the offense can hear — keeps the attacking team guessing for the entire second half.
Loose vs. Tight Depth Adjustments
The 1-3-1 is uniquely adjustable by depth without requiring a different call. A single instruction at a timeout changes the entire defensive posture.
Loose (drop back to roughly 20 feet): against weak ball-handling guards and poor shooters. The defense baits lob passes into the trap area and is conservative with the timing of traps; a late or over-committed trap against a poised ball handler produces an easy outlet. The loose adjustment gives the defense more time to set its rotations before trapping.
Tight (extend to roughly 30 feet): against poor perimeter shooters with penetrating guards. The defense extends X1 beyond the arc to deny the first catch, and the entire structure tightens one step toward the perimeter. The goal is to force the ball into the trap zone before the offense can establish a rhythm.
This adjustment does not require a new name or a play card — "loose" and "tight" or "back" and "up" are sufficient, and they carry meaning that every player can apply immediately without a diagram. The Potsdam "Drop" variation — dropping the entire back line inside 15 feet against a team with a genuine great shooter — is a named version of the loose adjustment, used specifically when the perimeter threat is too dangerous to trap aggressively.
- Point (X1): deny reversal, cut off the lane — never chase the ball handler after a wing pass
- Wings (X2, X3): move on the flight of the ball; ball-side wing traps, off-side wing drops to paint
- Middle (X4): cover the elbow on every corner trap — this is the non-negotiable priority
- Baseline (X5): first trapper in the corner; never cheat to either side; communicate everything
- All five: on every trap, non-trapping defenders sprint to pass lanes immediately — not after the catch
How to Teach the 1-3-1
The 1-3-1 cannot be installed in one whiteboard session. The rotations require repetition at game speed before the zone produces turnovers — a half-drilled 1-3-1 produces open threes, not steals.
Stage 1 — Alignment and movement: five defenders, no offense. Ball moves from the coach to each trap zone in sequence. The defense calls out each rotation and moves on voice command before the ball arrives. This stage establishes the vocabulary and the movement habit. Stop and correct every defender who reacts after the ball instead of moving on its flight.
Stage 2 — Corner trap drill: five defenders vs. four offensive players — no offensive player in the trap zone initially, one enters after the initial pass. The defense sets the corner trap and every non-trapping defender locates the three nearest passing outlets before the ball arrives. Run this until the elbow coverage is automatic.
Stage 3 — Attack the skip pass from the offense: put the scout team into the exact configuration that breaks the zone — corner entry followed immediately by a corner-to-elbow skip. Run this against the defense until the rotation is beat correctly more often than not. The defenders feel the weakness, learn exactly where the elbow threat comes from, and build the rotation habit against actual pressure.
Stage 4 — Live, tracking trap efficiency: play five-on-five and track two numbers — the number of traps the defense executes cleanly (two defenders on the ball, three others in passing lanes) and the number of traps that produce a corner-to-elbow skip before X4 closes. These two numbers tell you everything about whether the zone is ready to use in a game.
What Breaks the 1-3-1
X1 chases instead of denying reversal. The moment X1 follows the ball to the wing instead of cutting off the reversal lane, the top of the zone is open and the whole structure has to scramble. X1's job is angles, not ball pressure.
X5 cheats to one corner. A baseline defender who anticipates the ball will reach one corner early, which means the opposite corner is open before the pass is even thrown. X5 must stay centered under the basket until the ball commits.
Non-trapping defenders hold their zones. A zone that traps the corner and leaves the three other defenders standing in their spots gives the offense a 2-on-1 advantage on every outlet pass. Rotations to passing lanes are mandatory, not optional.
Running it without drilling the skip-pass counter. If the defense cannot stop the corner-to-elbow skip in a controlled drill, it will not stop it in a game when the pace is higher and the offense is looking for exactly that read. Stage 3 of the teaching progression exists because of this failure mode.
When to Run the 1-3-1 — and When to Switch Out
The 1-3-1 is the strongest change-up against a guard-heavy team with poor outside shooters — it forces them out of rhythm, cuts foul trouble structurally, and denies the reversal patterns that most half-court offenses depend on.
It has three natural weaknesses that require a matchup-based decision before installing it against a specific opponent. First, rebounding: the spread alignment leaves the baseline open for offensive boards. Against the best offensive-rebounding team on the schedule, the 2-3 or man-to-man provides better rebounding position. Second, perimeter shooting: if the opponent has three or four reliable corner shooters, the baseline defender cannot cover every corner-to-corner sprint against crisp ball movement. Third, patient ball movement: an offense that can hold the ball and wait — without rushing a trap, without throwing a blind skip — will find the dead zone repeatedly.
The switch trigger is also a structural one. Run the half-court 1-3-1 as the base defense, then add three to five possessions of full-court pressure mid-game — particularly after a momentum swing or a media timeout — to disrupt tempo before the offense can adjust. The half-court version is the identity; the full-court version is the disruptor. Used in sequence, they make the offense guess which is coming for the remainder of the game.
Get Free Coaching Notes
Join the Online Basketball Playbook newsletter for new playbook breakdowns, drills, and practice-ready install ideas.
Get Free Coaching NotesSee it drawn up
Related diagrams
Keep Building
Related breakdowns
Jim Boeheim 2-3 Zone System and Coaching Philosophy
Jim Boeheim 2-3 Zone System and Coaching Philosophy