Milton Zone Attack vs 2-3 Zone
The 2-3 zone walls off the paint and dares you to beat it from the perimeter. The Milton Zone Attack accepts that dare — forcing the zone to choose between the corner and the high post, then punishing whichever it abandons.
Why the 2-3 Is Hard to Attack
Before building a zone offense, a coach has to understand what the defense is actually doing — not just what it looks like on paper. The 2-3 zone is not five defenders standing in positions. It is a designed system built around a specific set of trades, and those trades define exactly where the attack has to go.
The two front guards start a step inside the three-point arc, close enough together to deny a direct top-to-high-post entry. The back three are not flat on the baseline — the wing defenders (often called X3 and X4) are positioned at free-throw-line-extended, which means they can close to the corner without sprinting six feet. The center, X5, owns the paint and acts as the anchor for the entire structure.
Against aggressive versions of the 2-3 — particularly the Tandem variant popularized at the college level — the zone makes a deliberate analytical trade: it surrenders contested mid-range jumpers from ten to twelve feet in exchange for eliminating corner threes and uncontested rim shots. The Merrimack Tandem 2-3 averaged just .804 points per possession against it over roughly 1,900 possessions, ranking fourth in NCAA Division I in 2023-24. That is not a passive defense. That is a defense with a design philosophy.
The reason the 2-3 is hard to attack is that most zone offenses play into its strengths — they go side-to-side, they probe but do not commit, and they let the defense sit comfortably in its spots. The Milton Zone Attack is built on the opposite idea: force the zone to move, then punish the read it gets wrong.
The Soft Spots the Zone Can't Cover
Every zone defense has structural gaps — areas that are geometrically impossible to close simultaneously. Knowing them precisely is the foundation of any effective zone offense. Against the 2-3, there are three primary vulnerabilities that the Milton Zone Attack targets.
The High Post
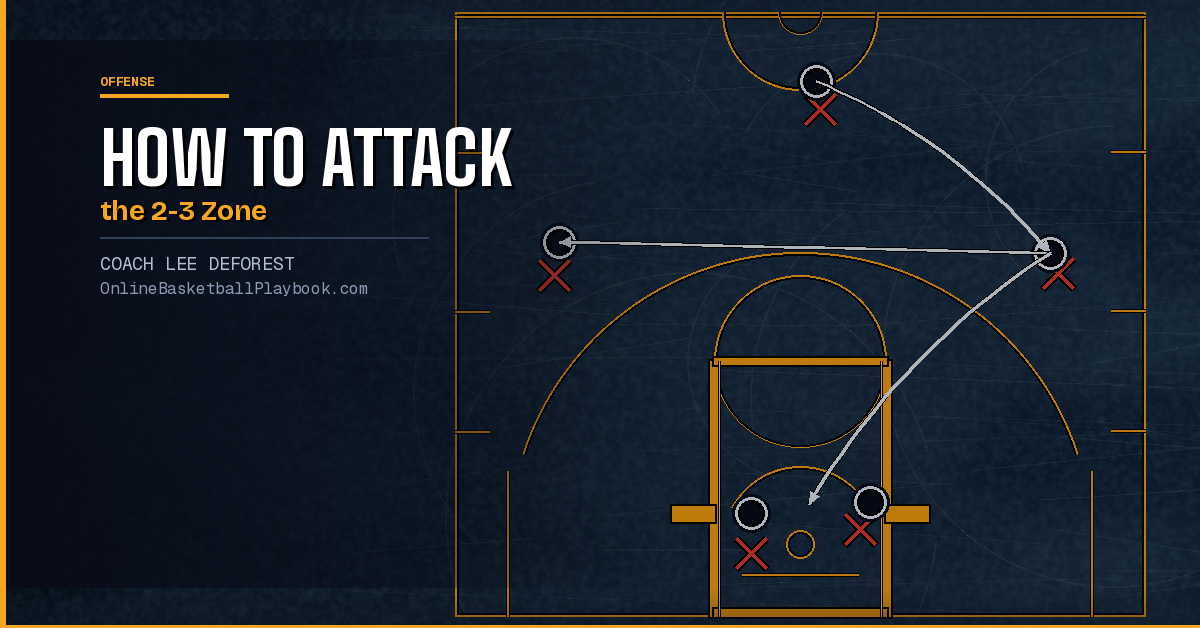
The elbow area and the top of the lane are the 2-3's most cited weakness. When the ball reaches the high post — either by a guard-to-post entry or by a flashing big — X5 has to commit to defending that player one-on-one. At the same moment, all four perimeter defenders in a disciplined Tandem system are supposed to sprint to their corner-box positions to eliminate kick-out threes. That rotation creates a moment of chaos: if the high-post receiver can read the rotations fast enough, a kick-out pass to the right corner or wing arrives before the zone closes out.
The Short Corner
The short corner — the area from the block out to the corner, just beyond X5's comfortable range — forces a difficult coverage decision. X5 can step out and contest, but doing so pulls the anchor out of the paint. Alternatively, X3 or X4 can rotate under the basket to take the short corner, but that opens the weak-side wing for a skip pass. Disciplined zone teams have answers for the short corner, but they require precise communication and timing, and those are things you can erode with ball movement and tempo.
The Corner on Ball Reversal
When the ball skips from one side of the court to the opposite corner — a true cross-court skip pass — the receiving corner player must be covered by a wing defender who is starting at free-throw-line-extended on the weak side. That is a long closeout. If the skip is crisp and the receiver is ready to shoot, the zone's wing has to decide instantly: fly to the corner and risk giving up the baseline drive, or pull up short and allow the catch-and-shoot. The Milton Zone Attack puts shooters in the corners specifically to force this decision repeatedly.
Milton Zone Attack: Alignment and Spacing
The Milton Zone Attack sets up in a 1-3-1 alignment on the offensive end: one guard at the top of the key, three players across the free-throw-line-extended (two wings and one player in the high post), and one player at the short corner or low block. This spacing directly targets the structural gaps described above.
The reasoning behind the 1-3-1 offensive alignment against a 2-3 zone is that it puts offensive players exactly where defensive players are not. The three guards across the middle are designed to pull the two front guards out of position. The high-post player sits in the dead zone between the two front guards and X5. The short-corner or low-block player forces X5 to make a decision every time the ball enters the post.
Spacing discipline is non-negotiable. If your wings drift toward the baseline, the zone's back line can cover them without stress. If your high-post player sets up too close to the basket, X5 can body him up and still protect the rim. Every player in the 1-3-1 offensive set needs to understand that their position is not where they are most comfortable — it is where they create the most stress on the defense.
The guard at the top of the key functions as the reset and the skip-pass initiator. He should be confident attacking off the bounce to drag out one of the front guards, and he should be comfortable making the long skip pass to the opposite corner. His vision is what links the left and right sides of the offense together.
The High-Post Flash: How It Works
The highest-value action in the Milton Zone Attack is the high-post flash — a big man or versatile forward cutting from the weak side into the elbow just as the guard receives the ball on the wing. The timing of this cut is what separates the action from a random post-up attempt.
The sequence works like this: the ball is on the wing. The two front zone guards have shifted ball-side. The weak-side top guard in the zone is still recovering. At that moment, the offensive player on the weak side flashes hard to the elbow. If the zone is disciplined, X5 steps up to take the flash. If the zone is undisciplined, the flash catches undefended. Either outcome opens a read.
If X5 steps up to cover the high post, the low-block or short-corner player is now one-on-one with no one protecting the paint below them. A simple drop pass from the high-post receiver to the cutter gets an easy finish.
If X5 stays home and no one picks up the flash, the high-post receiver has a clear look at a ten-to-twelve foot pull-up or an open kick-out to a shooter in the corner. In the analytics framework used by top zone coaches, a tough ten-footer is the acceptable trade the zone is making. Make them give it up consistently and the math still works in your favor — especially when your high-post player can make that shot at a 40-plus percent clip.
The worst version of the high-post flash is when the offensive player sets up in the lane before the ball moves. That gives the zone time to account for him. The flash has to be timed to the pass — cut as the ball is in the air going to the wing, not before and not after.
Corner Overload and the Skip Pass
The second primary action in the Milton Zone Attack is the corner overload. The concept is simple: put two offensive players on the same side of the court in positions the zone cannot cover simultaneously. One player in the corner, one in the short corner or on the low block. X5 can guard one of them. X3 or X4 can guard one of them. But not both.
Once the ball enters the corner from the wing, the zone has to rotate. X5 steps up to cover the short corner. X3 closes from free-throw-line-extended toward the corner. At that moment, the weak side opens up. The corner player reads the rotation: if X5 closes, the low-block player gets the drop. If X3 closes, the skip pass goes to the opposite wing or opposite corner, where one shooter has been left with too much ground for the zone to recover.
The key to the skip pass is the receiver's footwork. The player in the opposite corner needs to be set and ready before the ball is in the air. If she or he is still drifting into position when the skip arrives, the zone's recovering wing will close in time. Stand in the corner. Hold the spot. The skip comes when the defense rotates, not when you ask for it.
Practice the skip pass repeatedly in training. Coaches often spend time on ball movement but neglect the physical act of throwing and receiving a cross-court skip at game speed. The pass is longer than most players make in a half-court offense. It has to be thrown with enough pace to beat the closing wing and enough accuracy to land in a shooting pocket — not low, not behind the receiver, not so hard that the catch disrupts the shooting motion.
The two front guards start close enough together to deny the high-post skip — if a gap opens between them, it is a straight pass to the elbow and the zone bleeds.
— Two-Three Zone (Concepts), Basketball Vault
Reading Zone Rotations in Real Time
A zone offense that only runs set plays will eventually get solved. The Milton Zone Attack teaches players to read what the zone is giving them on every catch — not to execute a pre-designed sequence, but to recognize the defensive rotation and make the correct pass.
There are three reads every offensive player should make on every catch against a 2-3 zone.
Who Closed on Me?
When you catch the ball, identify which zone defender just closed on you. If a wing defender closed from the weak side, the weak side is now short a body. If a front guard came down to the wing, the top is open for a pull-up or a high-post entry. If X5 stepped out to cover you in the short corner, the paint is empty behind them.
Where Is the Ball-Side Big?
X5's position tells you more than any other defender's position. If X5 is at the rim, the short corner and high post are both available. If X5 has stepped up to the elbow, the back line of the zone has a hole at the baseline. Track X5 on every possession — it is the anchor that controls all the other rotations.
Is the Skip Open?
After identifying the ball-side rotation, glance to the opposite corner. If a corner shooter is holding position and the weak-side wing is still recovering, the skip pass wins. If the weak-side wing has already pre-rotated toward the opposite corner, the ball goes back to the top for a reset. The skip should only go when the receiver is clearly a step ahead of the closest zone defender.
These three reads should become second nature through repetitive drilling. A player who can process all three in the moment between catching and passing will operate faster than the zone can rotate, and that speed differential is how the zone breaks down.
Run a live shell drill at practice: five offensive players in the 1-3-1 set against a live 2-3 zone, with the restriction that no player can dribble — passes only. This forces every offensive player to read rotations immediately on every catch and trains the skip-pass habit without relying on ball-handling as a crutch. After ten possessions without dribbling, open the dribble up. The reads will already be there.
Drills to Build the Attack
Good zone offense is built in pieces before it is run as a system. The following drills target the specific skills the Milton Zone Attack requires.
3-on-3 Corner Overload
Place an offensive player in the wing, one in the corner, and one in the short corner. Place three zone defenders in a ball-side half of the 2-3 (one front guard, one wing, and X5). The offensive players must read which defender closes and make the correct pass — either the drop to the short corner or the kick back to the top. Run this without a shot until each player can make the correct read five times in a row, then open it up to live finish.
Skip-Pass Shooting
Place a passer at the top of the key, a receiver in the left corner, a receiver in the right corner, and a coach or manager as the simulated zone wing defender on one side. The passer initiates to one side, the simulated wing closes toward that corner, and the passer fires the skip to the opposite corner. The receiver must be set and shoot immediately on the catch. Track makes and misses. Require at least 30 attempts per session to build comfort with the distance and the pace of the pass.
High-Post Flash Timing
Wing player with the ball, one big on the weak side, one coach playing X5. The big's job is to time the flash to the elbow on the wing's signal — a shoulder fake or a nod. X5 reacts live. If X5 steps up, the big reads and makes the drop pass to a cutter. If X5 stays, the big takes the pull-up. Run this until the flash timing feels natural and the big is making the correct choice without hesitation.
5-on-5 No-Dribble Zone
As described in the Coach's Note above — five against a live 2-3, no dribble allowed for the offense. This accelerates every read the Milton Zone Attack demands. Do not skip this drill. Teams that run it consistently develop zone-reading instincts that set plays alone cannot build.
- Set up in a 1-3-1 offensive alignment — top guard, two wings at free-throw-line-extended, one high-post player at the elbow, one short-corner or low-block player — and hold spacing discipline throughout every possession.
- Time the high-post flash to the pass, not to the catch — the cutter should arrive at the elbow just as the ball lands in the wing's hands, before the zone has time to account for the new position.
- Read X5's position on every catch: if X5 steps to the elbow, send a cutter baseline behind him; if X5 stays at the rim, attack the high post or short corner immediately.
- On corner overloads, the corner player holds position rather than moving toward the ball — the drop pass and the kick-out both require a stationary receiver so the defense cannot close in time during the delivery.
- Practice the cross-court skip pass at game speed in every practice: the receiver must be set and ready to shoot before the ball is in the air — skip passes thrown to moving targets get recovered by zone wings.
- Against aggressive Tandem 2-3 systems where guards jump-switch and deny reversal, push the tempo — attack before the back three players can set their tandem positions and the zone loses its pre-positioned coverage before it can function.
Want more basketball coaching strategies, drills, and tools?
See it drawn up
Related diagrams


Keep Building
Related breakdowns