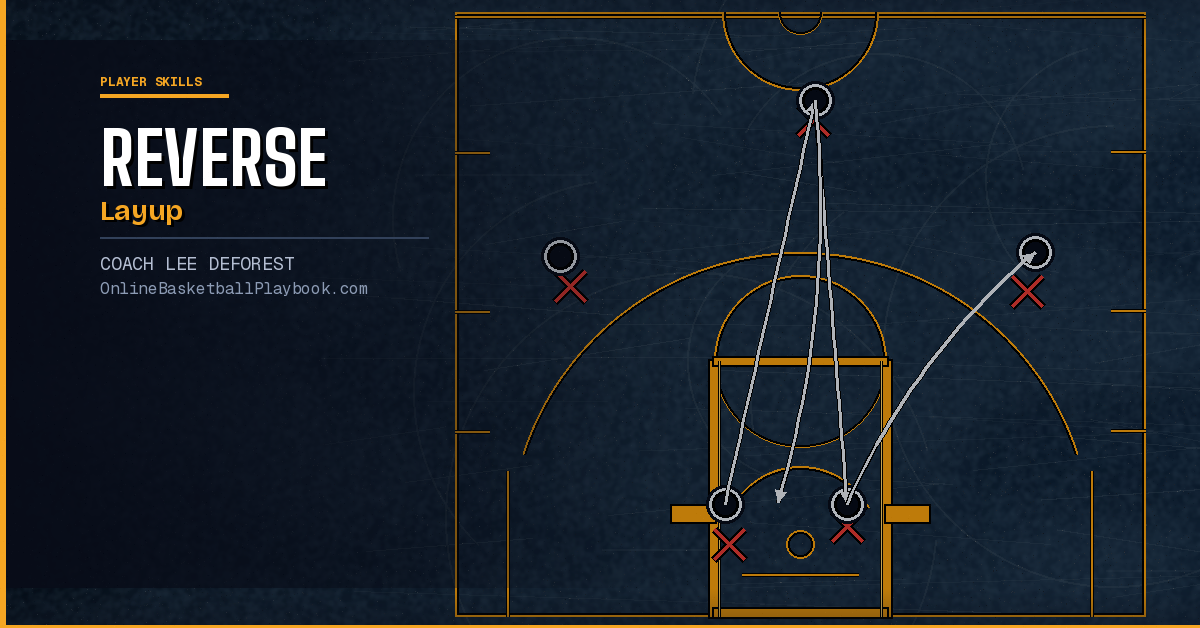

Reverse Layup in Basketball
The reverse layup uses the rim as a shield against a chasing defender. It is one of the most reliable finishes in a player's menu — and one of the least taught. Here is how to install it correctly.
What the Reverse Layup Is and Why It Works
A reverse layup is any finish where the player attacks one side of the basket and releases the ball on the opposite side — using the backboard and the rim as a physical barrier between the ball and the defender. Where a standard layup goes up on the same side as the approach, the reverse goes underneath the basket and comes up on the far side.
The physics are simple: a defender who is chasing from behind or who is positioned on the ball-side of the rim cannot contest a shot that is released on the other side of an iron ring. The basket itself does the blocking work. That is the entire point of the move. A player does not need to be athletic enough to absorb contact or strong enough to finish through a body — they just need the technique to put the ball in a spot the defender cannot reach.
Elite guards use the reverse finish throughout their careers precisely because it takes size out of the equation. A 5-foot-10 guard can make a layup that a 7-foot center has no shot at blocking — because the rim is in the way. That is not luck. That is geometry weaponized through footwork.
When to Use It — Reading the Defense
The reverse layup is a read, not a default. Knowing when to throw it is as important as knowing how to make it. The primary trigger is a help defender who has gotten across the lane and is positioned on the near side of the basket. If you drive the left side of the lane and the help is there waiting, finishing right where you entered is exactly where they want you. The reverse takes you to the other side of the rim, where they are not.
The second trigger is a trailing defender — a ball-handler who got beaten on a drive but is recovering from behind at an angle. Finishing on the near side gives that defender a legitimate contest. Going under the basket and releasing on the far side puts the rim between the ball and their outstretched hand.
The third trigger is angle. When a player catches a pass in the short corner or receives a skip to the wing and has momentum carrying them toward the baseline, continuing under the basket and reversing is often the most efficient path to a makeable shot. Stopping, resetting, and attacking from a static position is slower and gives the defense time to rotate.
The read hierarchy: see the help position first, identify where the rim protection is, then choose the finish that ends on the opposite side of that protection. That decision should happen in the air during the final two steps — not at the basket.
Footwork and Approach Angles
Approach angle determines everything on the reverse layup. The player must enter on one side of the basket with enough momentum and control to carry safely under the rim and release cleanly on the far side. If the approach is too flat — nearly parallel to the baseline — there is not enough angle to create separation from the rim, and the ball clips the bottom of the backboard. If the approach is too straight — driving directly at the basket from the lane — it is nearly impossible to redirect under the rim without traveling.
The ideal approach for a right-side reverse finish comes from the left side of the lane or from a drive across the paint. The player is moving from the left, gathers with a left-right or right-left two-step, carries momentum under the basket, and releases with the right hand on the right side of the backboard. The body sweeps in a shallow arc from one side of the rim to the other.
Footwork specifics: the gather step is taken with the inside foot (the foot closer to the basket), followed by the plant step on the outside foot as the player clears the near side of the rim. The release happens as the outside foot plants — ball lifted up and placed softly on the upper corner of the backboard square, allowing the bank to drop it through. The player should not be fully extended vertically. The finish is more of a controlled underhand or sidearm release placed on the glass, not a power jam.
Body lean is toward the basket during the arc. A common error is leaning away, which shortens the reach and makes the angle to the glass steeper than it needs to be. Stay compact, keep the ball protected beside the body until the last second, and release it on a high, arcing trajectory off the backboard.
Train the rim-finish family — regular, opposite-hand, power, reverse, floater/runner, Euro step — and choose by the help. Use the rim as a shield; finish through contact.
— Finishing & Footwork, Basketball Vault
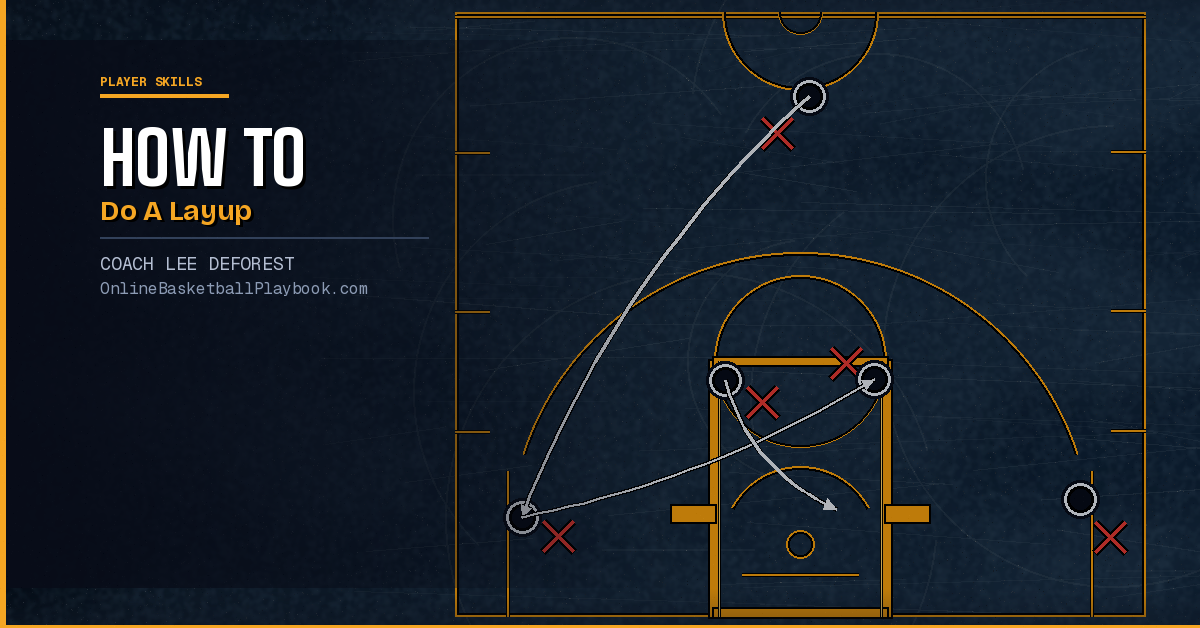
How to Teach the Reverse Layup Step by Step
Teaching the reverse layup requires breaking it into three isolated skills before combining them: the approach arc, the body control under the basket, and the release. Trying to teach all three simultaneously produces a slow, mechanical move that does not transfer to a game. Build each part in isolation first.
Step 1 — The Arc Walk-Through
Walk players through the arc without a ball. Start on the left block, take two steps under the basket, end on the right block. Emphasize the lean toward the rim, not away from it. Repeat in both directions until the movement is automatic. This takes five minutes and removes the tension of the ball from the learning process.
Step 2 — Mikan Series Foundation
The classic Mikan drill — alternating layups from each side of the basket without dribbling — is the best foundation for the reverse because it forces continuous movement under the rim and builds the rhythm of going from one side to the other. Add reverse Mikan: same drill, but finish each rep on the opposite side of the rim from the approach. Both hands, both sides, continuous reps, no dribble.
Step 3 — One-Dribble Trigger
Now add a single dribble. Player starts two steps outside the lane on the left side, takes one hard dribble toward the basket, gathers, goes under, finishes on the right side. The one-dribble constraint forces the player to read the angle and commit — there is no extra dribble available to readjust. Run this from both sides with both hands before expanding the approach distance.
Step 4 — Live Defense Read
Add a defender positioned on the near side of the rim. The offensive player drives and must decide in real time whether a standard layup or a reverse layup is the right finish based on where the defender is. The decision should be made on the second-to-last step, not at the basket. This is the only way the move translates to game conditions.
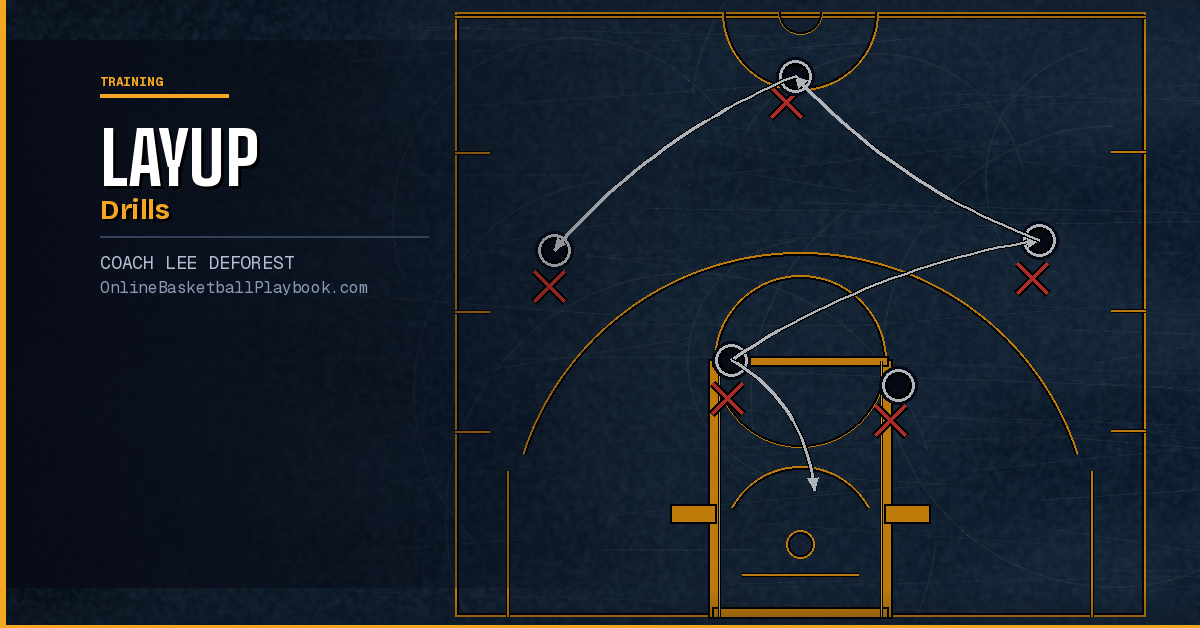
Drills to Build the Reverse Layup
Repetition quality matters more than volume here. A player who takes 20 clean reverse Mikan reps daily will develop a reliable finish faster than one who takes 100 sloppy attempts off the dribble. Structure practice to enforce the correct mechanics on every rep.
Reverse Mikan Drill
Two minutes, both hands, no dribble, continuous movement under the basket. Count made attempts, not total attempts. Compete against a personal best. The goal is rhythm and placement on the glass — not power. Players who muscle the ball through the rim on a reverse have missed the point entirely. The finish is a soft, arcing placement on the backboard square.
Baseline Drive Series
Start on the wing, drive baseline, use one dribble, finish with a reverse on the far side. Three sets of five from each side. Rotate a passive defender to provide visual reference without full resistance. Progress to an active defender once the mechanics are consistent.
Help-Side Read Drill
Three-player drill: ball handler drives the middle, one passer at the elbow, one defender positioned as help at the near side of the basket. On the drive, the defender shows or stays. If the defender shows, the driver finishes with a reverse. If the defender stays home, the driver passes to the elbow for a jump shot. This builds the decision alongside the finish — which is how it works in a real game.
Opposite-Hand Emphasis
The most common weakness is a player who can reverse with their dominant hand but converts to a weak-hand layup when going the other direction. Dedicate full sessions to non-dominant hand reverse finishes. A player who can reverse with both hands is nearly impossible to stop from mid-range drives.
Run the reverse Mikan drill at the start of practice two to three times per week for the first month of the season. Consistency of approach — the same arc, the same lean, the same soft placement on the glass — is built through repetition before the defense is introduced. Add live defense only after players can make seven of ten in the Mikan drill consistently.
Common Mistakes and How to Fix Them
The reverse layup fails in predictable ways. Each error has a specific mechanical cause and a specific fix.
Going Under Too Early
The player ducks under the basket before clearing the near side of the rim, which kills the approach angle and forces an off-balance release. Fix: use a cone or a chair placed one step inside the near side of the rim as a boundary marker. The player must clear the marker before going under. This forces the correct arc.
Leaning Away from the Basket
Instinct tells players to lean away from the rim when finishing under it — they feel like they are going to run into the stanchion. That lean shortens the reach and turns a makeable finish into a lip-out. Fix: emphasize that the body arc follows the ball toward the glass. The backboard is the target, not something to avoid. Video feedback is effective here — players are often surprised by how much they are leaning away.
Releasing Too Late
The player carries the ball past the release point and finishes too far on the far side of the basket, missing the backboard angle entirely. Fix: identify the release window — approximately when the outside foot plants and the body is directly below the far edge of the rim. Mark the floor with tape during drills so players can self-correct their release timing.
Using the Wrong Hand
On a right-side reverse, the finish should come from the right hand. Players who default to their dominant hand regardless of direction turn what should be a protected finish into an exposed one. Fix: make opposite-hand finishes non-negotiable in all Mikan work. The repetition removes the hesitation in game conditions.
No Backboard Use
Players who try to lay the ball directly into the basket on a reverse are attempting an extremely small target at an off-angle. The backboard is not optional — it is the primary target on every reverse layup. Fix: require that every made reverse in practice banks off the glass. Deduct any straight-in makes during drill work.
Fitting the Reverse into a Full Finish Menu
The reverse layup has the most value when players treat it as one option in a coordinated menu rather than a standalone trick. The finish menu should include: the standard layup (same side as approach), the power layup (two-foot gather, straight up through contact), the reverse layup (opposite side, rim as shield), the floater/runner (one-dribble early release over a big), and the Euro step (lateral gather to avoid the help).
Each finish solves a specific defensive problem. Standard finishes work against no help. Power finishes work against contact from behind. Reverse finishes work against lateral help positioned at the rim. Floaters work against shot-blockers. Euro steps work against help who has committed early. A player who has all five reads the defense and picks the solution. A player who has one or two takes whatever the defense gives up.
Building the menu does not require equal time on every finish. The standard layup and the power layup are the most common and get the most reps. The reverse and the floater are the highest-leverage additions because they solve the help-defense problem that beats most standard finishes. Prioritize those two before adding the Euro step, which has a steeper technique learning curve and is less reliable for players under 14.
The reverse layup in particular transfers directly to game situations that arise out of any half-court offense. A player who cuts baseline, receives a pass in the short corner, and has a defender in pursuit has a near-automatic reverse finish if the footwork is there. A ball handler who drives the middle and faces a high help defender on the near side of the rim has a clean reverse available on almost every drive. These are not exotic situations — they happen in every game at every level. Players who own the reverse layup convert them. Players who do not own it pick up the ball and try to go around the defender, which usually ends in a charge or a miss.
Install the reverse layup as a standard part of your finishing curriculum alongside the Mikan drill and the power layup. Give it consistent reps early in the season, drill both hands from both directions, and build the read against live defense before the first game. A team that can reverse with both hands is a team that the help defense cannot stop at the rim.
- Arc before dribble: Walk players through the approach arc without a ball first — right side enter, sweep under, left side exit — to build the muscle memory for the angle before adding any ball-handling pressure.
- Reverse Mikan daily: Two minutes of reverse Mikan at the start of practice builds reliable touch and rhythm on the glass faster than any other drill; track makes, not attempts, to enforce quality.
- Both hands, non-negotiable: Every reverse layup rep in practice must end with the hand that matches the finish side — right-side reverse with the right hand, left-side reverse with the left — no exceptions, because dominant-hand cheating destroys the move in a game.
- Backboard is the target: Require every made reverse to bank off the glass during drill work; a straight-in attempt is targeting a two-inch margin at an off angle, and the backboard is the much larger target at the correct angle.
- Add the read last: Introduce the help-side defender drill only after players can hit seven of ten in the Mikan drill — the decision-making layer builds on top of the mechanics, not alongside them.
Want more basketball coaching strategies and drills?
See it drawn up
Related diagrams


Keep Building
Related breakdowns