
Which Part of the Rim to Aim At When Shooting
Most players stare at the whole rim when they shoot. That vague focus costs them makes. One small shift — aiming at a precise spot on the back of the rim — removes the guesswork and tightens every shot.
Why Rim Aiming Matters More Than You Think
When a player misses a shot, the first thing most coaches watch is the shooting form — the elbow, the follow-through, the feet. Those mechanics matter. But there is a simpler, faster cause that gets overlooked: the player had no specific target. They aimed at "the basket" instead of a point on the basket, and the brain had nothing precise to lock in on.
Research on expert performance across sports — archery, golf, darts — consistently shows that athletes who identify a small, specific target outperform those who aim at a general zone. Basketball shooting is no different. The rim is 18 inches in diameter. The basketball is roughly 9.4 inches in diameter. A perfectly aimed ball fits through the rim with less than four and a half inches of margin on either side. That margin disappears fast on a side-to-side miss. The only way to consistently thread that gap is to aim at a spot, not a shape.
This matters even more for developing players. Young players who have not yet groomed a consistent release will compensate with visual guesswork. If you can install a correct aiming habit early, you give their mechanics something reliable to calibrate against. A shooter who aims at the back rim and consistently hits long has a clear diagnostic: the target is right, the arc needs adjustment. A shooter who aims at "the rim" in general has no anchor from which to self-correct.
Elite coaches treat eye discipline the same way they treat foot discipline — as a teachable, trainable fundamental, not an instinct. Jay Wright at Villanova spent dedicated time on what his players were looking at before and during a shot. The eye precedes the hand. If the eye is unfocused, the hand follows an unfocused instruction. Nail the target first; the mechanics have something to work toward.
The Back of the Rim: The Right Target
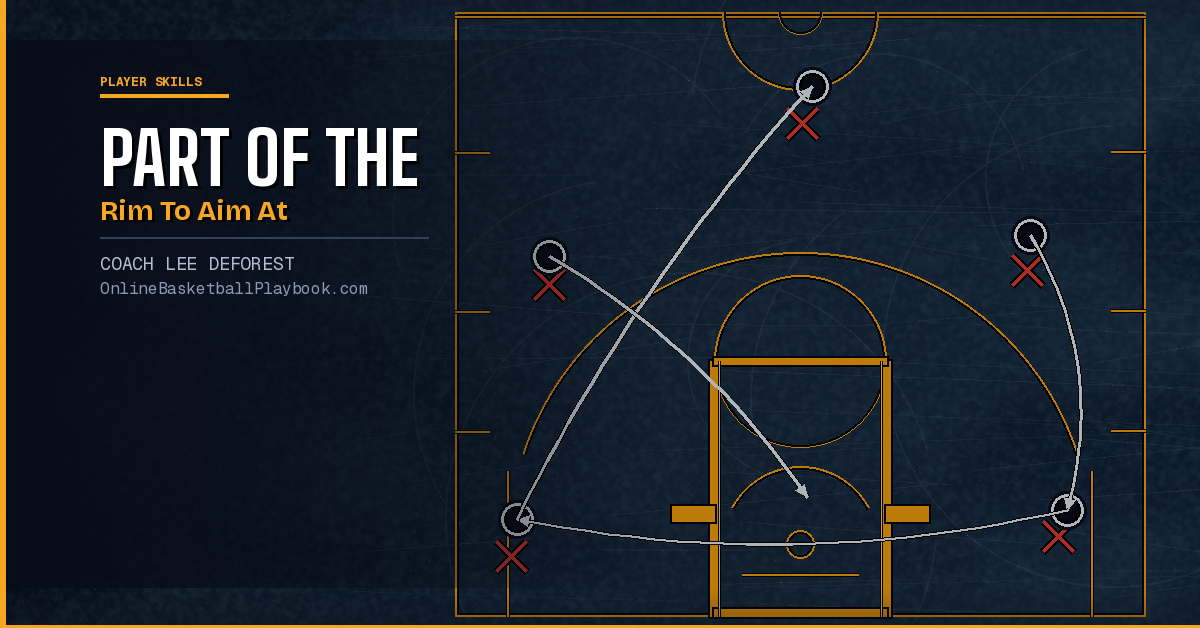
The answer most shooting coaches land on, independently of one another, is the same: aim at the back of the rim — specifically the back inside edge of the rim, the part farthest from the shooter.
Here is why that spot wins over the alternatives. When a player aims at the front of the rim, any undershoot hits iron and dies short. The margin for error forward is zero — the ball must clear the front rim, travel across 18 inches of open air, and drop through the net. When a player aims at the center of the rim, they are still aiming at an abstract zone rather than a surface. But when a player aims at the back inside edge of the rim, three things happen in their favor.
First, an on-line shot that is slightly short still has the back rim to deflect it upward and in. This is where "shooter's rolls" and "shooter's bounces" come from — a ball that dies a few inches short hits the back rim, loses energy, and often falls through because it is already on line. Second, the back-rim target automatically produces a steeper arc. When the eye is locked on a point farther and higher in the shot's path, the arm naturally adjusts to project the ball on a higher trajectory to reach that target. Higher arc means a larger effective hoop opening — a ball dropping steeply through a hoop sees more of the 18-inch circle than a ball arriving on a flat line. Third, the back rim is a fixed, stable visual reference. It does not move, it does not blend into the background, and it is the same distance from the shooter on every straight-on shot from a given spot.
The practical cue coaches use most often: "pick a spot on the back of the rim and don't let go of it until the ball gets there." Eye discipline means your gaze stays on the back rim through the release and the follow-through — not chasing the ball, not glancing at a defender, not looking at the net. The back rim stays in the center of your vision until the shot is complete.
The most dangerous player is the one who is continually improving — a shooter who trains every rep with a score, a target, and a consequence to chase gets better faster than one who just puts up shots.
— Shooting Development, Basketball Vault
How Arc and Angle Change the Target
The back-of-the-rim target works cleanly for most mid-range and three-point shots taken in the straight-on or slightly angled positions. But arc changes the equation, and so does shot angle. Every shooter needs to understand how these variables adjust the optimal aiming point.
Arc first. A flat shot — the kind Dr. Hal Wissel diagnoses as a "line drive" — approaches the rim at a shallow angle and requires near-perfect front-to-back accuracy to go through cleanly. The effective opening shrinks because the ball arrives almost sideways to the hoop. For these shooters, the back-rim target is even more critical because it forces a higher trajectory. Wissel's correction for the flat-arc shooter is a "ceiling target" — pick a point on the gym ceiling above the front of the rim and aim your arc there. That cue indirectly does the same thing as the back-rim target: it gets the ball going up first, so gravity brings it down on a steeper angle through the hoop.
On extremely high arc — the rainbow shot — the ball drops almost vertically through the hoop. In that case the back-rim target becomes less necessary because the ball is entering the hoop from above, and small horizontal errors are more forgivable. However, extremely high arcs introduce a new error: inconsistent depth. The shooter needs to drive enough power to carry the ball on that longer parabolic path, and slight power variations cause big depth misses. This is why most shooting coaches aim for what researchers call the "optimal arc" — roughly 45 degrees plus the angle created by the shooter's height and distance. That range sits between flat and rainbow, and the back rim is the perfect target for it.
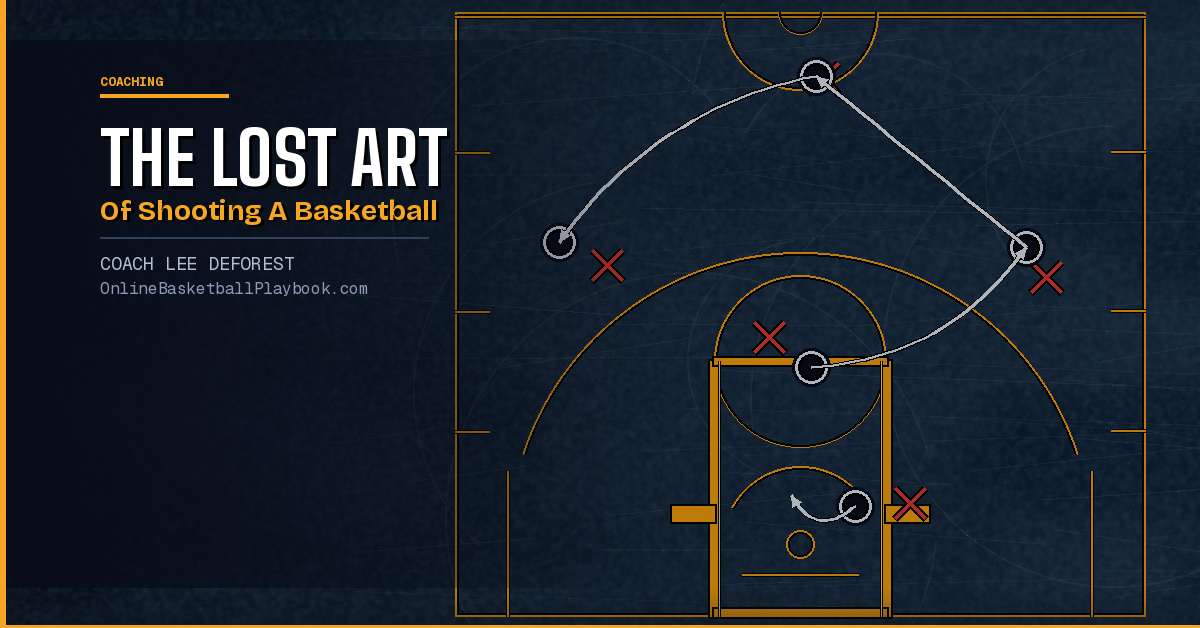
Angle matters too. When shooting from the corners, the geometry changes. A corner three is shot from a spot where the shooter is almost parallel to the baseline. The rim is no longer a circle facing the shooter — it looks like an oval. From that angle, the effective gap between the near edge of the rim and the back edge is smaller in the shooter's visual field. Corner shooters often do better aiming at the center of the rim as seen from their angle, or at the backboard just above the square — which naturally redirects the ball into the hoop on a cleaner angle. From the corner, bank-shot thinking starts to blend with straight-shot thinking.
Aiming for Bank Shots vs. Straight-On Shots
The bank shot is underused and underpracticed at almost every level of basketball. The backboard is there for a reason — glass is forgiving in ways the rim is not, and certain spots on the floor make the bank shot a higher-percentage option than the direct shot.
For bank shots, the aiming target shifts entirely away from the rim and onto the backboard square. Specifically, the target is the top near corner of the painted square above the basket, on the same side as the shooting angle. From the right elbow (45-degree angle, right side), the ball should hit the upper-left corner of the square and bank in. From the left elbow, the upper-right corner. The reason this spot works: the geometry of the rebound off that point is such that the ball naturally deflects at the angle needed to enter the basket. Coaches who drill the bank shot show this with tape or markers on the glass — the target is very small, roughly the size of a fist, at the top corner of the square.
The bank shot is highest percentage from the mid-range angles: the 45-degree positions from both elbows, and the short corners. From directly in front of the basket, the bank shot loses its geometric advantage and becomes a guessing game. From the wings (about 60 degrees off center), the bank is still viable but requires precise angle calibration. From the corners, it is generally not recommended because the angle into the glass creates too steep a deflection toward the near-side of the rim.
Tim Duncan made the bank shot a signature weapon because he drilled it obsessively from the same spots. His aiming target was identical every time — same spot on the glass, same arc, same release. The bank shot rewards repetition and precision far more than it rewards athleticism. For players who struggle with pure jump shooting, adding a credible bank shot from one or two spots can meaningfully improve their overall field goal percentage without requiring any change to their primary shooting mechanics.
Teaching Rim Aiming to Your Players
Teaching visual focus is harder than teaching footwork because you cannot directly see what a player is looking at. You can see a bad elbow position. You cannot see where a player's eyes land at the moment of release. That means you need cues, feedback systems, and drills that make eye discipline observable and coachable.
Start with the pre-shot routine. Every player should have a consistent moment where they establish their target before the ball arrives. On a catch-and-shoot, this means eyes finding the back rim while the player is still reading the pass — not after the catch, not during the shot. On a pull-up, it means the head and eyes coming up to locate the target during the last dribble, not while releasing. Jay Wright's Villanova standard was clear on this: "think shot before you get the shot." The mental act of aiming happens before the physical act of shooting.
One effective drill for building this habit is the "look before you catch" catch-and-shoot sequence. The player stands at a spot, the passer holds the ball. The player calls out their target ("back rim") or points at it before nodding to receive the pass. This forces conscious attention to the aiming point before the mechanics begin. After ten repetitions with verbal acknowledgment, the pre-shot eye lock becomes an ingrained habit. You can then remove the verbal cue and watch whether the head and eyes are up and stable before the catch.
For younger players, Dr. Hal Wissel's "ceiling target" cue works well as an aiming substitute. Ask a young player to find a spot on the ceiling above the front of the rim and aim the ball there. The ceiling is a big, clear visual target, and the act of projecting toward it forces the correct arc. As the player's shot matures, the ceiling cue gets replaced with the back-rim cue — but the movement pattern (eyes up, project high, follow through) is already trained.
Film is useful here if you have access to it. A front-facing camera can capture where the player's eyes are pointed at the moment of release. If the head is down, looking at the ball, or tracking a defender, the aiming discipline has broken down. Make it a habit to review a short film clip with players and ask them: "Where are your eyes right before you let go?" Most players cannot answer. That uncertainty is the coaching opportunity.
Run a quick diagnostic before installing new aiming cues: ask your players where on the rim they aim during games. Most will say "the basket" or "the net." That vague answer tells you they have no specific target. Start with one clear instruction — "aim at the back inside edge of the rim every single shot" — and confirm it with a verbal cue in practice before making it automatic.
Common Aiming Mistakes and How to Fix Them
Even when players understand the back-rim concept, several consistent mistakes undermine it in games and practice.
Watching the ball instead of the target
The most common aiming breakdown: the player sets the target early but then loses it the moment they begin their shooting motion, tracking the ball upward with their eyes. This produces a trailing head and a loss of follow-through direction. The fix is to hold the follow-through position — arm up, fingers pointing down — until the ball clearly hits or misses the target. If the eyes chase the ball, the arm often comes with them. Use the follow-through hold as the cue: if the arm drops before the ball reaches the rim, the eyes probably led it.
Locking in the target too late
Some players do not find the rim until they are midway through their shooting motion. By then, the mechanical sequence has already started without a precise aiming instruction. The brain cannot process a visual target and simultaneously coordinate a complex motor sequence in real time — the target needs to be locked in before the motion begins. The pre-shot eye routine must become as automatic as the shooting motion itself.
Aiming at the front of the rim from habit
Players who grew up hearing "clear the front rim" often unconsciously aim at the near iron. This produces short misses and front-rim rattlers. A simple drill to fix it: shoot a set of ten shots while consciously saying "back rim" aloud before each attempt. The verbal repetition overrides the visual habit faster than correction alone.
Changing the target by shot distance
Some players instinctively shift their aim forward on longer shots, believing they need to aim "farther" to compensate for distance. The back-rim target does not change with distance — only the power does. From the three-point line, the back rim is still the back rim. Power comes from the legs driving through the shot, not from the aiming point moving forward. Reinforce this constantly: the target is fixed, the legs provide the distance.
- Back rim on every straight shot: lock the eyes on the back inside edge of the rim before the catch arrives, hold that target through the release and follow-through — do not let the gaze drift to the ball or the net.
- Bank shot target is the backboard square corner: from 45-degree elbow angles, aim at the top corner of the painted square on the near side — the geometry of that spot deflects the ball cleanly into the basket at the correct angle.
- Set the target before the catch: require players to verbalize or physically acknowledge the rim before catching a pass in shooting drills — this installs the "think shot before you get the shot" habit that Jay Wright's Villanova program used as a non-negotiable standard.
- Ceiling cue for young players: for youth players who aim too flat, use a ceiling-target cue (pick a spot above the front rim on the ceiling) to build the correct high-arc habit before introducing the back-rim concept.
- Power does not change the target: remind players that distance is handled by the legs, never by moving the aiming point forward — the back rim stays the back rim from 15 feet and from 25 feet.
Want more basketball coaching strategies and drills?
See it drawn up
Related diagrams


Keep Building
Related breakdowns
Taking Your Basketball Shooting to the Next Level
Taking Your Basketball Shooting to the Next Level