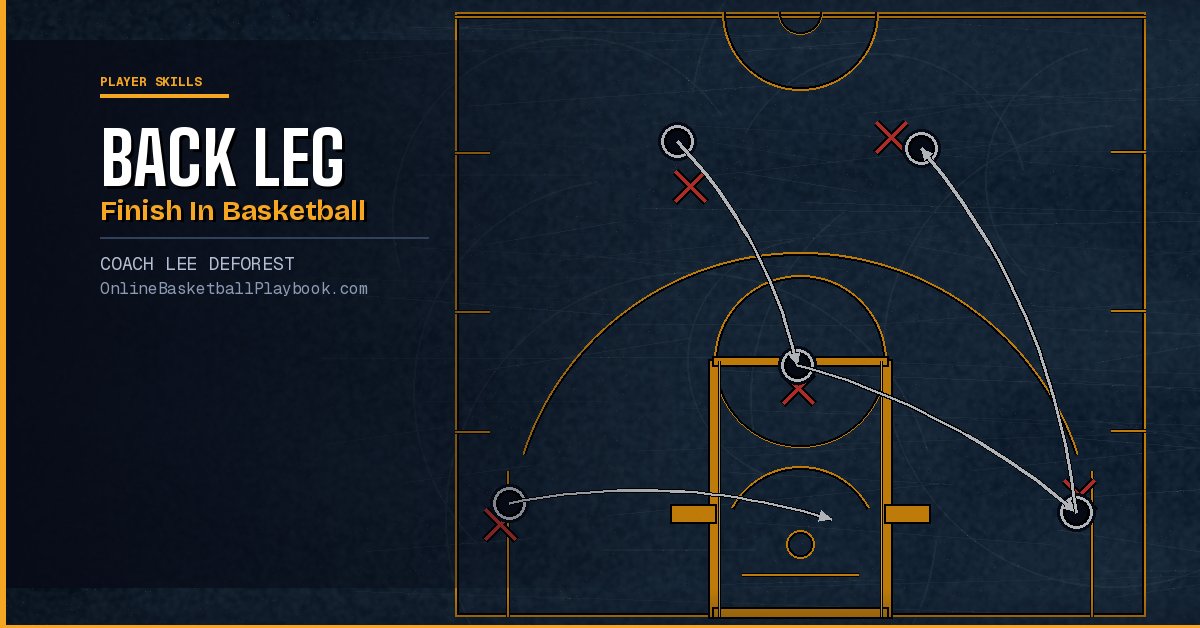

How to Do the Back Leg Finish in Basketball
The back leg finish lets players absorb contact, stay balanced through traffic, and convert at the rim when a straight-line layup would get swatted. Here is how to teach it correctly.
What the Back Leg Finish Is
The back leg finish — sometimes called the "gather step" or "scoop-and-lean" finish — is a layup technique where the player uses the leg trailing behind the drive to create separation, absorb contact, and release the ball at a high, protected angle over the defender. Instead of rushing the last step and losing control, the player deliberately slows the gather, plants the back leg, and uses that leg's push to lift through — or around — the help defender.
The finish gets its name from what the player feels: the back leg fires at the moment of release, giving the ball a controlled upward arc rather than a flat, rushed release that defenders can pin against the glass. Done correctly, the ball goes up soft, at a difficult angle for the defender, and with the player's body positioned to draw contact rather than avoid it.
This is not a single-use move for elite players. Any guard or wing who drives to the rim needs this finish in their vocabulary, particularly on drives to the strong side where a wide-open power layup is not available and a help defender has closed off the straight-line angle.
Why Footwork Comes Before the Finish
You cannot teach the back leg finish in isolation. Players who try to learn the release before their footwork is sound will float the ball ineffectively and pick up unnecessary charges or blocks. The foundation is the same footwork base that governs every rim finish: a proper gather, a decisive last step, and a balanced takeoff.
Coaches Jerry Krause, John Kimble, and Mike DeVillibis all converge on the same idea — body control precedes ball skill. The "quick" stance (balanced, weight on balls of the feet, head above the midpoint) is the physical prerequisite. Until that habit is wired in, teaching a specific finish at the rim is premature because the player arrives off-balance and the technique falls apart on contact.
For the back leg finish specifically, the gather must happen with enough floor ahead of the defender to allow the plant. Players who wait too long to initiate the gather end up directly under the rim with no angle, and the back leg push sends the ball into the backboard at the wrong spot. Teach the gather location first — typically two steps before the rim — so the back leg has room to work.
The jump stop concept from Kimble's system is directly relevant here. Landing simultaneously on both feet at the gather point preserves the right to choose either foot as the takeoff leg, which makes the back leg finish available from both sides of the floor without re-teaching the entire mechanic. Players who default to a stride-stop gather lose this flexibility and can only execute the move to one side.
Step-by-Step Mechanics
Here is the sequence coaches should teach, position by position, in order:
1. Drive with a Purpose
The back leg finish begins before the gather. The player must get downhill — not drifting laterally, but attacking the defender's lead foot directly (what Kimble calls the "north" drive). Lateral drives arrive at the rim at a shallow angle that removes most of the back leg's effectiveness. Drive at the defender, scrape off their shoulder, and the angle at the rim opens up naturally.
2. Read the Help Early
Two dribbles before the rim, the player should identify where the help is coming from. The back leg finish is particularly effective against a help defender positioned on the strong-side block, because the gather and lean allow the player to finish under and around that defender rather than going up directly into the contest. If the help is not there, a standard power finish is usually the better call — simpler and higher percentage.
3. Initiate the Gather
The gather step is the last dribble — the ball comes into two hands, low and controlled, about two full strides from the rim. This is not a hesitation; it is a deliberate, smooth motion. The player's body stays low through the gather, keeping the center of gravity down so the back leg can generate upward force rather than lateral drift.
4. Plant the Back Leg
After the gather, the front foot leads toward the rim and the back leg plants wide — typically about shoulder-width outside the drive lane. The wider the plant, the more the player's body can lean toward the basket during the release, creating the separation from the defender. The key coaching point: the back leg is not passive. It fires upward at the moment the front foot leaves the floor, adding height and body lean simultaneously.
5. Release High and Soft
The hand releases the ball at the top of the body's lean, not at the top of the jump. This is the most common mistake players make — they wait until they are at maximum height and the body lean has collapsed. The release should feel early and high, with the ball leaving the hand as the body continues its upward arc. The off-hand provides protection by staying between the ball and the defender's contest.
6. Use the Rim as a Shield
The back leg finish works best when the player aims for the high side of the backboard square — above and slightly behind the rim from the player's perspective. This keeps the ball out of a defender's straight-up contest and uses the rim structure as natural protection. On strong-side back leg finishes, kissing the ball off the top of the backboard square is higher percentage than going directly to the front of the rim.
Common Mistakes and How to Fix Them
Most players who struggle with the back leg finish make one of four errors. Each one has a direct fix that can be drilled in isolation before returning to full-speed attempts.
Rushing the Gather
This is the most frequent error at every level. The player panics as the defender closes, initiates the gather too late and too fast, and arrives at the rim moving laterally with no room for the back leg plant. Fix: use a "gather cone" drill where a cone is placed two full strides from the rim. Players must gather before they reach the cone. Repetition at half-speed, then three-quarter speed, before adding a defender.
Passive Back Leg
Players frequently plant the back leg but do not fire it. The leg stays on the floor and the player leans horizontally rather than going up. This produces a low, floating release that is easy to block. Fix: use a vertical jump marker on the wall — tape a piece of paper at the top of the player's reach. They must touch it on every back leg finish rep. If the leg fires correctly, they will reach it. If they lean without jumping, they will not.
Early Release Hand
Players trained on power finishes sometimes release too early on the back leg finish, sending the ball flat before the body lean generates its full angle. Fix: coach the cue "wait for the lean" — the ball should not leave the hand until the body has already begun tilting toward the basket. Have players shadow the motion without a ball first, identifying the feeling of the lean before adding the release.
Wrong Approach Angle
Players who drive laterally instead of downhill will find the back leg finish nearly impossible — there is no room for the plant and the release angle is off. Fix: go back to driving mechanics. Passers step east or west; drivers step north. The driver's first step must attack the defender's lead foot directly. If that first step is right, the approach angle to the rim corrects itself.
Drills to Build the Skill
Three drills build the back leg finish progressively, from isolated footwork to live-defense repetitions.
Gather-and-Plant Drill (No Ball)
Players walk through the gather and plant ten times with no ball, left side and right side. The coach checks: gather initiation location, back leg plant width, and whether the back leg fires on takeoff. This is five minutes of practice time that pays back all season. Once the footwork pattern is automatic, add the ball at walk speed, then jog speed.
Cone Series Drill (Ball, No Defense)
Place three cones: one at the three-point line on the wing, one at the elbow, one two strides from the rim. Players dribble from cone to cone, gather at the third cone, and execute the back leg finish at one-quarter speed. The cone forces the gather at the correct location. Increase speed incrementally over two weeks. Both sides of the floor, both hands.
2-on-1 Finish Series (Live Defense)
Two offensive players, one defender in the paint. The offensive player with the ball drives; the defender closes late. The driver must read the defender's position and choose: power finish (defender out of position) or back leg finish (defender cutting off the straight angle). The second offensive player occupies the weak side but cannot receive a pass — this keeps the driver committed to finishing through the help. Run four to six minutes at the start of any ballhandling practice block.
Train the rim-finish family — regular, opposite-hand, power, reverse, floater, Euro step — and choose by the help. Use the rim as a shield; finish through contact.
— Finishing & Footwork concept, Basketball Vault
Introduce the back leg finish only after your players have demonstrated a clean two-foot jump stop gather on both sides of the floor. Players who skip the footwork foundation will revert to old habits under defensive pressure, and the move will disappear from their game exactly when they need it most.
How It Fits Into a Finish Menu
No player should rely on a single finish at the rim. The back leg finish is one option in a full finishing menu that should include the standard right-hand layup, the left-hand layup, the power (two-foot) finish, the reverse, and the floater or runner. Each finish has a situation where it outperforms the others. Teaching players which finish to choose — based on what the defense gives — is as important as teaching the finish itself.
The back leg finish occupies a specific slot: strong-side drives where the help defender has taken away the power finish angle but the player still has enough floor to gather and plant. It pairs naturally with the floater on weak-side drives and the reverse when the player has beaten the help and found the back side of the rim available. Together these three finishes — back leg, floater, reverse — cover the majority of contested situations a guard or wing will face at the rim in a well-organized defense.
DeVillibis' three-move curriculum principle applies here too: do not give players all five finishes at once. Introduce the back leg finish after they own the power finish. Give them two to three weeks of reps before adding the next option. Players who are handed a full menu at once master none of it. Depth of ownership on two or three finishes is worth far more than shallow exposure to six.
Once a player owns the back leg finish, the defense must respect it, and that respect opens up the standard power finish again. The two moves feed each other. A player who only has the power finish is predictable; a player who can go either way forces the help defender to guess, and guessing defenders are late defenders. That half-second of hesitation is all the margin a good finisher needs.
- Gather two strides out, not one. Initiating the gather too close to the rim leaves no room for the back leg plant and collapses the finish into a rushed floater with no body control.
- Fire the back leg — do not just plant it. The leg must actively push upward at the moment of release; a passive plant produces a horizontal lean with a low, blockable release angle.
- Drive north, not east or west. The approach angle is the single biggest predictor of whether the finish will work — a lateral drive removes the floor space and the angle needed for the back leg to function correctly.
- Use the top of the backboard square as the target. Aiming above and behind the rim protects the ball from a straight-up contest and gives the release its softest angle into the cylinder.
- Rep both sides before adding defense. The back leg finish must be wired in on both the left and right side before live reps — defenders will attack the weaker side immediately, and players revert to old habits under pressure.
Want more basketball coaching strategies and drills?
See it drawn up
Related diagrams


Keep Building
Related breakdowns
How to Do a Steve Nash Back Leg Finish in Basketball
How to Do a Steve Nash Back Leg Finish in Basketball
Providence Friars: Transition Offense Back Screen Diagonal Screen Play
Providence Friars: Transition Offense Back Screen Diagonal Screen Play