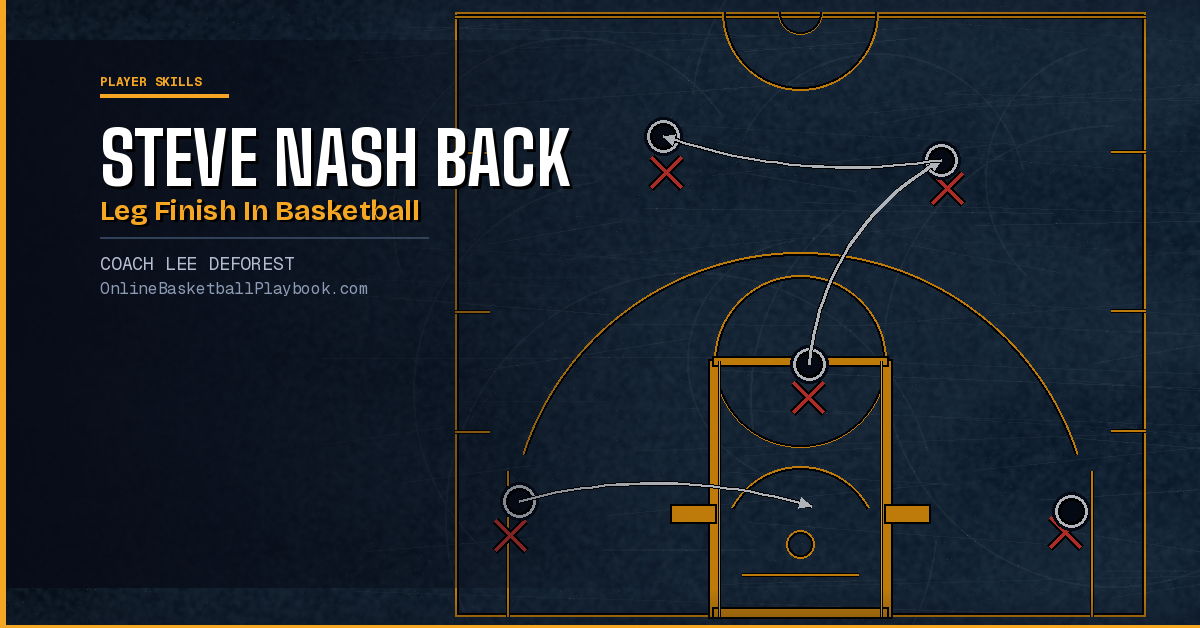

How to Do a Steve Nash Back Leg Finish in Basketball
Steve Nash was listed at 6'3" and spent his career finishing over big men. His secret was footwork — specifically a back leg finish that used body position, not height, to get the ball over shot-blockers at the rim.
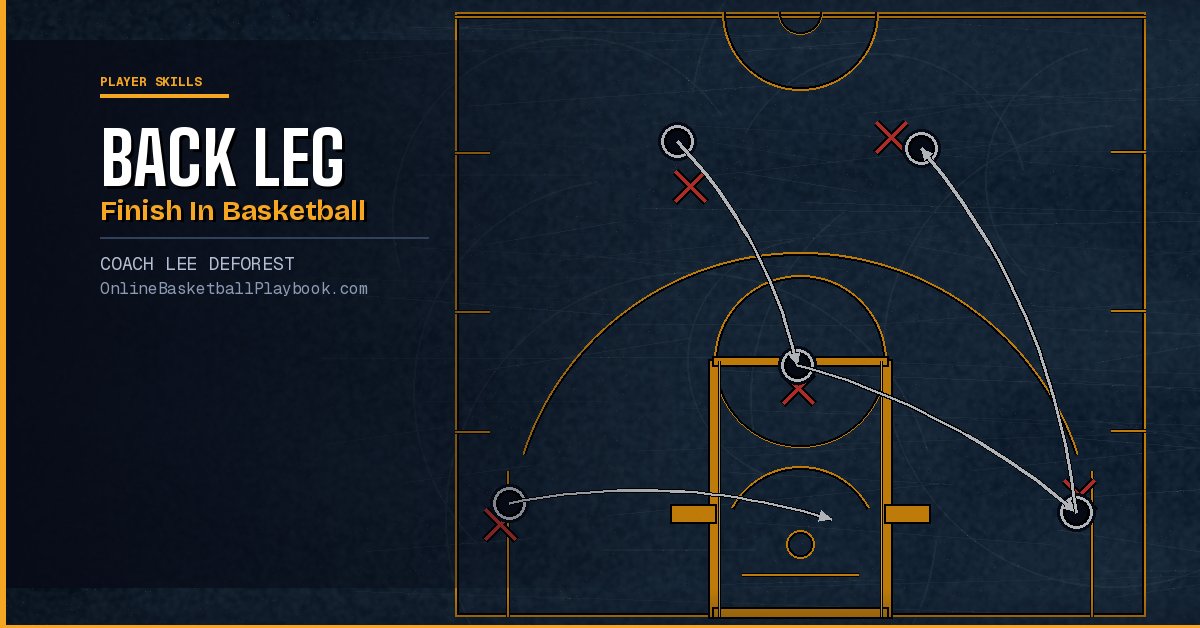
What Is the Back Leg Finish?
The back leg finish is a layup technique where the shooter extends the back leg — the trail leg, the one farther from the basket — downward and behind the body at the moment of release. This creates two simultaneous effects: it shifts the hips under the ball for more upward launch angle, and it positions the body so the ball travels toward the rim on a steeper arc, making it harder for a shot-blocker to reach across and reject it cleanly.
Nash used this constantly in pick-and-roll situations. He would use a ball screen to get a step on the big man, attack the paint at an angle, and then instead of leaping straight up — where his shorter frame would lose — he would extend that back leg low and behind him. The result was a shot that climbed at a sharper angle, crested higher above the backboard plane, and came down softly into the cylinder. Defenders who were three inches taller often couldn't stop it because the ball was traveling upward through space they weren't defending.
This is not a trick. It is a structured finishing technique that any guard or wing can learn with deliberate footwork training. What made Nash different was not that he invented the move — it is a known technique in the finish menu — but that he drilled it until it was automatic at game speed, in traffic, off multiple angles of attack.
Why It Works Against Bigger Defenders
Finishing against length is a body-control problem, not a strength problem. A taller defender has reach advantage when the ball travels on a flat arc — the kind of arc you get when you gather and jump straight up beside a big. The back leg finish changes the geometry. By dropping the trail leg, the player shifts their center of gravity backward slightly at the moment of release. The arm travels on a more vertical path. The ball leaves the hand on a steeper upward angle.
Defenders who rotate late to contest are usually arriving from the side or behind. A steep arc means the ball is already above the defender's highest reach point before they can get their hand on it. This is why Nash finished effectively against shot-blockers who had six or seven inches on him — the ball was not in the space those defenders were contesting.
There is also a contact absorption element. When a defender does make body contact, the back leg acts as a counterbalance. Instead of getting knocked sideways and losing shooting angle, the player can absorb the contact through the hip and still direct the ball toward the rim. Nash earned free throws this way repeatedly — he was not just finishing, he was finishing through contact by using the trail leg as a stabilizer.
A finish menu — regular, opposite-hand, power, reverse, floater/runner, Euro step — chosen by reading the help defense; use the rim as a shield and finish through contact.
— Finishing & Footwork, Basketball Vault
The Footwork Breakdown Step by Step
Teaching the back leg finish starts with the gather. Most players rush the gather and land both feet close together, which eliminates the ability to extend the trail leg at all. The sequence has to be deliberate and slow before it becomes automatic at game speed.
Step 1 — Attack at an Angle, Not Straight to the Basket
The back leg finish is most effective when the player approaches the rim from a 45-degree angle, not a straight baseline or straight middle drive. Straight drives compress the body into the rim before there is time to extend the back leg properly. An angled approach gives the player room to use the rim as a shield and creates the lateral gap where the trail leg can drop without interference.
Step 2 — The Two-Count Gather
Use a two-count stride stop into the gather, not a jump stop. The inside foot (closer to the basket) hits first. The outside foot — the future trail leg — hits second, slightly behind and wider than the inside foot. This is the setup position. If both feet land simultaneously in a jump stop, the trail leg extension becomes awkward and the body is too upright at release.
Step 3 — Drive the Inside Knee Up
At the moment of jump, the inside knee drives upward. This is the same knee action as any layup — it creates vertical lift. The difference in the Nash finish is what the other leg does simultaneously.
Step 4 — Drop and Extend the Back Leg
As the inside knee rises, the trail leg drops, extends backward, and stays low. Do not kick it up — that telegraphs the move and disrupts balance. Drop it straight down and slightly back, as if you are trying to touch the floor behind you with your heel. The lower the trail leg, the steeper the body angle, and the steeper the shot arc. Players learning this for the first time often extend the trail leg only six inches. Over time it should extend eighteen to twenty-four inches for maximum effect.
Step 5 — Soft Wrist at Release
Because the body is angled rather than vertical at release, the wrist and fingers do extra work to direct the ball to the correct spot on the backboard or into the cylinder. The release should be soft — a guide rather than a push. Nash had exceptional touch because he trained his release at this awkward angle until the hand alignment was automatic.
How to Train It in Practice
This finish must be drilled at game speed in both directions before it is used in live play. A player who has only trained it going right will panic and revert to their default finish when forced left. Below is a progression that works for players at the high school level and above.
Phase 1 — Mikan Drill Variation
Run the Mikan drill but emphasize the trail leg extension on every repetition. Start slow. The goal in Phase 1 is not speed — it is feeling the trail leg drop on the correct side on every single finish. Do ten on the right, ten on the left, alternating. Coach watches only the trail leg. If it does not drop, the rep does not count.
Phase 2 — Angle Drives from the Elbow
Player starts at the elbow (the corner of the free throw line and lane line), takes two live dribbles toward the rim at a 45-degree angle, gathers in two counts, and finishes with the back leg drop. No defense. The focus is the approach angle and the gather sequence. Run it from both elbows. Ten reps each side per day until the gather is automatic.
Phase 3 — Contested Finishes with a Passive Defender
A defender stands inside the paint, raises one arm, and does not jump. The offensive player attacks, gathers, and finishes with the back leg technique. The raised arm is not trying to block — it is a visual reference. The player must learn to read where the defender's arm is and adjust the body angle so the ball travels above that raised hand. This teaches the situational awareness element that Nash executed at an elite level.
Phase 4 — Live Pick-and-Roll Finishing
Run a simple two-man pick-and-roll with a ball handler and a screener. A defender fights through the screen. The ball handler must use the back leg finish when they turn the corner and face a late-recovering big. This replicates the exact situation Nash spent fifteen NBA seasons exploiting.
Introduce the back leg finish only after a player has mastered the basic two-count stride stop. Players who skip the foundational gather mechanics and try to learn the trail leg drop on top of a sloppy gather will develop an unstable, inconsistent finish that falls apart under defensive pressure. Build the foundation before adding the technique layer.
Reading the Defense to Know When to Use It
The back leg finish is not the right tool every time a player enters the paint. Choosing it at the wrong moment — against a defender who is already under the rim, for example — produces a forced, off-balance attempt when a simple power layup would have scored more reliably. Part of the Nash genius was that he read the defense quickly and matched his finish choice to the specific defensive position he saw.
Use It When the Defender Is Arriving From the Side
A defender rotating from the weak side, moving laterally to contest, is the ideal back leg finish situation. They are not directly under the shot. They are trying to close out and get a hand on the ball as it rises. The steep arc of the back leg finish puts the ball out of their reach before they arrive.
Use It When You Have a Half-Step Lead on a Taller Big Man
If the ball handler turns the corner on a pick-and-roll and has a half-step lead on the big who is recovering, the back leg finish is the answer. Straight-up finishes give the big time to recover and contest from directly behind. The angled body position and steep arc let the smaller player score before the big can recover fully.
Avoid It When a Defender Is Already Set Under the Basket
Against a defender who is stationary, directly under the basket, with both hands up, the back leg finish loses its geometric advantage. In that situation, a power finish (two-foot gather, strong upward drive) or a reverse layup using the rim as a shield is the better read. Nash was a master of this distinction — he never forced the back leg finish when the paint was fully loaded.
Use It to Draw Fouls
When the defender is closing hard and contact is likely, the trail leg extension actually helps absorb contact and stay balanced through the finish. Referees often call the foul on a defender who makes contact with a player displaying obvious body control through the finish sequence. Nash averaged nearly eight free throw attempts per game during his peak seasons — a significant portion came from exactly this kind of controlled contact-finishing.
Common Mistakes and How to Fix Them
Coaches who teach this finish see a predictable set of errors, and almost all of them trace back to one of two root causes: rushing the gather, or kicking the trail leg instead of dropping it.
Mistake 1 — Jump Stop Instead of Stride Stop Gather
A player who gathers with both feet landing simultaneously cannot effectively drop the trail leg. Both legs are committed to the same landing moment. Fix: re-train the gather specifically. Use a cone drill where the player must always land inside foot first, then outside foot, before jumping. Make them feel the two-count rhythm in their body before adding any finish at all.
Mistake 2 — Kicking the Trail Leg Up and Back
This is the most common visual error. The player extends the trail leg upward, like a scorpion kick, instead of dropping it downward. The upward kick actually reduces the shot arc by forcing the body to lean forward to compensate. Fix: put tape on the floor twelve inches behind the player's gather position. The heel of the trail leg should move toward — not above — that tape mark.
Mistake 3 — Finishing Only from the Dominant Side
Players drill the back leg finish extensively going right and ignore going left. In games, defenders force the ball to the weak hand specifically because it breaks practiced finishing patterns. Fix: every repetition in practice is matched by an equal rep from the opposite direction. No exceptions. This applies to every finish in the menu, but especially to the back leg finish, which requires opposite-hand coordination.
Mistake 4 — Losing Shot Arc Because of Body Lean
If the player leans too far toward the basket during the trail leg drop, the body angle becomes nearly horizontal and the arc drops. The ball travels flat rather than steeply. Fix: the player's eyes should be looking up at the rim during the release, not looking at the floor. Keeping the eyes up naturally adjusts the body to the correct angle without over-coaching the specific degrees of lean.
- Two-count gather first, always: inside foot lands first, then the trail foot — never a simultaneous jump stop; this single habit creates the platform everything else depends on.
- Drop the trail leg down, not up: the heel moves toward the floor behind the body; if it goes up, the arc flattens and the finish falls apart under contact.
- Train both directions every session: match every right-side rep with a left-side rep — defenders in games will force the weak hand specifically to break this finish pattern.
- Attack at 45 degrees, not straight: angled drives create the space for the rim shield and the trail leg extension; straight drives compress the gather and eliminate the body-angle advantage.
- Soft wrist at release: the off-angle body position means the wrist guides the ball — any pushing motion sends it off the backboard wrong; train the touch separately in slow-motion reps before adding speed.
Want more basketball coaching strategies and drills?
See it drawn up
Related diagrams


Keep Building
Related breakdowns
Providence Friars: Transition Offense Back Screen Diagonal Screen Play
Providence Friars: Transition Offense Back Screen Diagonal Screen Play