
How to Defend the Pick and Roll
The pick and roll is the most common action in basketball. Every team runs it. Every defense must stop it. This guide breaks down the four main coverages — hedge, drop, switch, and blitz — and tells you exactly when to use each one.
Why the Pick and Roll Is So Hard to Guard
The pick and roll creates a two-on-two problem in a game of five-on-five. When the ball-handler uses a screen, two offensive players attack two defenders — and the other three offensive players are already stretching the defense in the gaps. The screener's defender is stuck: help too early and the screener rolls to an open layup; stay too deep and the ball-handler turns the corner for an easy mid-range look or drives straight to the rim.
What makes modern ball-screen offense so difficult is the combination of threats it presents simultaneously. A great point guard coming off a screen can shoot off the catch, pull up at the nail, or knife into the paint — all within one dribble. A skilled screener can slip before the screen is set, roll hard to the rim after contact, or pop out to the three-point line. That means the defense has to honor every read the offense is making, in real time, with no way to know which option is coming.
There is no perfect coverage. Every scheme has a counter. The best defensive teams pick a primary coverage based on their personnel and the offensive personnel they are facing, drill it relentlessly, and add wrinkles to take away the most dangerous counter. Understanding the strengths and weaknesses of each option is where building a pick-and-roll defense begins.
"High hedge → automatic slip to the basket."
— Pick-and-Roll Reads, Basketball Vault
That single principle — the offense exploits whatever the defense shows — is the lens you need to evaluate every coverage. The defense is not just reacting to the screen; the ball-handler is reading the defense and attacking its choice. Your scheme has to account for both the initial coverage and the response to being countered.
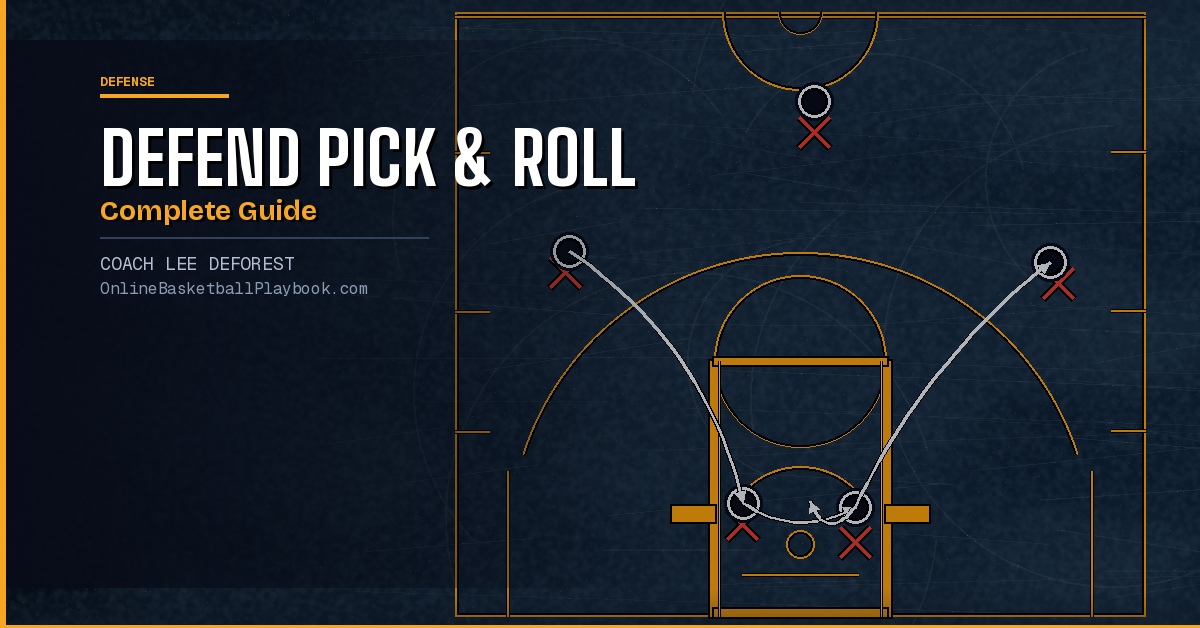
The Hedge (Show) Coverage
The hedge, sometimes called a show, is the traditional big-man response to a ball screen. When the screen is set, the big steps up hard above the level of the screen — out toward the three-point line — to cut off the ball-handler's path to the rim. The ball-handler's defender fights over the top of the screen and recovers. The big then drops back to pick up the rolling screener before the guard can get back.
Done correctly, the hedge takes away the drive. The ball-handler has to pick up the dribble or retreat, and in that moment the defense has time to reorganize. It works especially well against teams that want to score in the paint off the pick and roll, against smaller guards who are not great shooters off the bounce, and when your big is mobile enough to get out and get back.
The weakness is the automatic slip. Because the hedge is such an aggressive action, a smart screener will read it early and slip to the basket before the screen is even set. The big is out at the three-point line, the guard is stuck behind the screen, and the slipping screener catches the lob or gets a clean look at the rim. Teams with athletic screeners who can read the hedge — and bigs who know to look for it immediately — will punish an aggressive show coverage all night.
The other counter is the step-back jumper. A ball-handler who can read the hedge and pull up at the three-point line before the big closes out puts the big in a terrible spot: help too early and give up the drive, hedge out and give up the pull-up. Elite guards make this read and live at the nail all game.
Use the hedge when your big is mobile and can get back quickly, when the opposing ball-handler is a below-average pull-up shooter, and when the screener is not a slip threat. Avoid it against teams with an elite pick-and-pop big or a ball-handler who kills pull-up mid-range looks.
The Drop Coverage
The drop is the most popular pick-and-roll coverage in today's game at every level. Instead of hedging out to stop the ball-handler, the big drops back to protect the paint — staying at the level of the paint, or even below — while the guard fights over or under the screen depending on the shooter's threat level.
The logic behind the drop is simple: protect the rim first. The big does not chase the ball-handler, which eliminates the slip. The screener cannot roll to an open layup because the big is already there. Most teams run the drop because it protects against the drive and the roll at the same time, keeps the big in position to contest without fouling, and does not require elite athleticism to execute.
The counter is the mid-range pull-up or the three-point shot. When the big drops, the ball-handler has a clean look at the top of the key or elbow area. A point guard who is a great shooter off the dribble will take that jumper all game. Teams in the NBA started running drop coverage to stop Nikola Jokic and Karl-Anthony Towns from getting downhill — but then elite guards like Steph Curry and Damian Lillard punished them with the midrange.
The adjustment against a lethal pull-up shooter is to have the guard go over the screen — staying on the ball-handler's hip the entire way — while the big drops a hair higher. This is called an "over-drop." It gives up slightly more rim protection but takes away the open pull-up. Against a non-shooter, the guard can go under the screen, knowing the ball-handler is not a threat from beyond the arc.
Switching the Ball Screen
Switching eliminates the coverage problem entirely — at least in the first half-second. When the screen comes, both defenders simply swap assignments. The guard picks up the screener, the big picks up the ball-handler, and there is no coverage gap to exploit.
Switching works best when both players are approximately the same height, speed, and defensive skill level. When those conditions hold, a clean switch creates no mismatch and no gap. The offense gets nothing free. This is why small-ball lineups with four or five switchable players became so common — every ball screen results in a clean swap, and the offense has to create something from scratch in the halfcourt.
The problem is the mismatch. When a point guard screens for a center, the switch puts a center guarding a guard in space — and a point guard guarding a center in the post. Offenses attack this relentlessly. They run "mismatch hunting" sets specifically to get the switch and then isolate the mismatched defender. A point guard posting up a center for a quick score is a nightmare for switch-heavy defenses. And a center trying to stay in front of a quick guard on the perimeter is almost always a losing battle.
Switching also creates problems if help rotations are not sharp. On a switch, the guard who picks up the roll man must guard a player 50 to 100 pounds heavier than them in the paint. If the rotation is slow, that becomes a post-up or a lob. The best switching teams communicate early, jump the switch before contact, and have wings who can body up big men for a possession without fouling.
The Blitz (Trap) and How to Counter the Counter
The blitz — also called a trap or double-team on the ball screen — is the most aggressive pick-and-roll coverage. Both the guard's defender and the screener's defender attack the ball-handler at the point of the screen, creating a two-on-one trap. The goal is to force a turnover, a five-second call, or a rushed decision that leads to a bad pass.
When executed with good timing and sharp rotations, the blitz can completely disrupt a team's offensive rhythm. Ball-handlers who are not comfortable with pressure, teams that want to slow the game down and get into their sets, and opponents with a smaller bench that struggles to rotate into passes — all of these are good blitz targets. For a quarter or a half, the blitz can take a star ball-handler completely out of his comfort zone.
The counter, however, is built into the coverage. A blitz creates a four-on-three advantage for the offense everywhere on the court except where the two defenders are trapping. A composed ball-handler who throws the ball out of the blitz — back to a corner, ahead to a cutter, or skip to the weak side — puts the defense in rotation against a numbers advantage. Against a team with multiple shooters and good ball movement, the blitz can turn into an open three-pointer on every possession.
The key to defending the blitz counter is having defenders who can "stunt and recover" — step toward the ball on the skip pass to take away confidence, then close out to their own man before the offense can get a clean look. The two blitzing defenders must sprint back into the play the moment the pass is made. And critically, the player guarding the screener's man cannot cheat. If the opposite big or wing takes a step toward the trap early, the screener rolls to an empty paint. Every rotation must happen after the pass, not in anticipation of it.
Matching Coverage to Your Personnel
The single biggest mistake coaches make with pick-and-roll defense is choosing a coverage based on what they like philosophically rather than what their personnel can execute. Coverages are tools. The right tool depends on who is on the floor.
If your best player is a powerful, mobile big who can move his feet laterally and get back quickly — the hedge might be your primary coverage. If your bigs are rim protectors who are slow in space — the drop is a better fit. If you have five athletes who are all similar in size and skill — switching eliminates the problem at the source. If you are playing against a star ball-handler in a playoff game and you want to disrupt his rhythm — a quarter of blitz might be worth the rotation risk.
Personnel mismatches are also a factor. If the opposing team's best player is the screener, not the ball-handler, then the hedge — which briefly leaves the screener in space — is dangerous. If their point guard cannot shoot, the drop is perfect because you can go under the screen and take away any pull-up threat. If they have a great lob threat at the five, blitzing and leaving the roll man in space is suicidal.
The best defensive teams mix coverages within a game. They establish a primary scheme, then use a different look once or twice a quarter to take away the counter the offense is running on their base coverage. A team that hedges all night will see the slip all night. Show the drop for two straight possessions, then hedge the third — and the screener who was looking to slip will be caught flat-footed.
- Hedge: Use when your big is mobile and their guard cannot pull up. Watch for the automatic slip.
- Drop: Use to protect the rim and eliminate the roll. Guard must go over the screen vs. shooters.
- Switch: Use when personnel is switchable. Identify mismatch hunts before they happen.
- Blitz: Use to disrupt rhythm and create turnovers. Rotations must be instant or give up open threes.
- Mix coverages: Don't run the same look all game. Vary it to take away counters and force adjustments.
- Communicate early: Call the coverage before the screen is set — late calls lead to blown assignments.
Communication is the foundation of all of it. A coverage called late is a coverage that fails. Defenders need to talk before the screen is set — calling out "screen coming," identifying the coverage, and confirming who has the ball-handler and who has the screener. Teams that talk on every ball screen are harder to run the pick and roll against than teams that rely on physical tools alone. Effort and communication win more possessions than athleticism.
Finally, every pick-and-roll defense needs a clear rule for what happens on a kick-back to a corner shooter. The ball-handler throws it out of the coverage, and now there's a defender out of position and a shooter in the corner. Someone has to close out — who? That answer has to be drilled and automatic. The defense that breaks down most often does so not on the screen itself, but on the second pass after the screen. Practice your rotations on the kick-back as much as you practice the primary coverage.
Want more defensive breakdowns like this delivered to your inbox?
Join the Free Newsletter →See it drawn up
Related diagrams


Keep Building
Related breakdowns