
How to Attack Every Ball Screen Coverage
The ball screen is the most common action in basketball. Your offense only works if your players can read what the defense is showing and make the right decision — every single time the screen is set.
Why Ball Screen Reads Are the Foundation of Modern Offense
Every offense at every level — from a middle school motion system to an NBA pick-and-roll package — lives and dies by how well the ball-handler and screener read the defense after the screen is set. A perfectly executed screen that leads to the wrong decision is just a wasted possession. A poorly set screen that produces the right read can still generate a high-quality shot.
The reason ball screen reads matter so much is that the defense has multiple viable answers to a ball screen, and no single answer is perfect. A hard hedge leaves a gap in the middle. A drop gives up the pull-up jump shot. A switch creates mismatches. A blitz traps the ball-handler but leaves four defenders against four offensive players with momentum on their side. Each coverage has a crack, and the offense's job is to identify that crack in real time and exploit it.
This is why teaching reads — not just plays — is the backbone of a modern offensive system. When players understand the reads, they can execute correctly whether it's the play you drew up or a broken action that turned into a live ball screen two seconds into the possession. Understanding how to run motion offense concepts gives your players a framework for reading and reacting rather than following scripted routes that break down under defensive pressure.
The good news: there are really only a handful of coverage types your players need to learn. Master those, and every ball screen situation becomes manageable. This guide breaks each one down — what the defense is doing, what the offense sees, and what the correct read is.
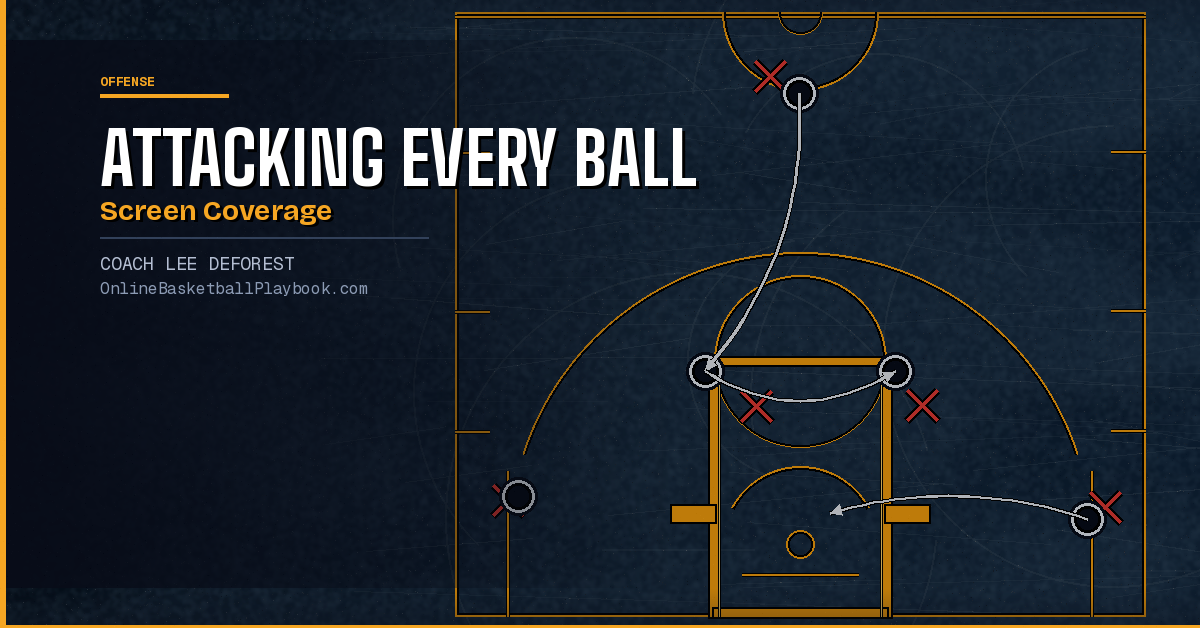
The Four Main Ball Screen Coverages
Defenses have developed several distinct approaches to stopping ball screens. Understanding each one is the first step toward attacking all of them.
The Hedge (or Show)
The hedge is when the screener's defender steps out hard into the ball-handler's path after the screen is set, buying time for the on-ball defender to fight over the screen and recover. The degree of the hedge varies — a soft show is a quick step out, while a hard hedge takes the big two or three steps into the lane to completely cut off the ball-handler's driving lane.
The hedge is popular because it eliminates the drive. But it has a glaring weakness: the screener's defender is now several feet from the screener and out of position. That is the offense's advantage to exploit.
The Drop
In a drop coverage, the screener's defender stays low — dropping back toward the paint — while the on-ball defender fights over the screen to stay connected to the ball-handler. The goal is to protect the rim and force the ball-handler to take a pull-up jump shot from mid-range or the free throw line area, which the defense is willing to give up.
Drop coverage is extremely common at every level today because most ball-handlers are not reliable mid-range shooters. If your guard can knock down that pull-up jumper consistently, drop coverage is the one that breaks down fastest.
The Switch
Switching is exactly what it sounds like — the two defenders simply swap assignments when the screen is set. No hedge, no drop, no chase. The screener's defender picks up the ball-handler, and the on-ball defender picks up the screener.
The switch eliminates confusion and effort. But it almost always creates a mismatch somewhere — either a smaller guard defending a big in the post, or a bigger defender chasing a guard on the perimeter. The offense's job is to identify and attack that mismatch immediately.
The Blitz (Trap)
A blitz sends both defenders — the on-ball defender and the screener's defender — to trap the ball-handler in the corner of the screen. Done correctly, it puts the ball-handler in a two-on-one situation and forces a quick decision. Done incorrectly, it leaves four defenders scrambling against a ball-moving offense that now has a four-on-three advantage.
The blitz is most often used as a change-up coverage against a dominant ball-handler. It rarely works as a base scheme because it requires flawless rotations from all five defenders.
Ball-Handler Reads by Coverage
The ball-handler's job is to read the coverage before and during the screen, then make the correct decision in the moment. Here is the specific read for each coverage type.
Attacking the Hedge
Against a hard hedge, the first instinct of many ball-handlers is to turn the corner and try to dribble around the hedging defender. That rarely works against an athletic big who is executing a true hard hedge. The correct read against a high hedge is to reject the screen or hit the roll man immediately.
When a big hedges hard and high, he has vacated the paint. The screener's roll to the rim is now an open lane — no one is home. The ball-handler's read: use the screen to drag the hedge out, then dump the ball immediately to the rolling screener before the defense can recover. That one read alone — recognizing the automatic roll against a hard hedge — turns one of the most common defensive coverages into one of the easiest buckets in the game.
If the ball-handler cannot get the pass to the roller, the next option is to pull back and attack the space left by the hedger once he recovers back to his man.
Attacking the Drop
Drop coverage concedes the pull-up jump shot. The read here is the most straightforward of all four: come off the screen with pace, use the screener's body to get the on-ball defender even slightly off balance or behind, and rise up for the mid-range or free-throw-line pull-up before the dropped defender can close out.
If the ball-handler is not a reliable pull-up shooter, the drop is still vulnerable to a direct downhill drive. The dropped big is protecting the rim, but if the ball-handler gets all the way to the front of the rim, the big is at a disadvantage. The key is pace — attack the drop at full speed, not a controlled trot.
Attacking the Switch
Against a switch, the ball-handler should recognize the switch as it happens, put on the brakes, and immediately look for the mismatch. Usually that means the screener — a bigger player — is now being defended by a smaller guard who switched onto him. The ball-handler does not need to attack; his job is to create and deliver. Pin the switching guard in the post, feed the screener, and clear out.
If the switch puts a big defender on the ball-handler (a smaller guard), that ball-handler should attack the big off the dribble immediately. Bigger defenders cannot keep pace with quick guards in space. Drive, get to the rim, or force the secondary rotation that opens a kick-out three.
Attacking the Blitz
The blitz is the coverage that looks the most dangerous but is actually the most exploitable for a ball-smart offense. When two defenders trap the ball-handler, four offensive players are matched against three defenders — and those three defenders are recovering from rotations, not set in their positions.
The read: get the ball out of the trap immediately. Do not try to dribble through or split the trap. Pick up the ball, find the nearest open player — often the corner — and fire a quick pass. Against a blitz, two quick passes almost always produce an open shot or a drive. The offense that ball-moves on a blitz is the offense that scores in transition numbers off a half-court set.
"Against a hard blitz, throw back to the corner and 'slice' to the rim."
— Basketball Vault
Screener Reads: Slip, Roll, and Pop
The ball-handler gets most of the attention in ball screen offense, but the screener's read is equally important. An unintelligent screener who rolls blindly every time is easy for a defense to account for. A screener who can slip, roll, or pop based on what the defense gives him is nearly impossible to guard.
The Slip
The slip is the screener's answer to an aggressive defender who is shading early to fight over the screen before it is even set. If the screener's defender hedges hard or tries to jump the action, the screener does not complete the screen — he cuts directly to the basket before contact, receiving the ball on the move for an easy layup or dunk.
The timing of the slip is critical. It should happen the moment the screener reads his defender committing to the hedge. A slip that comes too early tips off the defense; a slip that comes too late means the screener gets tangled in the screen action instead of cutting free.
Teaching the slip requires defenders in practice who actually hedge, which is why studying how defenses guard the pick and roll helps your offensive players understand exactly what to look for and when to slip.
The Roll
The roll is the default screener action against most coverages. After setting the screen, the screener pivots and rolls hard to the rim on the ball side — keeping his hips and shoulders square to the basket, hands up as a target, reading where the help defense is coming from.
The roll works best against hedges (where the paint is vacated) and drop coverages where the dropped big is caught between contesting the pull-up and protecting the roll. It requires the ball-handler to time the pass and the screener to finish with both hands through contact.
The Pop
When a screener is a reliable three-point shooter, the pop becomes a deadly counter. Instead of rolling to the rim, the screener pops back to the three-point line after setting the screen — usually the short corner or the wing — and receives a pass for an open look.
The pop is most effective against switch coverages, where a slow-footed big has switched onto the ball-handler and cannot close out to the popping shooter in time. It also works against any help defense that collapses on the roll — the pop replaces that collapsing defender with an open shooter on the perimeter.
Spacing and Corner Reads
Ball screen offense is a five-man read — not just a two-man game. The three players away from the ball screen action have their own reads, and those reads determine whether the ball-handler and screener have room to operate or whether the defense can pack the paint and take away every option.
The Corner Lift
The most important spacing read in ball screen offense is the corner lift. When a ball screen is set on one side of the floor, the ball-side corner player should read the defense and lift into the vacated space left by the screener's defender. This keeps the floor spaced and gives the ball-handler a release valve if the primary reads (roll, pop, or drive) are not available.
The corner lift is also a natural counter to drop coverage. If the dropped big collapses toward the roll, the corner player lifts into the mid-range area and becomes an open pull-up option that the defense has not accounted for.
Weakside Actions
On the weakside — away from the ball screen — two things need to happen simultaneously. First, weakside players must maintain proper spacing and not drift toward the ball, which would collapse the driving lane. Second, a weakside big should consider whether to stay lifted (to drag his defender up and keep the paint clear) or to duck in hard if the ball-side roll opens up secondary cuts.
The 5-out motion offense gives coaches the best floor spacing framework for ball screen reads, because every player on the floor starts at the three-point line and has a clear read based on where the ball and screener go. No one is crowding the paint before the action even develops.
Ball Reversal and Reset
Not every ball screen produces an immediate advantage. Sometimes the defense executes cleanly and the offense needs to reset. A quick ball reversal — swinging the ball to the opposite side of the floor — often resets defensive rotations and gives the offense a second chance to get into a fresh ball screen action with better angles. Teaching players to reverse quickly rather than forcing a second or third dribble into a collapsing defense is a critical habit for any ball screen system.
Many teams run ball screen actions but never teach the spacing reads away from the screen. If your corner players do not know to lift when the action comes their way, your ball-handler has one fewer viable option and the defense's job is dramatically easier. Spend as much practice time on off-ball reads as on the ball-handler's decision.
How to Teach Ball Screen Reads in Practice
Knowing the reads is one thing. Getting five players to execute them correctly in a game, under defensive pressure, in real time — that is the coaching challenge. Here is a progression that works from individual skill development up to five-on-five live reps.
Step 1: Walk-Through Read Drilling
Start with no defense. Walk the ball-handler and screener through each coverage scenario slowly. The coach calls out "hedge," "drop," "switch," or "blitz," and the two players make the correct read without any defensive resistance. This builds the vocabulary and the mental map before any physical reps happen.
Step 2: Two-on-Two with Live Defense
Add two defenders and run the ball screen two-on-two. The defense chooses their coverage — the offense must read it and execute. No other players are involved yet. This isolates the primary read and forces the ball-handler and screener to communicate and react without relying on spacing from teammates.
Step 3: Three-on-Three with Corner Player
Add the corner player and a third defender. Now the ball-handler has the corner lift as a third option. The defense can blitz, which forces the ball-handler to throw back to the corner. This rep introduces the spacing read without the complexity of a full-court five-on-five set.
Step 4: Five-on-Five Constraint Drill
Run five-on-five with a constraint: the defense must call their coverage out loud before the screen is set. This allows the offense to work on execution under live pressure while still building the habit of identifying coverage before making decisions. Once execution is clean, remove the verbal call and let the offense read in real time.
Working these reads into a regular basketball practice plan — even 10 minutes of focused two-on-two and three-on-three reps — produces significant improvement over just running five-on-five scrimmages and hoping players figure it out.
Step 5: Film Study
Pull three or four clips from your own game film. Find possessions where the ball screen coverage was clear but your players made the wrong read. Show the clip, pause it at the moment of the screen, ask the players what the defense was doing, and then show what should have happened. Film study accelerates the read development by connecting the mental framework to real game situations your players have already experienced.
- Hedge → automatic roll: when the big steps out hard, the paint is empty — dump to the roller immediately before recovery.
- Drop → pull-up or downhill drive: come off the screen with pace and rise up before the dropped defender can close out; if you're a driver, attack the rim at full speed.
- Switch → find the mismatch: stop, identify which player is mismatched, and attack or feed that player within two seconds of the switch.
- Blitz → two passes: get out of the trap fast, reverse to the corner, and keep moving the ball; two quick passes beats every blitz rotation.
- High hedge on the screener → slip early: if the screener's defender is shading to hedge before the screen is set, slip to the basket before contact and catch the ball in stride.
- Corner player: when the ball screen comes to your side, lift into the vacated space — do not stand and watch; stay available as the release valve.
- Reset when nothing is there: quick ball reversal resets rotations and gives the offense a fresh angle — never force a second or third dribble into a collapsing defense.
Ball screen offense rewards players who read first and act second. The fastest path to improvement is not adding more actions — it is getting better at reading the handful of coverages defenses actually use and executing the correct counter every time. Build that habit in practice, reinforce it with film, and your ball screen efficiency will improve regardless of your personnel.
For players who want to sharpen the individual skills that make these reads executable — footwork off screens, handle under pressure, and finishing at the rim — the work done in basketball footwork drills directly supports the on-court decisions this guide covers.
Get free play diagrams, drills, and coaching guides delivered weekly.
See it drawn up
Related diagrams


Keep Building
Related breakdowns

Drop Coverage in Basketball Ball Screen Defense
Drop Coverage in Basketball Ball Screen Defense