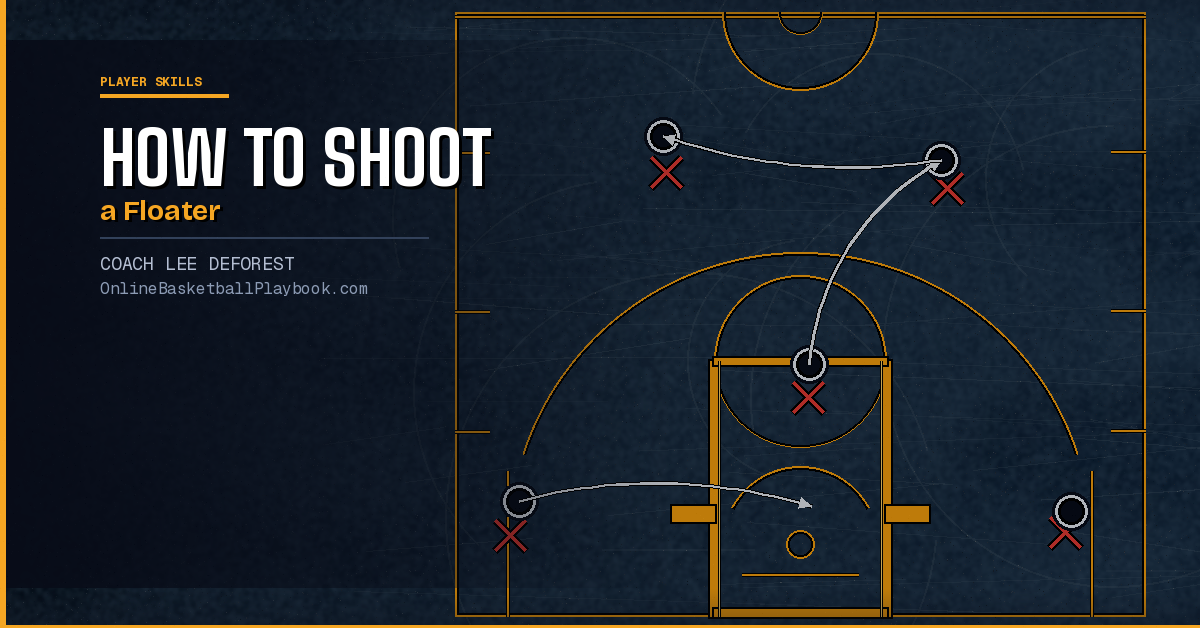

How to Shoot a Floater in Basketball
The floater is a soft, high-arching shot released near the foul line that sails over shot-blockers. Guards who master it become near-impossible to stop in the lane — it fills the gap between a layup and a pull-up jumper.
What Is a Floater?
A floater — sometimes called a runner or tear-drop — is a one-handed shot released on the rise, typically between the foul line and the painted area. The ball is launched with a soft, high arc that peaks well above the shot-blocker's reach before dropping into the basket. Unlike a standard layup, the shooter does not continue under the hoop; unlike a pull-up jump shot, the feet rarely fully leave the floor together. The result is a shot that lives in a dead zone for defenders: too far to contest from under the hoop, too quick to close out from the perimeter.
The floater became prominent in the NBA as smaller guards found themselves driving into paint crowded by elite rim protectors. Players like Tony Parker, Stephen Curry, and Ja Morant built complete offensive arsenals around the shot precisely because it neutralizes height and length. At the high school and college level the same logic applies: the moment a guard draws the big defender off the block, a well-timed floater converts a difficult situation into two points.
Understanding basketball shooting form is the foundation of the floater — the same wrist snap, finger-tip release, and follow-through principles apply, adjusted for a one-handed action at speed. Players who have not yet dialed in basic shooting mechanics will find the floater inconsistent, so the two skills develop in parallel.
When to Use the Floater
Knowing when to use the floater separates players who practice it from players who deploy it effectively in games. The shot is most valuable in four specific situations.
1. Paint penetration with help defense collapsing. When a guard beats his primary defender off the dribble and a big rotates to protect the rim, the floater is the answer. The big must choose: jump and leave his man, or stay and concede the shot. A guard who has logged reps on the floater thrives in this read. This connects directly to dribble penetration reads and is why modern motion offense in basketball places so much emphasis on guard-big spacing — the floater is the payoff shot when space collapses.
2. The two-man game on the pick-and-roll. After using a ball screen, the guard often has a brief window in the lane before the roll man's defender rotates. A floater released quickly in that window beats both the original big and the rotating helper. Players who study pick-and-roll defense from the defensive side will immediately recognize how the floater exploits the coverage gaps — it's the offensive counter to every drop coverage scheme in the game today.
3. Transition attack before secondary defenders set. On the fast break, a floater off one or two dribbles can beat a retreating big to the spot. The shot rewards players who push pace and read the floor ahead of them rather than sprinting through to a layup a defender has a step on.
4. Late in shot clocks when a full driving lane closes. Rather than forcing a contested layup or pulling back for a longer shot, the floater gives guards a reliable bail-out option in traffic. It is shorter than a mid-range pull-up but more reliable in tight windows than a contact layup.
Footwork and Mechanics
The footwork of the floater is what separates it from a hasty, off-balance shot in traffic. Every detail matters because the action happens quickly and in a confined space.
The Gather Step
From a dribble drive, the gather step is the moment the player picks up the ball and begins loading into the shot. The gather should happen early enough that the player is not reaching or leaning. Most players gather off the second-to-last dribble, letting the final step become a controlled, purposeful movement rather than a scramble. Rushing the gather produces flat shots with no arc.
One-Foot vs. Two-Foot Launch
The floater can be released off one foot or two. Off one foot — the more common version — the player takes a long gather step and releases at the peak of a slight hop off the inside foot. This generates rhythm and allows the shooter to extend under the defender's angle. Off two feet, the player takes a jump-stop and launches from a more stationary base. The two-foot version sacrifices some flow but improves balance for players still developing the shot.
Regardless of which version you use, the inside foot (the foot closer to the basket on the side you're finishing) is almost always the plant foot. A right-handed floater going right plants off the right foot; a left-handed floater going left plants off the left foot. This keeps the body angled correctly and protects the shot from the help defender.
Body Angle and Shooting Pocket
The shooter's hip and shoulder should be angled slightly toward the basket, not square to the sideline. The ball comes up from the dribble into a one-handed shooting pocket — elbow in, ball on the fingertips, guide hand lightly on the side. Getting the ball into that position cleanly during a live drive is a skill unto itself, which is why the shot requires dedicated repetition separate from general ball-handling work. Strong basketball footwork drills that emphasize gather mechanics and body control under pressure will accelerate this development.
"Train the rim-finish family — regular, opposite-hand, power, reverse, floater/runner, Euro step — and choose by the help."
— Basketball Vault
The Release and Touch
The release of a floater is fundamentally different from a standard jump shot. The goal is maximum arc with a soft touch — the ball should barely feel like it's been thrown. Understanding how to produce that sensation deliberately is the key to building a reliable floater.
Wrist and Finger Action
At the release point, the wrist snaps forward sharply while the fingers push through the ball with an upward, rolling motion rather than a forward push. Think of tossing the ball straight up at a steep angle rather than flicking it toward the hoop on a flatter trajectory. This wrist snap produces back spin, which softens the ball's contact with the rim and glass, giving the shot more margin for error on slightly off-target attempts.
Release Point Height
The floater is released at a higher point relative to the body than most other shots — often as high as the shooter can extend one-handed while still maintaining control. A higher release point accomplishes two things: it gets the ball over the outstretched arm of a bigger defender, and it naturally creates a steeper arc that drops into the basket at a favorable angle. Players who release too early (at chest level) find their floaters blocked; players who release late (after the momentum dies) find their shots flat and short.
The Arc Angle
Target a shot arc of roughly 45-55 degrees from horizontal. Below 45 degrees the ball enters the rim at a severe angle and requires extraordinary accuracy. Above 55 degrees the ball drifts on windy outdoor courts and loses consistency at speed. A good coaching cue: the ball should arc higher than the top of the backboard on shots taken near the elbow or closer. Watch slow-motion footage of elite floater shooters and you will notice the ball often climbs nearly to the shotclock stanchion before descending.
Landing and Follow-Through
After the release, land balanced on both feet and hold the follow-through — fingertips pointed at the basket, wrist fully snapped. The follow-through cue matters because it disciplines the release. Players who drop their hand immediately after shooting tend to rush the shot and produce poor arc. The landing should be inside the painted area, not in the lane where a defender might draw a charge call.
Drills to Develop Your Floater
The floater is a feel shot. It cannot be coached purely through cues — players have to log reps at game speed until the mechanics become automatic. The following progression builds the shot systematically.
Drill 1: Stationary One-Handed Arc Reps
Stand at the second hash mark on the lane line, about eight feet from the basket. Hold the ball in a one-handed shooting pocket with no guide hand. Shoot ten consecutive floaters focusing only on arc and wrist action. No footwork, no movement. Count how many have the right arc angle. Repeat until you hit eight or more with consistent arc. Switch sides.
Drill 2: One-Dribble Pull-Up Floater
Start at the wing, take one hard dribble toward the elbow, gather, and release a floater at the near block. This drill isolates the gather-to-release sequence. Focus on getting the ball into the shooting pocket cleanly off the single dribble. Add a second dribble once the one-dribble version is comfortable. Take twenty reps on each side daily.
Drill 3: Mikan-to-Floater Combo
Run a standard Mikan drill — alternating layups on each side — but on every third rep, stop short of the hoop and release a floater instead. This forces the player to adjust mid-approach, mimicking the in-game decision to float rather than lay up when a defender closes. It sharpens the read and reaction aspect of the shot.
Drill 4: Live Drive with a Tag
A coach or partner stands at the elbow with a raised hand, providing a "tag" — a raised arm the player must shoot over. The player drives from the wing, reads the tag, and releases a floater. This is the closest practice simulation to the real defensive challenge. It also trains the player to adjust release angle based on the defender's position. Incorporate this into your basketball practice plan two or three times per week for accelerated development.
Drill 5: Pick-and-Roll Floater
Set up a two-man game with a screener. The ball handler uses the screen, reads a simulated drop coverage by the screener's defender, and pulls up for a floater in the lane. This situational drill embeds the shot into a game-realistic context. The goal is to make the floater feel like a natural read off the pick-and-roll, not a fallback option.
Floater development plateaus quickly when players only shoot it in half-speed walk-through settings. The shot requires approach speed to produce the correct gather and release timing — always rep it at close to full game speed, even when isolating specific mechanics.
Common Mistakes and How to Fix Them
Players who work on the floater consistently still fall into predictable errors. Identifying and correcting these early prevents them from becoming ingrained habits.
Mistake 1: Flat Arc
The most common mistake. Players push the ball toward the basket rather than up, producing a low-arc floater that hangs in the shot-blocker's zone and rarely converts cleanly off the rim. Fix: return to stationary arc reps and consciously aim the ball at a spot on the ceiling above the basket, not at the rim itself. The mental target should be higher than the physical target.
Mistake 2: Releasing Too Late
Waiting until momentum has stopped before releasing produces a heaving motion rather than a flowing one. The shot should be released while the body is still rising or at the peak of the gather step. Fix: mark the release trigger as "ball at forehead height while still moving forward" — that cue places the release at the correct moment in the motion.
Mistake 3: Using Two Hands Through the Motion
Bringing both hands to the ball and releasing with two-handed force turns the floater into a push shot with no feel. Fix: practice getting into a one-handed pocket immediately on the gather. The guide hand can touch the ball on the way up but must leave before the release. Isolate this by doing the stationary drill with the guide hand held behind the back.
Mistake 4: Wrong Foot Plant
Planting on the outside foot (away from the basket) rotates the body open and makes a controlled one-handed release nearly impossible. Fix: call out "inside foot" as a verbal cue during live drills. Film the footwork from the front angle so players can see their own plant foot clearly.
Mistake 5: Not Reading the Defense
Committing to the floater before reading where the help defender is coming from leads to contested shots that could have been avoided with a simple kick-out pass. The floater is the correct read when the big is directly in the lane and a pass is not available — not a default action on every drive. Players with high basketball IQ development learn to trigger the floater based on the defender's position, not out of habit.
- Inside foot plant: always plant the foot closest to the basket for a controlled one-handed release and proper body angle.
- Gather early: pick the ball up one dribble before you think you need to — late gathers produce rushed, off-balance shots.
- Release at peak momentum: shoot while still moving upward through the gather, not after momentum has stopped.
- Arc beats accuracy: a high-arc floater with a soft touch is more forgiving than a flat accurate one — train arc first, then placement.
- Wrist snap straight up: think "push the ball toward the ceiling" rather than "push the ball toward the rim" — the angle takes care of itself.
- Read then shoot: check where the rim protector is before committing — the floater is a defensive read, not a default drive-finish.
Get free play diagrams, drills, and coaching guides delivered weekly.
See it drawn up
Related diagrams


Keep Building
Related breakdowns