
What Is a Triangle and 2 Defense
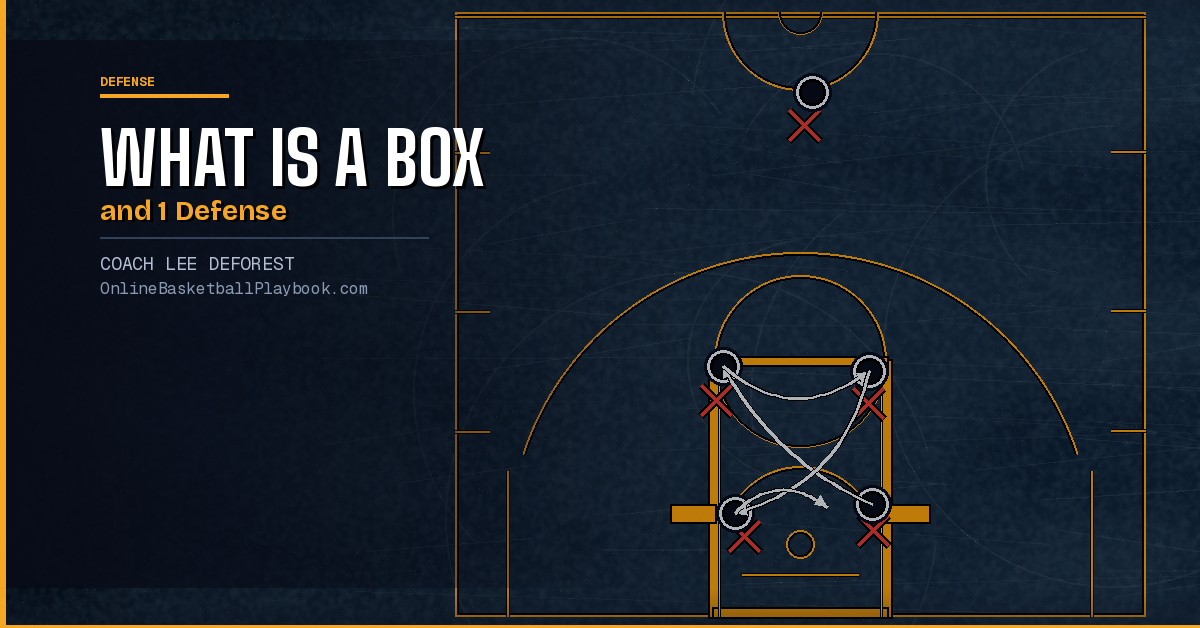
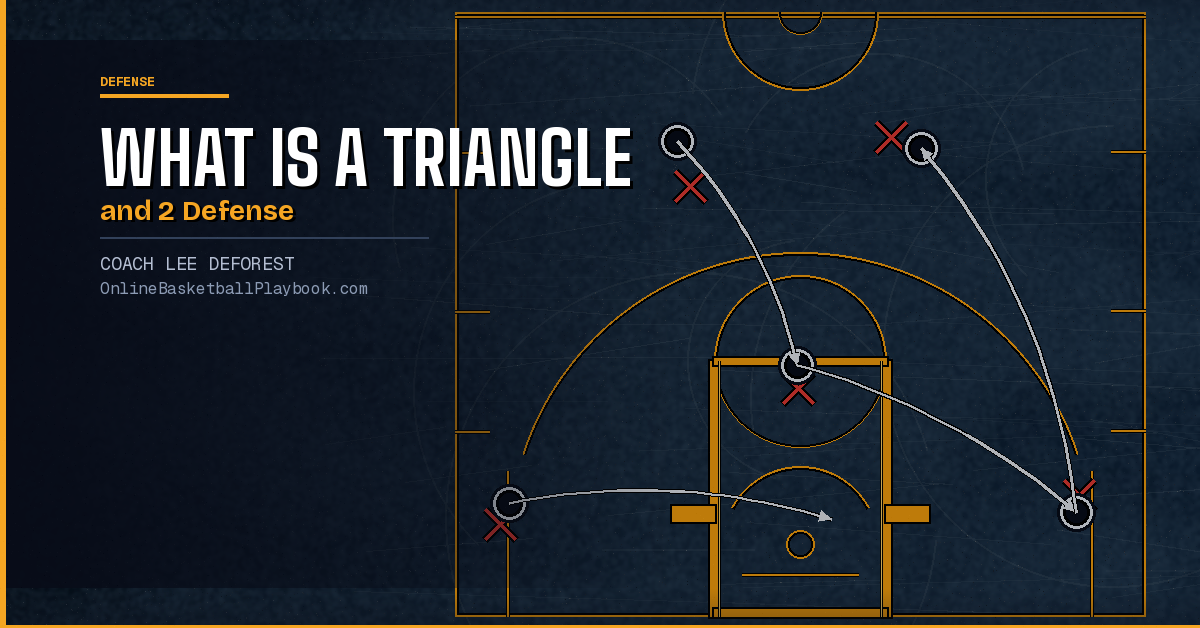
The triangle and 2 is a hybrid junk defense that assigns two chasers to man-to-man coverage on an opponent's two best scorers while the remaining three defenders form a zone triangle. It is a game-plan weapon, not a base defense.
Definition and Core Concept
The triangle and 2 belongs to a family of defenses coaches often call "junk defenses" — hybrid combinations of man-to-man and zone principles that are tailored to a specific opponent rather than deployed as an everyday system. The defining feature of the triangle and 2 is its purpose: neutralize two identified offensive threats simultaneously through man-to-man denial while protecting the rest of the court with a compact three-man zone.
Unlike the 2-3 zone defense, which covers the floor with balanced assignments, the triangle and 2 is an intentional imbalance. You are accepting vulnerability in certain areas of the floor — typically the perimeter — in exchange for the ability to completely shadow two players who, if left alone, would dictate the outcome of the game. The bet you are making as a coach is that the other three opponents are not capable of beating you consistently from those open spots.
The name comes directly from the shape each unit takes on the floor. Two defenders trail their assigned opponents everywhere — man-to-man, full-denial, no zone rotations. The other three defenders set up in a triangle: one at the top of the paint near the free throw line and one on each low block. This triangle is the safety net that prevents easy interior baskets when the chasers are occupied following screens or fighting through traffic.
Used correctly, the triangle and 2 can completely disrupt an offensive system built around two reliable scorers. Used incorrectly — or against the wrong opponent — it can break down in the first two minutes and leave your team scrambling to communicate across mismatched coverages for the rest of the half.
Personnel and Structural Setup
Before running a triangle and 2, you need to clearly assess your roster because the defense demands specific qualities from each group of players.
The Two Chasers
Your two man-to-man defenders must be capable of playing exhausting, full-court denial for extended stretches. They will fight through screens, sprint across the paint, contest every catch, and stay disciplined when the player they are guarding baits them into foul trouble. These are your most physically capable and mentally composed defenders. Size alone is not sufficient — quickness, anticipation, and the ability to stay locked in without help are what matter.
The Triangle
The three players forming the zone triangle need strong communication and zone instincts. The top defender of the triangle — often called the point of the triangle — is positioned around the free throw line and must be active enough to contest high-post catches, help on drives from the wing, and recover quickly. The two low defenders anchor the blocks and must front or contest any post entry that comes near their area while also being ready to rotate to the short corner if the ball swings to the baseline.
If your three zone defenders lack communication or are slow to rotate, the triangle breaks down into chaos. The help defense principles your team has built all year transfer directly into how the triangle zone functions — players who already understand help positioning will learn the triangle assignments faster.
Starting Alignment
At the start of each possession, the two chasers find their assigned players immediately — before the ball is inbounded if possible. The three zone defenders set the triangle with the top player at the free throw line extended toward the ball side and the two low players locked onto the blocks. As the ball moves, the triangle shifts and rotates toward the ball, maintaining its basic shape while staying compact enough to protect paint touches.
The Two Chasers: Keys to Execution
The chasers are the engine of the triangle and 2. Their assignment is straightforward on paper — deny your player the ball — but demanding in practice. Here is what each chaser must understand and execute consistently.
Full Denial, Not Soft Coverage
A chaser's job is total denial. The goal is not to contest shots after a catch — it is to prevent the catch from happening in the first place. Chasers must stay in the passing lane at all times, with a hand in the passing lane and active feet to cut off every attempted cut to the ball. When their player sets a screen for a teammate, the chaser fights through that screen immediately rather than switching — switching would hand the assignment to a zone defender who is not prepared to stay with a moving scorer.
Chaser Rotation
No single defender can maintain this intensity for 32 minutes. Coaches must build in a rotation system — ideally 2 to 3 players trained to serve as chasers for each opponent — and rotate them in deliberate substitution windows. A fatigued chaser is worse than no chaser at all; they will either foul from desperation or simply get beaten on back cuts and curls without the energy to recover.
Handling Screens
Off-ball screens are the primary tool offenses use to free their two best players. The chaser must go over every screen set on their player — not under, not switching, over. Going under surrenders the catch; switching opens the door for a mismatch. This means the chaser will sometimes get slowed down by a hard screen and temporarily lose their player. When that happens, the triangle zone must shrink until the chaser recovers — zone defenders cannot leave gaps by gambling for steals while a chaser is fighting a screen.
Communication with the Triangle
Chasers and zone defenders must talk constantly. When a chaser's player enters the paint, the low triangle defender on that side calls out the coverage so the chaser does not crash into a zone player going for the same ball. Clear calls — "switch," "I got ball," "help" — are what keep the two units from colliding into each other on interior possessions.
"Deploy when the opponent's offense is built around one or two identifiable scorers and removing those players from rhythm will disrupt the entire attack."
— Basketball Vault
The Triangle Zone: Responsibilities and Rotations
The three defenders forming the zone triangle are not passive. Their rotations must be sharp, their communication must be consistent, and their positioning must shift in real time as the ball moves around the perimeter.
Top Defender
The top of the triangle sits at the free throw line and serves as the first line of defense against any high-post entry. When the ball is on the wing, the top defender shades toward ball side to contest any entry pass into the elbow. When the ball is reversed, the top defender shifts across to re-establish ball-side positioning. This defender also closes out on skip passes to the top of the key when neither chaser is positioned to cover that area.
Low Defenders
The two low defenders own the paint from block to block. They front or contest any post catches, rotate to help when drives penetrate the lane, and cover the short corner when the ball reaches the baseline. Against a team running a motion offense, these two low defenders will see the most action because cutters and screeners from the non-chased opponents will work through the paint looking for cracks in the zone.
Ball Rotation Principles
The triangle rotates like a zone — toward the ball. When the ball is on the left wing, the triangle tilts left: the top defender cheats left, the left low defender rises slightly toward the block, and the right low defender tucks toward the lane. When the ball moves to the right side, the triangle shifts right. The goal is to never leave the basket exposed while still covering the primary passing angles into the post.
When to Deploy the Triangle and 2
The triangle and 2 is a situational weapon. Using it at the wrong moment or against the wrong opponent will hurt you more than help you. Here is how to think through the decision.
The Right Opponent Profile
The ideal opponent for a triangle and 2 has two dominant scorers who account for a large share of the team's total offense — ideally 50% or more of their points combined — and three remaining players who are inconsistent or limited from distance. When those conditions exist, the triangle and 2 removes the primary offensive engine while leaving the secondary players to beat you, which is an acceptable tradeoff.
If the opponent has three or more reliable scorers, the math breaks down. You can only chase two players, and the third scorer becomes completely open. That is not a game-plan weapon; that is a gift to their offense.
Moments Within a Game
Many coaches deploy the triangle and 2 as a change-up rather than a primary defense for an entire game. Common use cases include: starting the second quarter to disrupt a rhythm the opponent has found, opening the fourth quarter when you need a defensive stop to protect a lead, or using a timeout to switch into it after a big scoring run. The element of surprise is real — if the opponent has been executing their offense smoothly against your man-to-man, suddenly seeing two players get denied everywhere while three defenders form a zone forces a pause and forces quick thinking from their point guard.
Pairing with Your Base Defense
The triangle and 2 works best as an addition to a strong base defense, not a replacement for one. Teams that have poor man-to-man defense fundamentals will struggle to run the chaser assignments with any consistency because the chasers are essentially playing intense man defense for extended possessions. Build your base defense first, drill the principles, and then layer the triangle and 2 as a change-up that your players understand deeply rather than scrambling through every time it comes up.
Before installing a triangle and 2 for a specific opponent, coaches must identify the two targets through film work, confirm their usage rates and shot charts, and verify that the remaining three players are not reliable perimeter shooters. Skipping this step and running the defense on feel is how you hand opponents wide-open corner threes for 28 minutes.
Weaknesses and How Offenses Attack It
Every defense has a weakness, and the triangle and 2 is no exception. Understanding what the offense will try to do is what allows you to prepare your players for the moments the defense gets stressed.
Perimeter Shooting by Role Players
The triangle only has three defenders protecting five spots on the floor. With two chasers occupied trailing their players, any wing or corner three from the remaining three offensive players is going to be a long close-out sprint for the zone. If those role players are shooting 36% or better from three, the triangle and 2 will bleed points on the perimeter even while holding the two stars in check. This is the primary reason you must do the scouting work on the full roster before committing to this defense.
High-Low Actions
Offenses that run high-low post combinations — one player at the elbow, one on the block — will stress the triangle's top and low defenders simultaneously. If the top defender helps on the high post, the low entry opens. If the low defender commits to the block, the elbow is unguarded. Good post teams will find this crack quickly and exploit it through patient ball movement. Defending high-low requires the top defender to stay disciplined and not over-commit while the low defender stays connected to the block.
Using the Stars as Screeners
Smart offenses will use their two best players — the ones being chased — as screeners rather than primary scorers. A star setting a back screen for a cutter forces the chaser to navigate the screen while the cutter attacks the basket into the zone. The triangle must be prepared to help on any backdoor or slip action when chasers get caught on screens.
Tempo Attacks
The triangle and 2 is vulnerable in transition. When two chasers are sprinting to find their assignments after a made basket or a rebound, the zone is not yet set, and a fast-breaking offense can get into the paint before the defense organizes. This is why transition defense rules must be clearly defined for both chasers and zone players — who gets back first, who is responsible for the paint in the first two seconds.
Teaching and Drilling the Triangle and 2
Installing the triangle and 2 into a team's defensive system requires dedicated practice time and a sequenced approach. Trying to throw it in the night before a game rarely works at the youth or high school level.
Walk-Through and Film
Start with film. Show your players exactly why you are running this defense — identify the two targets, show clips of how they score, and explain what disrupting their rhythm will do to the opponent's offense. Players execute defensive schemes with more intensity when they understand the why behind the decision.
Next, walk through the alignment at half speed on the floor. Place defenders, explain positions, and run slow dummy possessions with no defensive pressure so that everyone understands where they belong before the defense gets tested at game speed.
Chaser Drills
The chasers need repetitions fighting through screens specifically. You can drill this in a one-on-one or two-on-one format where a designated screener sets picks for the offensive player while the chaser practices going over, staying in the passing lane, and recovering quickly when the screen temporarily knocks them off position. These reps are more valuable than any walk-through because the physical demand of fighting screens cannot be simulated by talking about it.
Incorporating this into your shell drill work is an efficient way to build both the zone rotation habits and the denial skills in the same practice block. Run shell drill for the triangle three, then add two live chasers and see how the units communicate under pressure.
Zone Rotation Repetitions
The three triangle defenders need rapid-fire ball-movement repetitions — wing to corner to top to opposite wing — with a coach or manager moving the ball while the three defenders rotate, call out their assignments, and work to maintain the triangle shape. Add offensive pressure gradually. Once the rotations are automatic at half speed, accelerate the pace and add cutters who are not chased to simulate the offensive role players moving to open spots.
Full-Team Scrimmage
Once both units are functional separately, put the whole defense together in a controlled scrimmage. Designate two offensive players as the "stars" and assign your two best chaser candidates to them. Let the offense run for five possessions, then rotate the chaser assignments to the next pair. Doing this in practice forces players who may never have served as a chaser to understand the demands of the role — which builds empathy and communication across the group even when those players are in the zone three during a game.
Tracking your defensive performance in these scrimmages is a valuable part of building basketball IQ in your players — when they see the data showing that the two stars scored fewer points per possession against the triangle and 2, they develop confidence in the scheme that carries into game situations.
- Identify the two targets through film before installing this defense — do not run it on feel
- Chasers go OVER every screen; never under, never switch to a zone player
- Rotate 2-3 chaser candidates to prevent fatigue from breaking down denial intensity
- Triangle shifts toward ball on every pass — the zone is never static
- If opponents' role players shoot better than 35% from three, scout a different game plan
- Use the triangle and 2 as a change-up, not a base defense — surprise is part of its value
- Drill transition defense specifically: chasers must sprint back and find their assignments before the zone sets
Get free play diagrams, drills, and coaching guides delivered weekly.
See it drawn up
Related diagrams


Keep Building
Related breakdowns