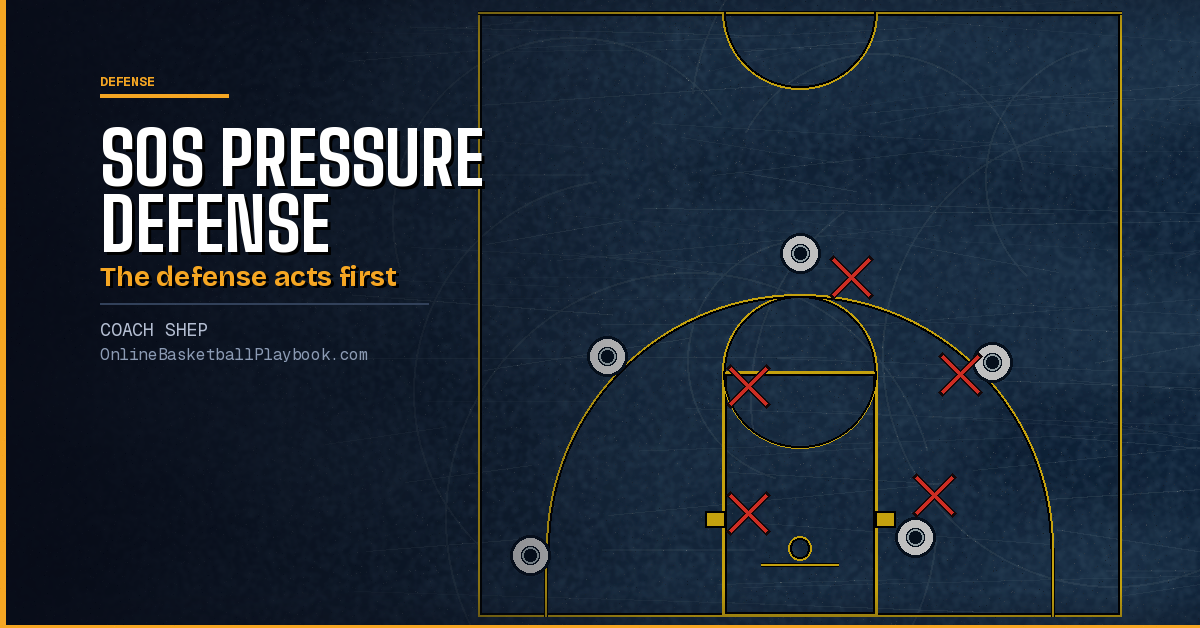
In pressure defense basketball, the defense acts first. It starts the action, attacks the offense and sets the tempo, so the offense has to react. SOS is one full pressure man-to-man system built on that idea. It steers the ball to set checkpoints, denies the first pass, holds weak-side help in fixed shapes, switches screens on contact and traps by rule, and on top of those half-court rules it adds its own full-court and mid-court presses. This page covers what the system asks of each defender, the rules on the ball, one pass away and in help, the presses that grow out of it, what it takes away and gives up, who it fits, and how other pressure man versions compare. It sits under types of defense in basketball in the defense section.
What Pressure Defense Basketball Asks of Each Defender
The system publishes six keys, used as a checklist: teach from simple to complex, one shared vocabulary, steer the ball to checkpoints, switching as the default, pressure that starts in the backcourt, and one clear role for every defender. One version frames the list as a diagnostic, a way to reinforce a defense that works or to rebuild one that does not. The adoption rule in another version is that a solid defense borrows single tactics from the system, and a weak one installs the whole thing.
The system's own pages do not spell the letters out. They present the key words as the memory aid: each one starts with S, O or S so coach and player share one language.
On the Ball: Set, On, Smother

- Set, while the ball is live and the dribble is unused: a semi-flexed stance with the nose on the chest, wide toe-to-heel feet and a constant patter step.
- On, once the dribble starts: a full backward slide at an arm's distance that grows or shrinks with the dribbler's speed, quick short slides, and a sprint to recover if beaten.
- Smother, once the dribble is picked up: feet just outside the shooter's, both arms fully up, hands moving to block his vision.
The hands differ by version. Version 1: one hand traces the ball and the other works the passing lane at eye level. Version 2: the outside foot and hand back, the inside hand at mid-section. The stance work underneath both is on defensive stance.
One Pass Away: Snuggle and Off
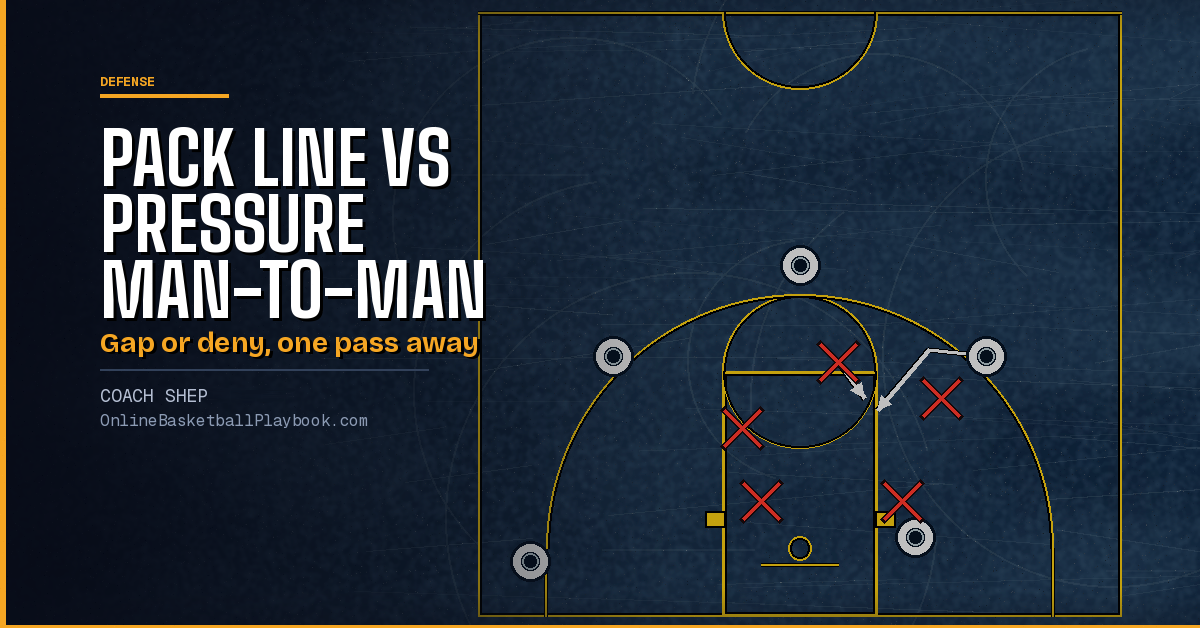
Snuggle is the denial one pass away: a low, bent-knee stance with the rear foot about 12 inches behind the man to stop the back cut. Both versions give that 12-inch cue. In Version 1 one arm sits at shoulder height in the lane and the other at the man's hip, and the stance reverses if the defender is beaten backdoor. Version 2 adds the nose at his chest and the inside arm in the lane.
Off covers the give-and-go: step one stride off the cutter, jump to the ball, then snuggle to deny the return pass all the way to the basket.
Help Side: Strike and the Helpside I
Strike is the weak-side helper's stance, pointing at ball and man about halfway between them and an arm's length below that line. He has five jobs: deny a cut into the paint, cover a lob to the post, take a charge, block a layup and box out. If the ball reverses to his man, he closes out to Set.
The weak side lines up in an "I." The versions:
- Version 1, by offensive count. A double I, low and high, when three offensive players are on the ball side, and a triple I when two are.
- Version 2, by post location. A double I with the post on the ball side, a triple I with the post on the weak side.
- Version 3, two weak-side defenders. The low I protects the rim, denies the lob, fronts the post on a baseline dribble and denies the high-post cut. The high I closes out on the skip pass and denies wing cutters.
Rotations start as the ball leaves the passer's hand, not on the catch. The near player rule sends the closest defender to the nearest open man on anything unscripted. The general rotation rules are on help defense principles and the closeout on closeout and recover.
Checkpoints and the Red Zone

The checkpoints are spots 18 feet or more from the hoop. On the wing, the defender pushes below the block toward the baseline and protects the middle drive. At the top of the key, he protects the elbows and pushes toward a corner. The Red Zone is the width of the lane running the length of the floor, and a defender beaten toward the middle turns the dribbler back. One version's line is that nothing good happens on middle penetration.
Box pressure follows: push the ball to a checkpoint, hold the helpside I and deny the reversal pass. One version compares it to herding a rabbit into a corner instead of chasing it, and calls reversal the defense's most vulnerable moment because every defender changes roles at once.
Screens, Posts and Traps
Contact switching is the default. The call is Screen, Over, Switch: the screener's defender calls "Screen," hedges one stride into the cutter's path, and the two trade men. One version gives five reasons to switch rather than show and recover: better denial of cutters, no hesitation, a broken screening rhythm, fewer fouls, and turnovers that become transition points. It admits purists still debate it. Any mismatch gets an automatic trap.
Which screens get switched, by version. Version 1 switches down and back screens off the ball and applies a high-low rule on baseline screens: switch if the cutter goes low, do not if he goes high. Version 2 switches back, down and lateral post screens and never switches a slip, only calls it. Version 3 switches every screen, including handoffs, and splits ball screens by location.
Ball screens: switch above the line, trap below it. Both versions split side screens at the free-throw line extended. Above it they switch on contact. Below it the post defender leaves early and traps before the screen is set.

Front the post. One version fronts every deep post-up with a slip front: on a wing pass the snuggle becomes a full front with the outside hand up. The other fronts the post or traps the corner on a corner drive, by team quickness.
The triangle on every trap. Two defenders trap and the other three form a triangle to read the pass out.

The ball-screen menu this switching rule sits in is on pick and roll defense.
Get the next coaching guide in your inbox
One email when a new guide or diagram set goes up. Free.
The Presses That Grow Out of It
Pressure starts at the outlet. The instant the rebound is secured, the defense denies the first outlet and pushes the ball to a checkpoint. One version's three words are smother, find, release: the defender nearest the rebounder smothers with hands high, the one nearest the point guard finds and delays him, and once the outlet is made the ball is pressured up a sideline.
Shadow. After an inbound, the defender who guarded the inbounder sprints to a spot 8 to 10 feet behind the on-ball defender. He has three reads: trap, hold (fake the trap and release), or switch, a run-and-jump surprise. Another version plays three defenders 12 feet above their men to steal the long pass, with a floating fourth.

Face, Lock and Blitz. Face fronts the guards after made free throws so the inbounder must throw over. Lock pre-traps the main handler before the inbound. Blitz denies the inbound and traps the first catch deep, and a Blitz Hold looks the same until the catch, then plays straight half-court pressure.
Red. Short-burst mid-court traps to change tempo or take the ball from a strong penetrating guard: pressure to the frontcourt sideline, a second defender traps, the other three form the triangle, and the coach sets the finish ahead of time.
The stated purposes for pressing are turnovers and rushed shots, making the offense go 94 feet, longer passing lanes, a disrupted tempo, the ball out of the main handler's hands, and a changed game plan. Two off-switches end it: the shadow defender is late, or the offense completes a deep or middle outlet. Then the team plays half-court pressure. More presses: best full court press and how to coach the run and jump press.
What It Takes Away and Gives Up
- Takes away: the first pass, the middle of the floor and the reversal, and with them the offense's tempo.
- Gives up: the risk of a big switched onto a small. One version says the screener slides down and posts the smaller defender, which is why NBA teams usually show and recover instead. This system answers with the automatic trap, which needs sharp rotations.
- Breaks when: the team rotates on the catch instead of the pass, lets the ball reverse or get to the middle, or switches a slipped screen.
Who It Fits
The system describes five defenders with clear roles working like clockwork as an equalizer for a team outmatched in offensive talent. The system adds one caution: add the full court and transition only after the half-court rules are mastered. A related pressure version adds that early results are slow and the defense is at its best late in the season.
Other Pressure Man Versions
Every man-to-man system settles the same forks, and pressure man versions settle them differently from the pack.
| Rule | Pressure man versions | Pack Line |
|---|---|---|
| One pass away | Deny: body in the lane, or snuggle denial | In the gap, no perimeter denial |
| Where the ball goes | Outside, to the corners or a checkpoint 18 feet or more out | Middle, into the help, never baseline |
| Screens | Over the top inside the arc, or switch | Fight through everything, no switching |
| Risk the owners name | The backdoor and the lob, accepted as pressure releases | An open catch on the wing, and it fails without great ball pressure |
Pressure without traps or with them is its own split. Frank Martin pressures the ball from half court with no traps and keeps his hands off the handler. Bob Huggins traps into a four on three scramble. Jay Wright's Villanova plays ball-you-man and treats a blitz or switch as a calculated risk taken on set triggers. Mike Krzyzewski's 1988 rules contest passes one pass away and stop the reversal, and he treats the backdoor as a pressure release. The full comparison is on pack line vs pressure man to man.
Drills
The system teaches from one on one up to five on five, two on two in between, with short daily reinforcement drills once a skill is learned. One baseline-drive progression from a related pressure version runs double closeouts one on one, helpside support three on three, then a four on four shell. Drill write-ups: basketball defense drills, the shell drill and building up man-to-man defense.
Questions Coaches Ask
What is pressure defense in basketball?
A defense that acts first: it pressures the ball, denies the first pass and steers the offense to spots it chooses, so the offense has to react instead of running its plays.
What does SOS stand for in basketball defense?
The system's pages present it as a memory aid rather than an acronym: the key words Set, On, Smother, Snuggle, Off, Strike and Screen, Over, Switch each start with S, O or S.
Does SOS pressure defense switch screens?
Yes, on contact, by default. Ball screens are switched above the free-throw line extended and trapped below it.
Is pressure man to man good for youth teams?
Two press guides point younger teams to plain man-to-man pressure: one with no trap gambles, the other ruling out trapping zone presses.
Want every diagram, printable?
OBP Pro members get the full diagram files for every alignment, coverage and action on this page, ready for a practice binder or a scouting report. $9 a month. Or draw your own version free in the play drawer.
See what OBP Pro includesMore Core Coaching Guides
- What Is Spacing in Basketball? Distances, Gaps and Alignments
- Pick and Roll Defense: Every Ball Screen Coverage Compared
- Dribble Handoff: Types, Reads, Counters and How to Defend It
- Lock Left Defense: Force Direction, Rules and Help Rotations
Back to Types of Defense and every Defense page.
Keep Building
Related breakdowns
Pack Line vs Pressure Man-to-Man
Both pressure the ball. They split on the defender one pass away, and that one choice decides drives, backdoors, screens and fouls.
Jim Boeheim 2-3 Zone System and Coaching Philosophy
Jim Boeheim 2-3 Zone System and Coaching Philosophy