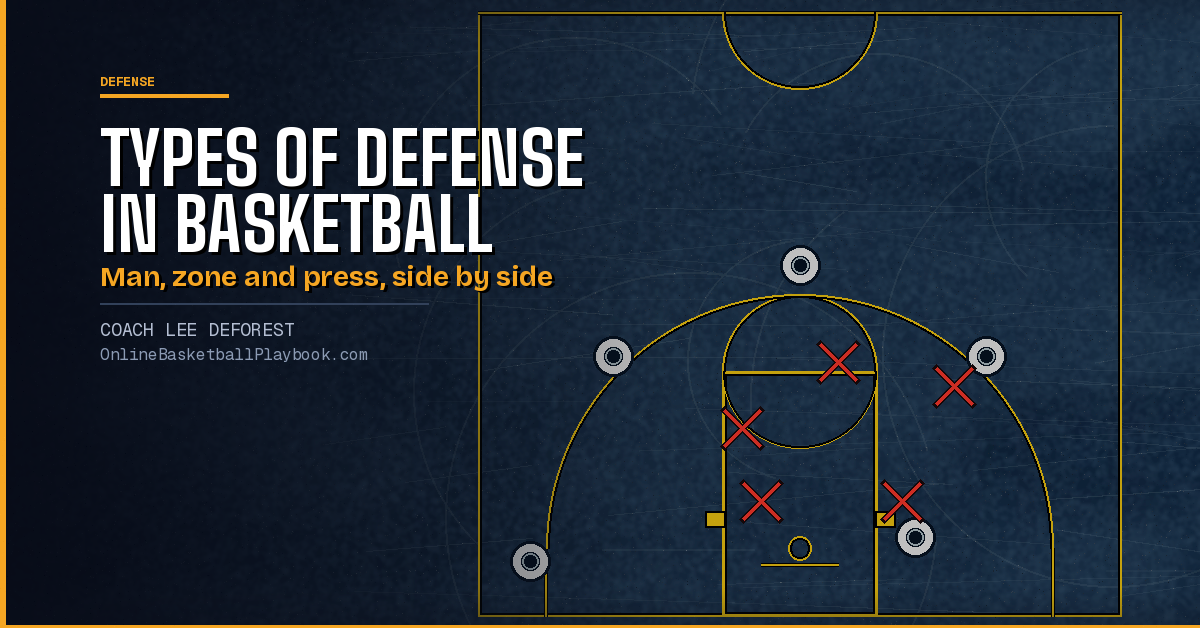
Every one of the types of defense in basketball makes a trade. It protects one part of the floor and gives up another. This page lays out the main defenses a coach can run, grouped into three families: man-to-man, zone and press. Each entry says what the defense takes away, what it concedes, and what kind of team it fits. Where good coaches teach the same situation two different ways, both ways sit next to each other so you can choose.
Use it as a map. Each section links to the full breakdown for that defense and to the side-by-side pages that compare two of them head to head.
The Three Families
Man-to-man gives every defender a player. Where he stands depends on how far his player is from the ball. The variations differ in one main thing: how hard the defenders one pass away fight the next catch.
Zone gives every defender an area. The whole defense slides on each pass. The variations differ in shape: how many defenders start at the top, how many start near the rim, and which spot on the floor the shape leaves thin.
Press extends the defense past half court. The variations differ in where the defense picks up the ball, whether it traps, and how many defenders stay back to protect the rim.
The same habits run through all three. Move while the pass is in the air, not after the catch. Keep the ball out of the middle of the floor. Talk before the action happens. A team that does those three things can play almost any shape below. Many coaches say zone should come only after man is solid, because a zone is man-to-man habits applied to areas.
Man-to-Man Variations
Full detail: Man-to-Man Defense: The Complete Coaching Guide and Help Defense Principles.
Pressure and denial man
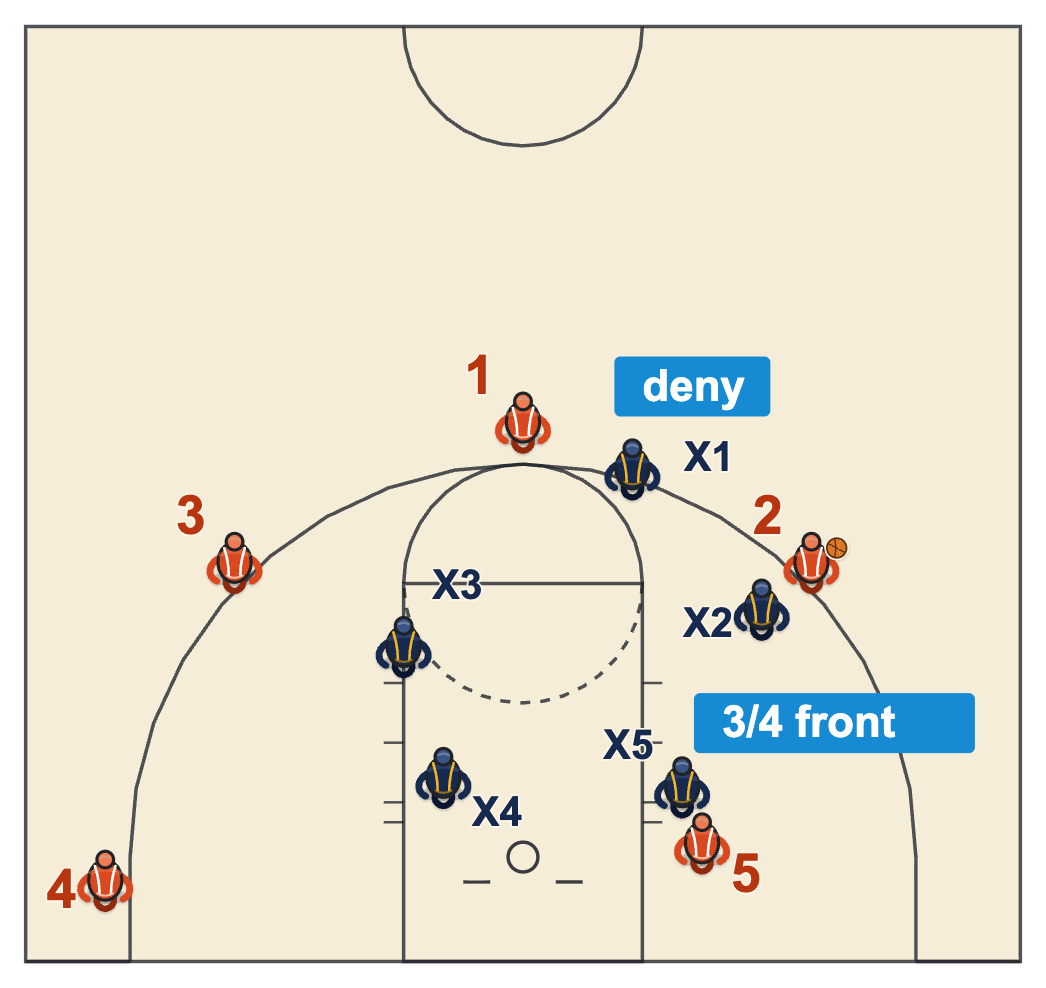
The defender one pass away stands up the line, a hand and a foot in the passing lane, and fights the catch. Defenders two passes away keep one foot in the lane. Defenders three passes away have both feet in the lane. The goal is to make every pass harder and push the offense farther from the basket than it wants to start.
Gives up: the backdoor cut. Any denial invites it, so the help side has to be in place to take the lob or the bounce pass. Fits: quick, well-conditioned teams that can recover.
Pack line (gap defense)
Only the ball is pressured. Every other defender keeps both feet inside an imaginary line about a step inside the three-point arc. They sit in the gaps and nobody denies. The ball is forced toward the middle, where the help already waits, and never along the baseline, where there is no help. Pack Line is the best known name for this idea. Full detail: How to Coach the Pack-Line Defense.
Gives up: the open catch on the perimeter, and a hard closeout on every swing. Fits: teams that cannot out-athlete the opponent but can talk and play the ball tough. It only works with a defender on the ball who can keep his man in front.
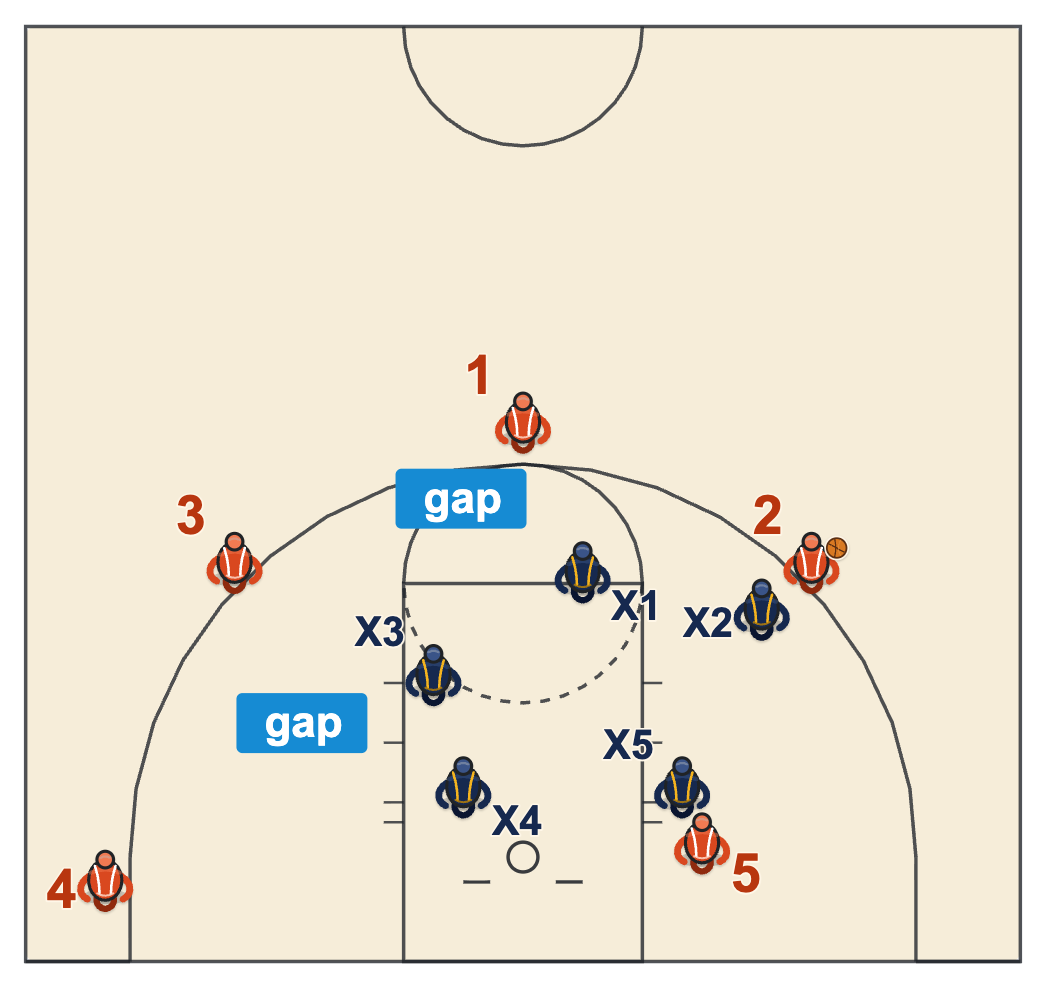
The full head-to-head, with the drive and the backdoor drawn out, is on Pack Line vs Pressure Man-to-Man.
Sagging man
A looser form of gap defense. Off-ball defenders sag well off their players to clog the lane and stop penetration, and do not extend past the range the opponent can actually shoot from. It is a low-foul style. It is also the easiest man defense to shoot over, so it is a scouting choice against poor shooters more than an identity.
Switching man
Some systems make switching the default on screens. The argument is that a rule removes hesitation, and hesitation is what gets defenders beat. Others fight through every screen and never switch. A middle path switches only between players of similar size and keeps the center out of switches. See Defending Screens and How to Defend the Pick and Roll.
Half-court man vs full-court man
Half-court man picks up at or near half court and builds the wall around the paint. Full-court man picks up after the basket and guards the ball the length of the floor. A common version never traps. It pressures every dribble, then everyone sprints back to the paint once the ball crosses half court. That makes it the half-court rules stretched over 94 feet, with no gambling. It costs conditioning, and it pays off against a guard who is not comfortable with the ball.
After a missed shot or a turnover, the fastest full-court man rule is simple: guard whoever was guarding you on the other end, then sort back to normal matchups once the ball is in the half court.
Where Man-to-Man Coaches Split
Four choices separate one man-to-man from another. None of them has a single right answer.
Deny one pass away
Fight the catch. Help comes from farther away. Expect backdoor cuts and teach the help side to take them.
Sit in the gap
Let the catch happen. Help is already in place. Expect catch-and-shoot chances and teach hard, short closeouts.
Force baseline
Keep the ball on one side, use the baseline as a defender, and trap or help from the low side. Suits quick teams.
Force middle
Send the drive into the help. Fewer fouls and fewer rotations along the baseline. Pack line teams never give up baseline.
Fight through screens
Stay with your player and never switch. Keeps matchups clean. Needs defenders who can get over the top.
Switch screens
Switching is the default, so nobody hesitates. Needs players who can guard more than one position.
Front the post
Take the entry pass away before it happens. Needs weak-side help ready for the lob.
Play behind or three-quarters
Concede the catch outside the post box, then wall up. Better for keeping rebounding position.
A fair middle answer on the first choice: deny or sit depending on the opponent. Deny the wing against a team that shoots from the wing or feeds the post from there. Against a point guard who lives on penetration, let the wing catch and take away the return pass.
Get the next side-by-side in your inbox
One email when a new comparison or diagram set goes up. Free.
Zone Variations
Every zone is named for its rows, front to back. Here is what each shape protects and what it leaves thin. The ranked comparison with personnel notes is on Best Zone Defense for Your Team.
2-3 zone
Two at the top, three across the back. It protects the paint and the rim and walls off a strong inside player. The soft spots are the high post, the short corner and the corners. It is the most common zone at every level. Full detail: 2-3 Zone Defense.
3-2 zone
Three at the top, two back. The middle defender up top sits at the free-throw line and takes away the high post. The wings deny the passes to the wing. It suits opponents who cannot shoot from the top and feed the high post. The weak spots are the corners and dribble penetration, because only two defenders start on the back line. A team that runs a 1-2-2 press can drop straight into a 3-2 in the half court with the same positions. Full detail: 3-2 Zone Defense. Head to head: 2-3 Zone vs 3-2 Zone.
1-3-1 zone
One at the point, three across the middle, one runner on the baseline. It is the most aggressive of the common zones. It traps the corners, denies the reversal pass and forces the offense into awkward angles. It gets more steals than a 2-3 and also gives up more open layups when a trap is broken. The baseline defender covers both corners and has to be the best talker on the floor. Full detail: 1-3-1 Zone Defense.
1-2-2 zone
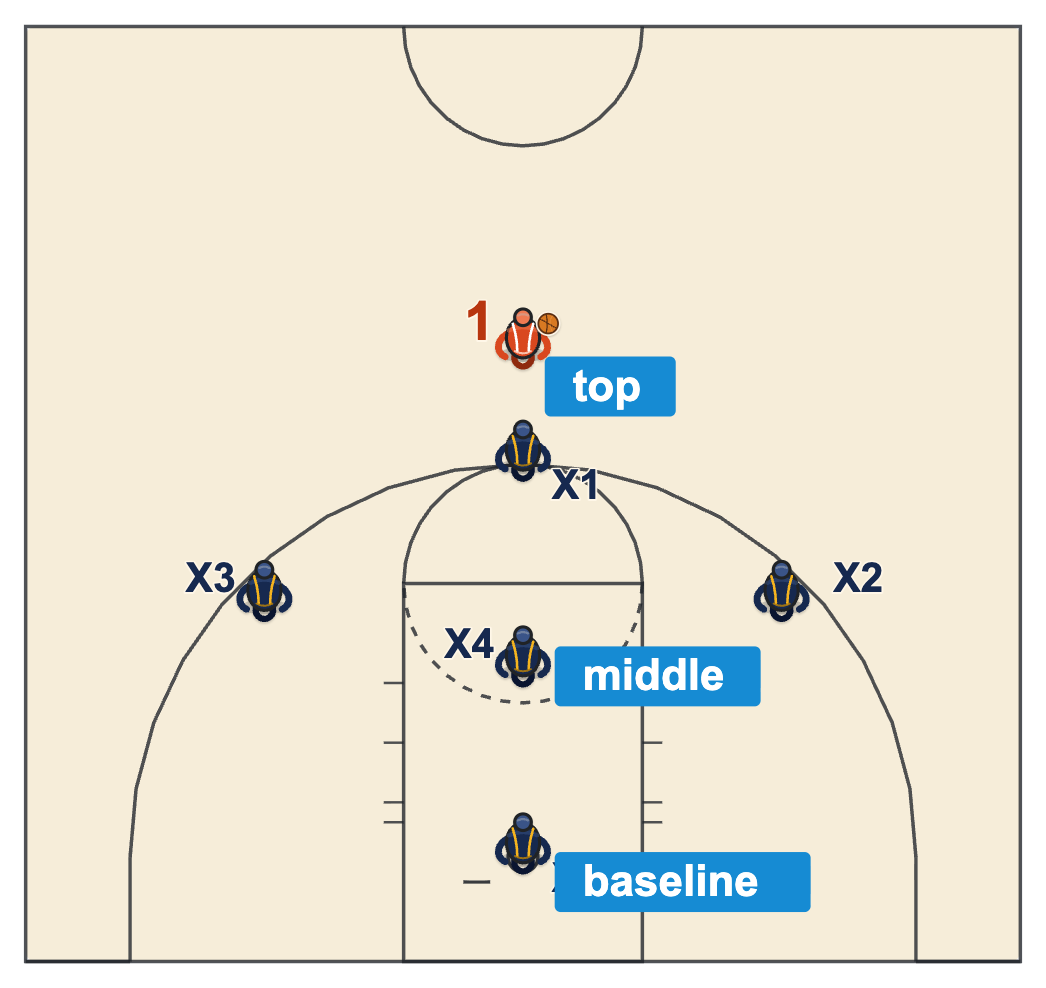
One on the ball, two wings who pinch toward the high post, two back. It pressures the perimeter harder than a 2-3. Pick it against an opponent built on guards and three-point shooters with little inside game. The cost is rebounding, because only two defenders start near the rim. Full detail: 1-2-2 Zone Defense.
2-1-2 zone
A 2-3 with the middle defender pulled up to plug the high post from the start. Use it when the opponent runs everything through the elbow. The trade is the corners, which get wider because the middle is loaded. Full detail: 2-1-2 Zone Defense.
Matchup zone
It starts in a zone shape, then plays man on whoever enters each area. Cutters are handed off from one defender to the next with a call, never chased across the floor. It is hard to scout and hard to teach, because it lives on talk. Full detail: How to Coach the Match-Up Zone.
Standard 2-3 vs Tandem 2-3
The 2-3 has a passive reputation. The tandem 2-3, the version Merrimack College made known, is the answer to that. It keeps the 2-3 name and changes the jobs. Here is the difference in one picture each.
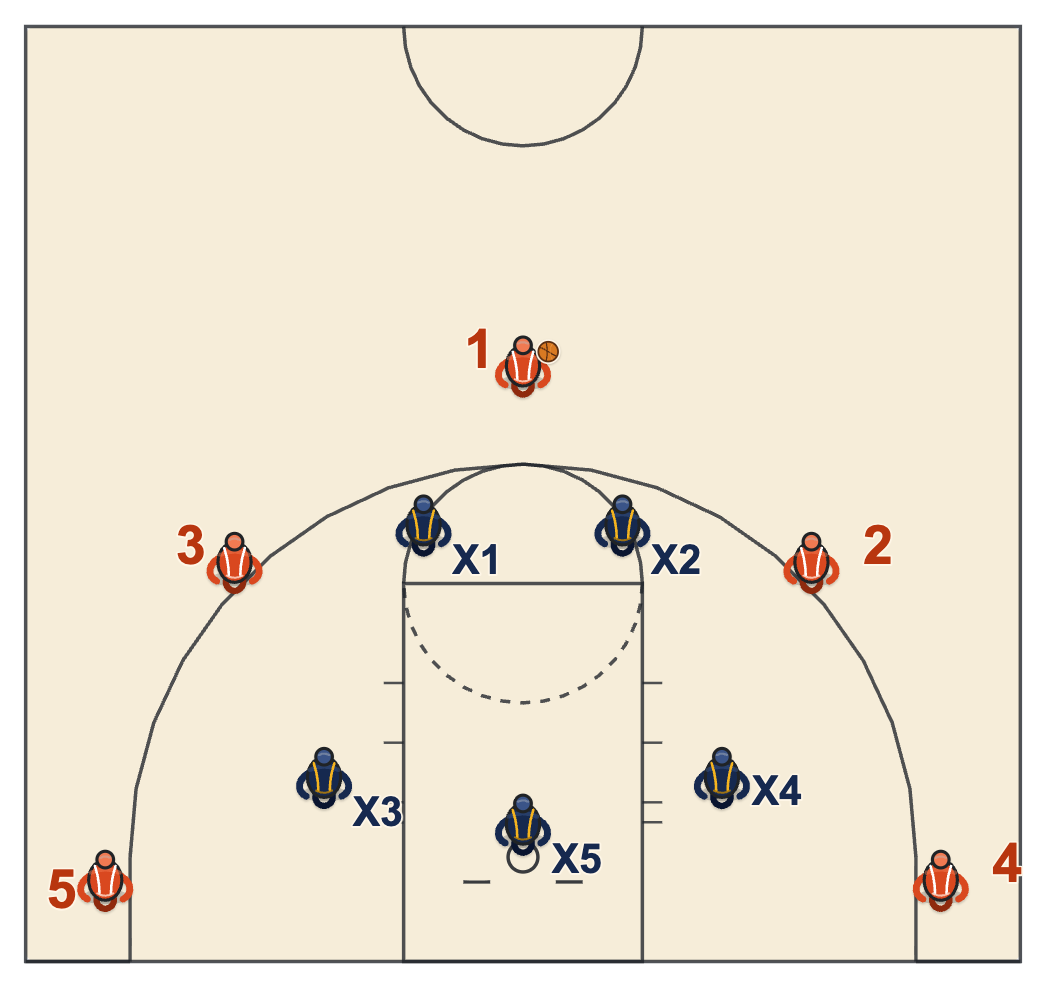
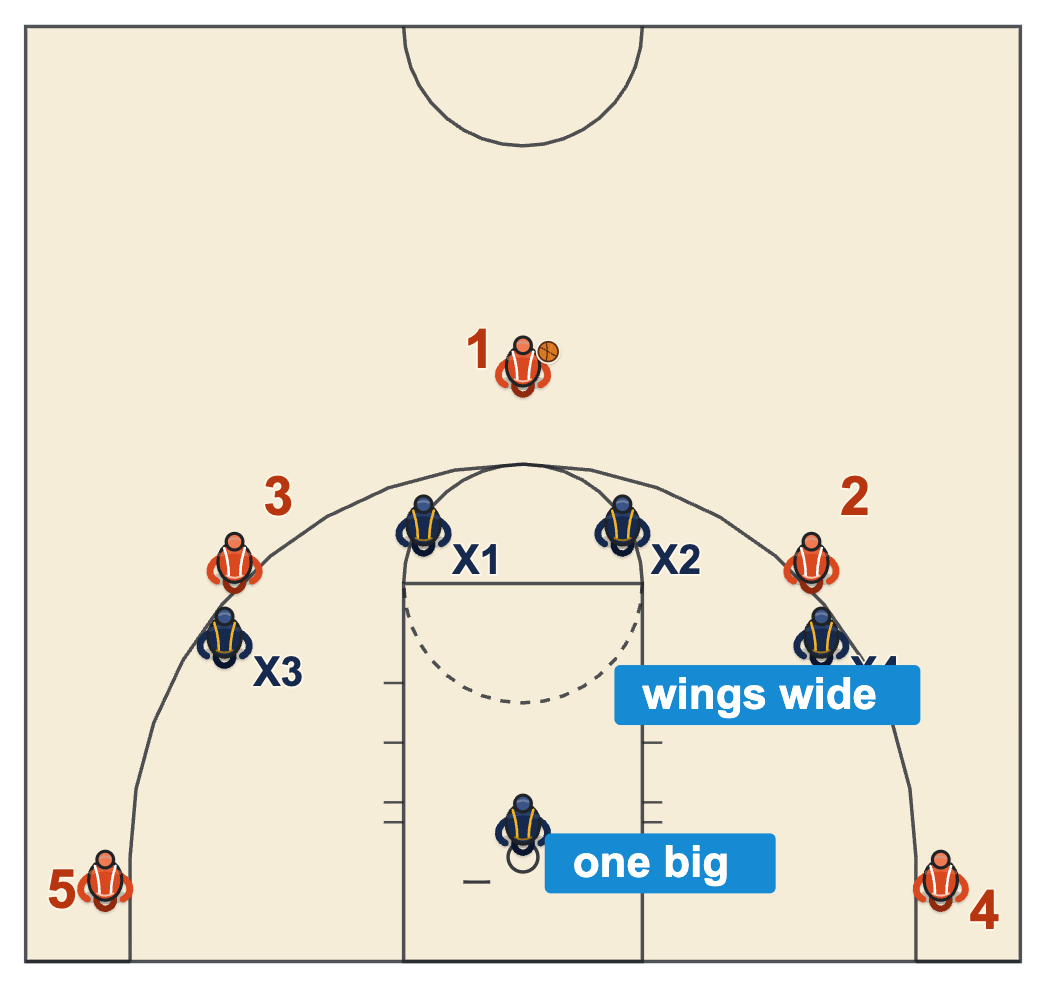
Standard 2-3
Back three flat, near the blocks. Protect the paint first.
High post: the two guards start close together so the pass to the elbow is denied or lobbed. If it gets there, the middle collapses on it.
Accepts: some corner threes and kick-outs.
Tandem 2-3
Wings start wide at the free-throw line extended. Close out with the backside to the corner so the drive goes to the big.
High post: cushion it instead of fighting the entry. On the catch, the big guards it one on one and the other four sprint out to the shooters.
Accepts: the 10 to 12 foot pull-up. Takes away the corner three and the open layup.
Coaches genuinely disagree on the high post. One camp says the guards own it and the ball should never get there. The tandem camp says a high post catch is fine as long as nobody collapses and every shooter gets a closeout. Pick based on your big. The tandem needs a center who can guard in space, contest without fouling, and run the defense with his voice.
Junk and Hybrid Defenses
Junk defenses mix a zone with a man assignment on one or two scorers. The box-and-1 puts four in a box zone and one chaser on the best player. The triangle-and-2 puts three in a zone and two chasers. The amoeba changes shape as it goes to confuse the offense. These are change-ups for a specific opponent, not a base defense. See What Is a Box and 1 and Amoeba Defense.
Some teams disguise the family itself. They start in a zone and quietly switch to man after a set number of passes, or start in a denial stance and then drop into zone rotations. The offense ends up running its zone plays against man, or its man plays against a zone.
Press Variations
Presses are grouped by where they pick up the ball: full court, three-quarter court or half court. The full ranked comparison is on Best Full-Court Press, and the overview is on Pressing Defense Systems Explained.
- 1-2-1-1 (diamond). Pressure on the inbounder, early traps, an interceptor in the middle and one safety. It guards the inbound pass, so it starts the pressure earlier than the others. Full breakdown.
- 2-2-1. Lets the inbound happen, turns the ball to a sideline and traps there. A containment press with one defender always on the rim. Full breakdown.
- 1-2-2. Picks up at three-quarter court, traps only a sideline dribble and keeps two back. Often used to burn clock more than to steal. Full breakdown.
- 1-3-1 full court. Traps where the sideline meets half court. Tall teams can throw over it. Full breakdown.
- Run and jump. A man press with no fixed trap spots. A second defender jumps the dribbler and the first rotates away. Full breakdown.
- Full-court man. Pressure every dribble, no traps, sprint back once the ball crosses half court.
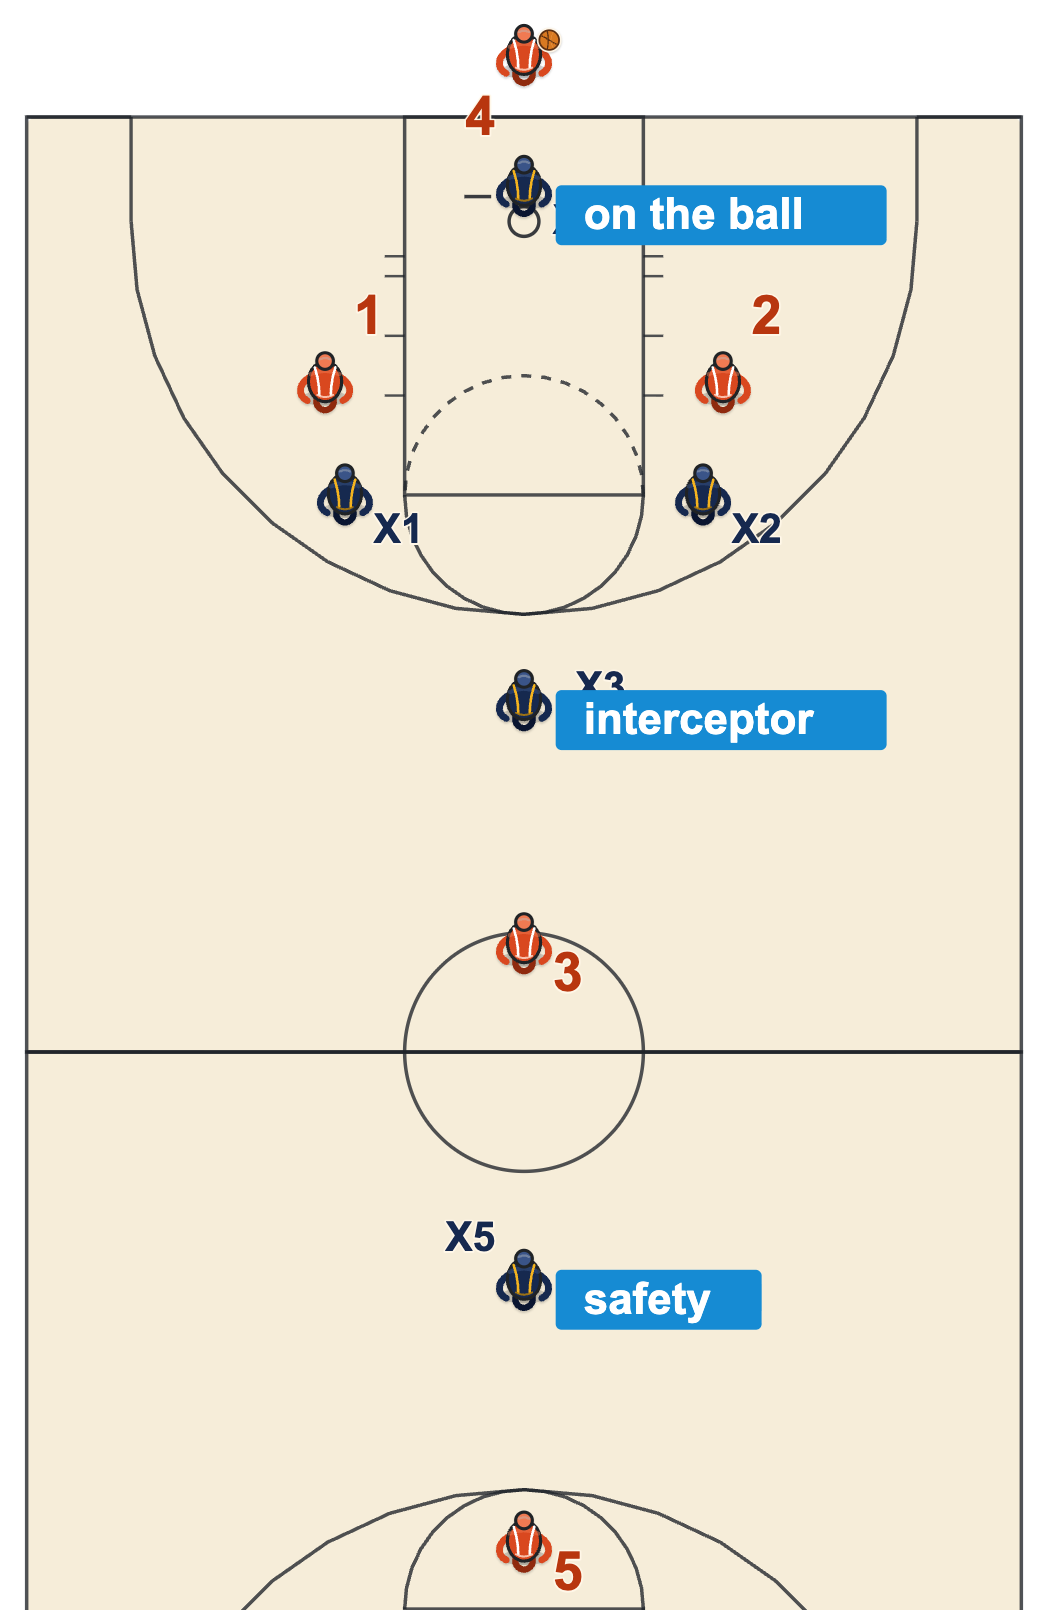
Every press shares three rules. No pass to the middle of the floor. No free dribble up the sideline. No fouling in the trap, because the trap is there to force a lob, not to take the ball out of the dribbler's hands. And every press needs a convert rule for when it gets beaten: everyone sprints to the paint, loads to the ball, then matches up.
All of Them in One Table
| Defense | Takes away | Gives up | Fits a team that |
|---|---|---|---|
| Pressure man | Easy passes, rhythm | Backdoor cuts, fouls | Is quick and in shape |
| Pack line | Drives, the paint | Perimeter catches | Talks and has one tough on-ball defender at every spot |
| Sagging man | Penetration | Outside shots | Faces poor shooters |
| 2-3 zone | The paint, the post | High post, corners | Has size and a talking center |
| 3-2 zone | High post, wings | Corners, penetration | Faces a high-post team that cannot shoot from the top |
| 1-3-1 zone | Reversal, corners | Layups off broken traps | Has length and a fast baseline runner |
| 1-2-2 zone | Perimeter shots | Rebounding | Faces guards and shooters with little inside game |
| 2-1-2 zone | The elbow | Corners | Faces an elbow-based offense |
| Matchup zone | Scouting, set plays | Seams if talk breaks down | Is experienced and vocal |
| 1-2-1-1 press | Time, the first pass | Layups behind the trap | Is deep and athletic |
| 2-2-1 press | The middle, tempo | The inbound pass, few turnovers | Wants pressure with low risk |
How to Choose
- Start with what you cannot allow. If a post player beats you, protect the paint (2-3, pack line). If shooters beat you, extend (pressure man, 1-2-2, 1-3-1).
- Match the jobs to your players. Every zone has one job that decides it: the center in a 2-3, the baseline runner in a 1-3-1, the back two in a 3-2. If nobody on the roster can do that job, pick another shape.
- Teach man first. Stance, help position and moving on the pass carry into every zone and every press. Younger teams get more out of a year of man-to-man than a year of zone.
- Keep one change-up. A second look, run for a few possessions, makes the opponent stop and think. It does not need to be a second full system.
Want to draw your own version of any of these for practice? Use the free play drawer. For the defense home page and every breakdown, go to Defense.
Want every frame, printable?
OBP Pro members get the full diagram files for every defense on this page, ready for a practice binder or a scouting report. $9 a month. Or draw your own version free in the play drawer.
See what OBP Pro includesMore Side-by-Side Pages
- Best Zone Defense for Your Team: 6 Zones Compared
- 2-3 Zone vs 3-2 Zone
- Man-to-Man vs Zone Defense
- Pack Line vs Pressure Man-to-Man
- Best Full-Court Press: 6 Presses Compared
Back to every Defense page.
Keep Building
Related breakdowns
Best Full-Court Press: 6 Presses Compared
The 1-2-1-1, 2-2-1, 1-2-2, 1-3-1, run and jump and full-court man, sorted by where they pick up, where they trap and how much they risk.
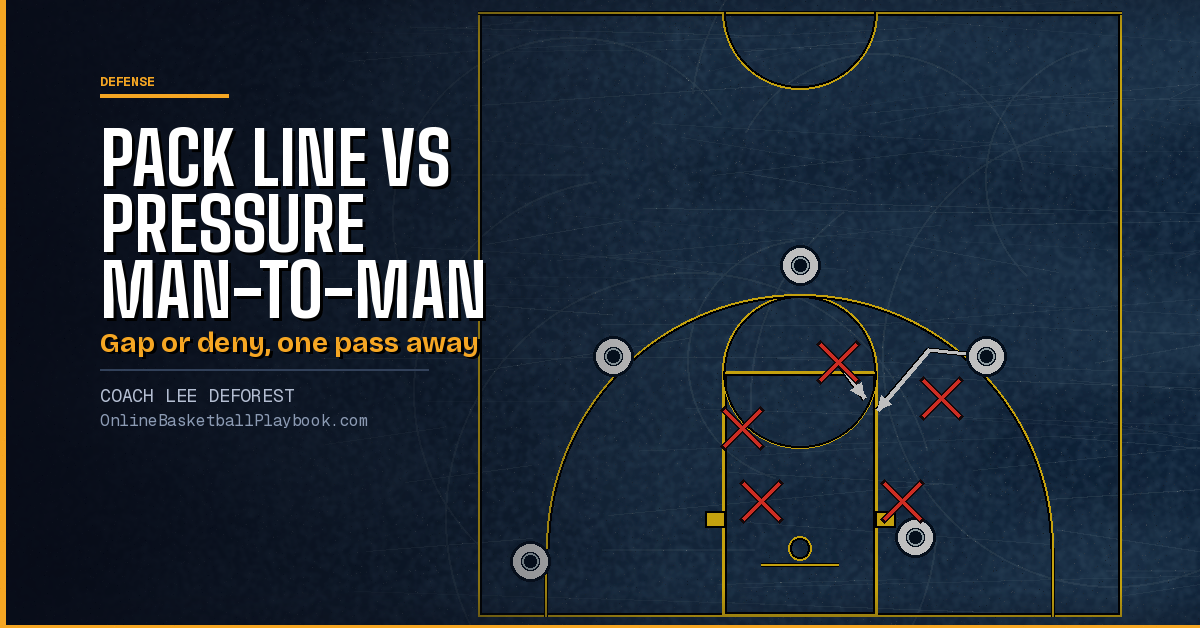
Pack Line vs Pressure Man-to-Man
Both pressure the ball. They split on the defender one pass away, and that one choice decides drives, backdoors, screens and fouls.
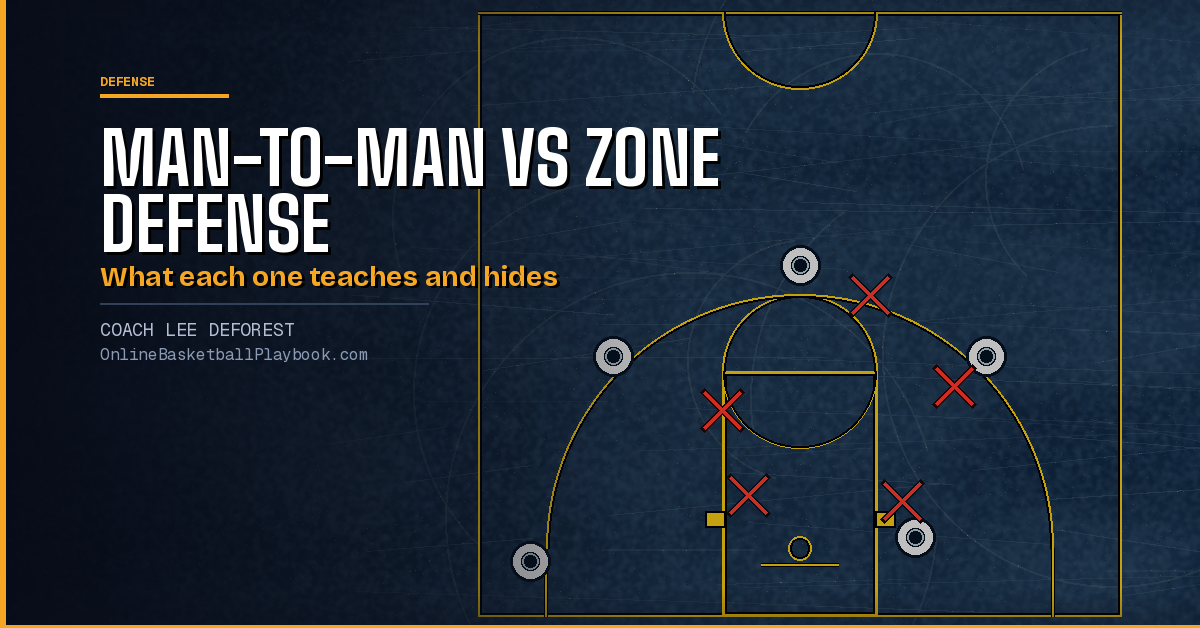
Man-to-Man vs Zone Defense
What each one teaches, what each one hides, when to switch mid-game, and the hybrid that sits between them.